Archives for : Builds

Original Wings West Z32 TT for Sale!

Ron is the original owner of this beautiful Z and now it is for sale. The Z was the original West Wings advertising car you may have seen it in old issues of Sport Compact Car and the likes of the late 90s and early 2000s. Ron has been a customer of ours since the really late 90s and in 2012 we completed an extensive upgrade\refresh to the Z. The following major parts were installed by us:

  • New Nissan Shortblock & SZ Stage 1 Heads
  • MSP Exhaust Manifolds
  • JWT Sport 700 Turbos
  • ASH Massive Intercoolers, Ducts, Intercooler Piping, & Z1 Throttle Bodies
  • 300Degree Fuel Rails with NISMO 740cc Fuel Injectors
  • SZ Max Street Clutch & Aluminum Segmented Flywheel
  • SZ 3″ Down Pipes
  • SZ 3″ to 2.5″ Test Pipes
  • Blitz SBC i-D Spec-R Boost Controller
  • Selin Dual POP Kit

The car has 87,000 miles on the chassis.

DSCF0001

DSCF0006

DSCF0010

DSCF0016

enginebay

dynosheet

This Z puts down 456 whp on 91 octane and 16 psi of boost (blue run) and 618 whp on 26 psi of boost and Q16 race fuel.

You can contact Ron directly via e-mail here.

WW-890685

Photos of the car back in the day used in the WW advertising.

Sam’s GTR Turbo Upgrade

It didn’t take long after we originally tuned Sam’s 2012 Black Edition GTR on 91 octane and E85 that we upgraded turbos. An oil leak on the passenger side turbo oil feed line helped that decision! Bigger turbos on a stock motor! An option that actually works very well when performed properly. The stock turbos are small and lose their efficiency at the higher RPMs. They have trouble holding boost and terrible back pressure ensues.

IMG_7785

With the engine out we went to work pulling off the stock turbos and finding the culprit for the oil leak.

IMG_7800

The stock turbos before they go in for surgery.

IMG_7845

The passenger side turbo oil feed line pictured above. This portion of the line bolts to the top of the turbo with a banjo bolt and crush washer. If you look closely you can see the red arrow pointing to the crack in the brazing of where the line meets the banjo fitting. This is somewhat of a common issue. Nissan has an updated part for both the oil line and a bracket (2014+).

IMG_7898

The “old” bracket on the left and the new on the right. You can see that the new bracket has an additional provision to support the oil feed line. The new line has an additional winglet to bolt to the new bracket.

IMG_7961

Our turbo upgrade came from RD Engineering. The anodized blue wheel on the left is the upgraded compressor wheel and the factory GTR compressor wheel on the right. A rather large difference!

IMG_7960

Turbine wheel also gets upgraded to help decrease that pesky back pressure.

IMG_7902

The only other upgrade performed while we were in there were GTC Turbo Inlets. GTC on the left and the factory DBA inlet on the right which is already larger from the CBA (2009-2011) models.

IMG_7903

The upgraded turbos feature Turbosmart actuators.

91

Above is the 91 octane dyno graph differences. Sam’s GTR has basic bolt-ons so the results can be better with modifications like an upgraded intercooler, intercooler piping, etc.. Blue was the power on stock turbos. Red is the upgraded turbos. This upgrade essentially allows one to run E85 FBO stock turbo power levels on 91 octane. A nice upgrade indeed if you don’t have E85 easily accessible. By 3500 RPMs the larger turbos start to take over on the stock motor and cams. As mentioned previously, more “breather mods” can help this. We’re also forced to limit our torque output with the stock connecting rods.

E85

Our E85 dyno graph. Blue is stock turbos (please excuse the RPM cut) and red our upgraded turbos. Again we are having to severely limit our torque output on E85. The potential with these turbos on a forged motor is much more. One can see that the stock turbos hit rather hard in the beginning. If you look at our cursor pointing at 6500 RPMs you can see how much the stock turbos fall off on boost where the larger turbos shine. This is a reminder that upgrading actuators on the stock turbos is not recommended. Your only increasing your back pressures which are horrendous for the engine. Close to 800 whp on a stock engine and still able to keep the torque level in check which is the achilles heel of the factory GTR shortblock.

Richard’s 300ZX TT

IMG_1696

This red 1990 Z32 TT came to us from Oregon with just an HKS Hyper Catback on it and over 160k on the odometer. We performed some simple upgrades and maintenance to keep it running stronger for another 20 years.

IMG_1698

We upgraded to NISMO 740cc fuel injectors, cleaned up the engine bay, replaced all water & air hoses, valve cover seals, etc. Pre-cats were upgraded to SZ 4-Bolt Down Pipes mated to SZ 3″ to 2.5″ HFCs and existing HKS catback. SZ Sport Street Clutch and SZ Flywheel were also installed to hold the new found power. A single JWT POP Charger was also installed and the new colorful Greddy Profec Boost Controller was installed to the left of the steering column.

IMG_1700

 dyno

Baseline pull in blue and our upgraded pull in red. 120+ pound feet of torque at 4500 RPMs!

John’s 370Z TT+

Not your run of the mill TT 370Z.  John’s Z features a built engine, GTM Stage 3 TT Kit featuring the use of GT3071R (T25) turbochargers on .64 A\R turbine housings and T04B housings.  Swapping both the compressor and turbine housing would allow for less back pressure and more power.  However, we can’t complain with the results once we straightened this beast out!

IMG_9912

We modified a few things in the GTM kit.  For one we moved the placement of the BOVs.  They were located extremely close to the MAF sensors causing drivability and tuning issues.  We also removed the water injection system, improved fitment of a few pipes, and powdercoated the pipes black from their original polished look.  Silicone couplers were also all swapped out in favor of Vibrant brand couplers.  Fixes are pictures above.  Another thing you may or may not have noticed is this Z also sports an R35 GTR intake manifold made possible by GTM.

IMG_9812

The custom lower plenum that makes it possible to run a GTR intake manifold.  We removed it to weld up the holes (pictured) for the old water injection system.  No need to run water\meth now that we converted this Z to ethanol.

IMG_9894

GTM fuel rails feed Bosch 1000cc fuel injectors.

IMG_9895

Feeding the rails and injectors is the CJ Motorsports twin pump fuel assembly.  Two Walbro fuel pumps feed the system.  We swapped one of the 255s with a 485.

IMG_9896

One of our modified pipes finished in powdercoated black.

IMG_0229

The finished product.

Onto the fruits of ours and John’s labor:

91

Peak boost of 15 psi, average of 14 psi we managed 567 whp.  This is for 91 octane.  After this we began working on the ethanol tuning.

18psi

18 psi for 615 whp (ethanol fuel), we slowly worked our way up.

19psi

19 psi for 674 whp.

21psi

21 psi for 706 whp.

e85

Fully cranked up we managed a peak boost pressure of 25 psi, dropping past 5500 RPMs in part due to the compressor and turbine housings.  Just enough to make 800 whp and 700 pound feet of torque.

Rob’s 300ZX TT

As the availability of ethanol has increased in SoCal (depending where in SoCal you live).  Rob’s itched to get the fuel in his Z along with other upgrades performed.  This Z32 is using JWT GTX63 Turbos, JWT 500 Cams, MSP Exhaust Manifolds, SZ 3″ Down Pipes, SZ 3″ to 2.5″ T-Pipes, and SZ 2.5″ Catback.  For fueling we turned to the BDE Top Feed Fuel Rail Kit with Bosch 1150cc fuel injectors.  Currently the Z is running a single Walbro 485 fuel pump which limited us as to how much power we could run.  Later on down the road we will add a second fuel pump to get the most out of the engine\turbo hardware.    To harmoniously control the engine and all the fueling we turn to the Haltech Platinum Pro-Plug In ECU and supporting sensors.  This allows the Z to be a full “flex fuel” vehicle.  Rob can pump in any different combination of 91 octane gasoline and ethanol fuel and not worry about having to switch tunes.  No guessing or worrying!

engine1

To simplify plumbing we fabricated our own metal hard line for the BDE rails.  Always after a clean and detail oriented engine bay.

gauge

Rob can monitor ethanol content with the use of this Dynosty gauge.  Here it shows a content of 46 if you couldn’t tell.

91

With a fresh engine in place we were able to make great power on terrible CA 91 Octane gasoline.

e85full

On an ethanol content of 78% and at this power level our single Walbro fuel pump was dropping fuel pressure.  Adding a 2nd fuel pump will get us around 750-800 whp.

613

For the time being we’ll leave the power level here (613 whp) on about 20 psi of boost.  This gives the pump some comfortable working room.  Thank you to Rob, BDE, JWT, and Haltech!

Bob’s NISMO 370Z TT

Bob came back to us after first having his Z34 tuned.  This time he came back for much more.  Bob, Fast Intentions, and Specialty-Z came together to formulate a plan to turbocharge the Z.  Fast Intentions has just recently began shipping their much anticipated twin turbo kit and we were the lucky ones to first install it.

The kit is offered in different options dependent mainly on turbo size selection.  All turbos used in the kit feature Tial .86 turbine housings made from SS cast for improved flow and heat enthalpy.  This allows faster spool from the turbine.  The base kit starts off with a pair of GT2860RS turbos.  Followed by the Garrett GTX compressor wheel upgrades.  Finally the Tial Alpha series (HTA) turbo as the creme de le creme for those looking past stock shortblock power handling capabilities.

before

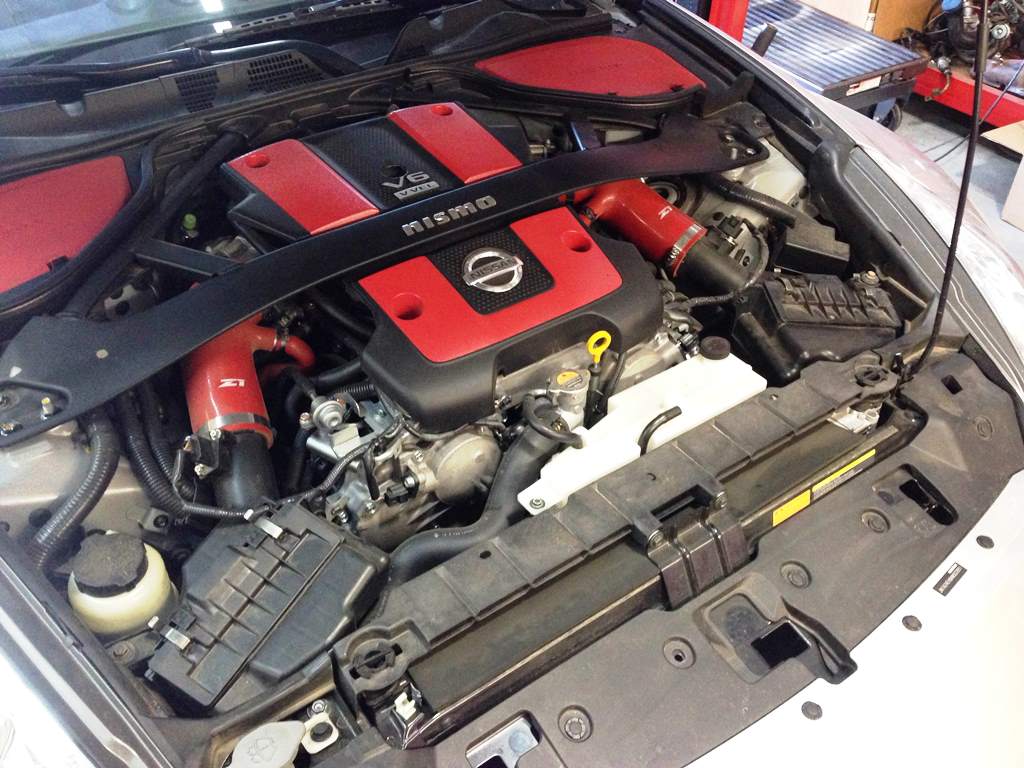
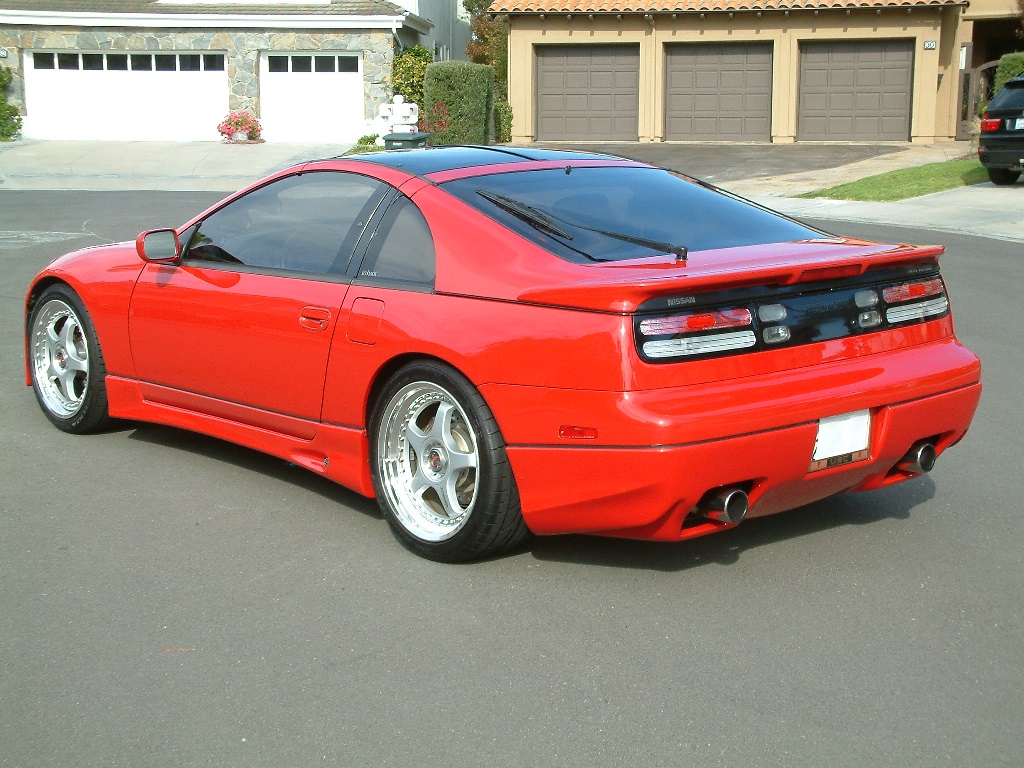
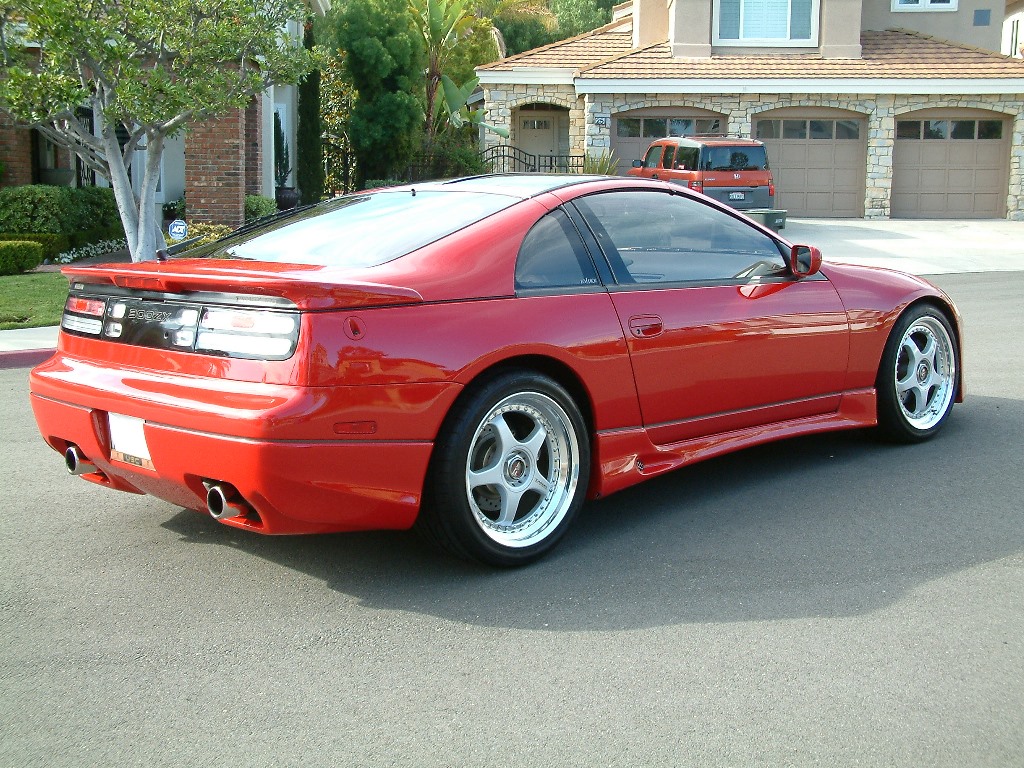
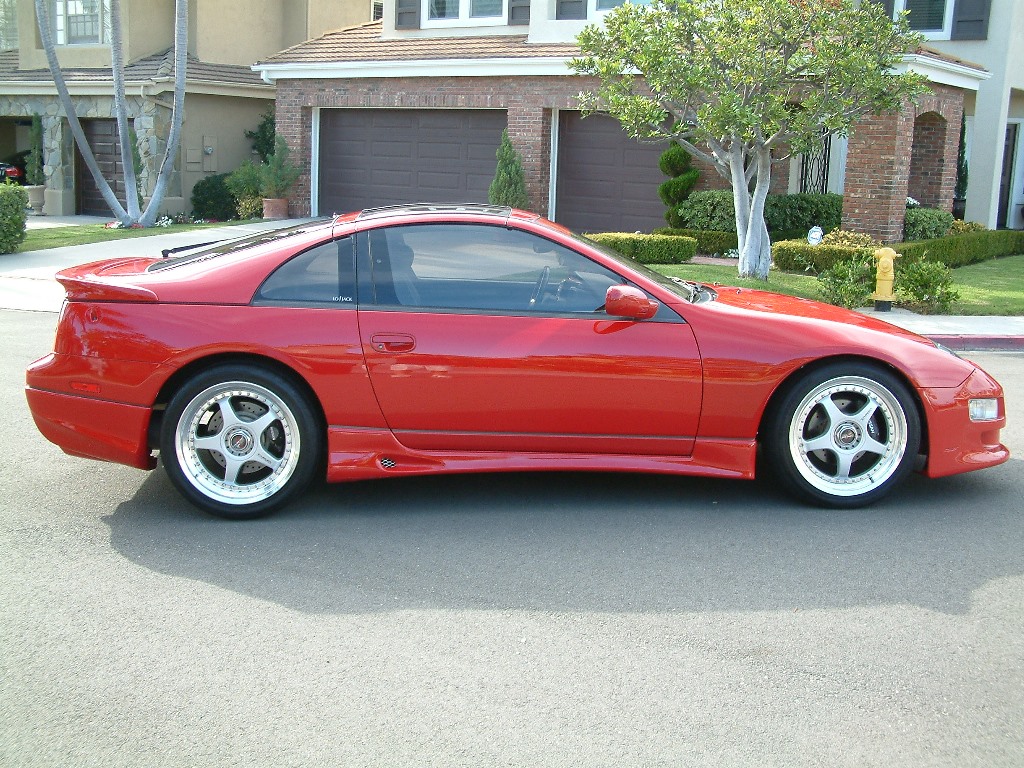
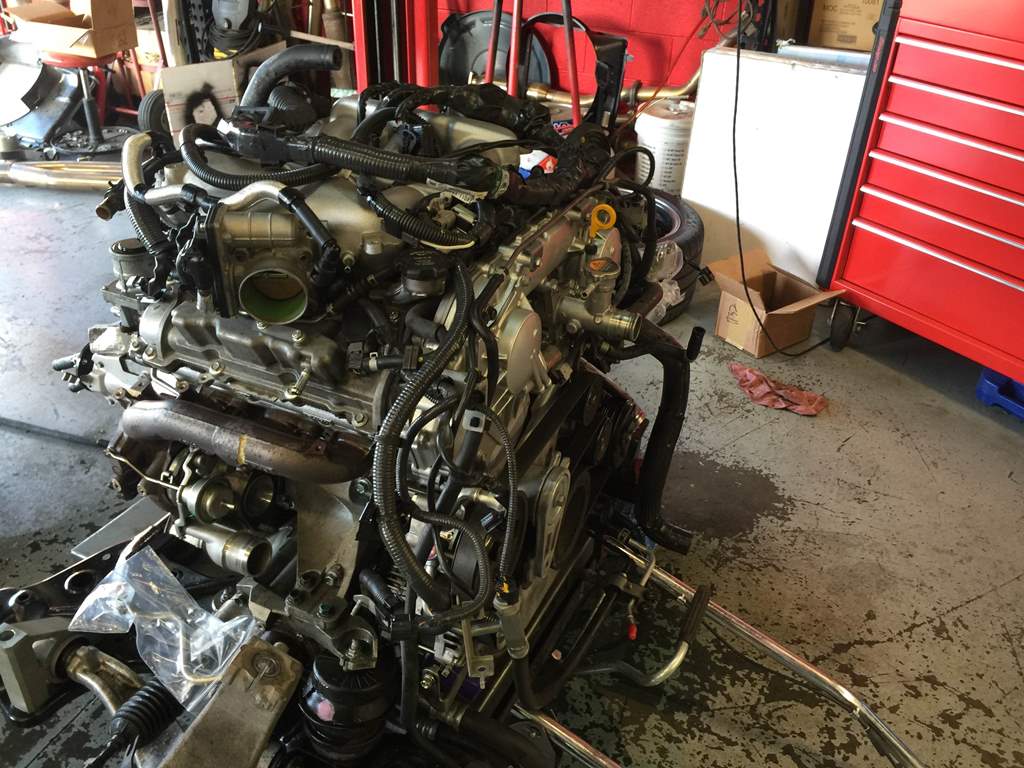
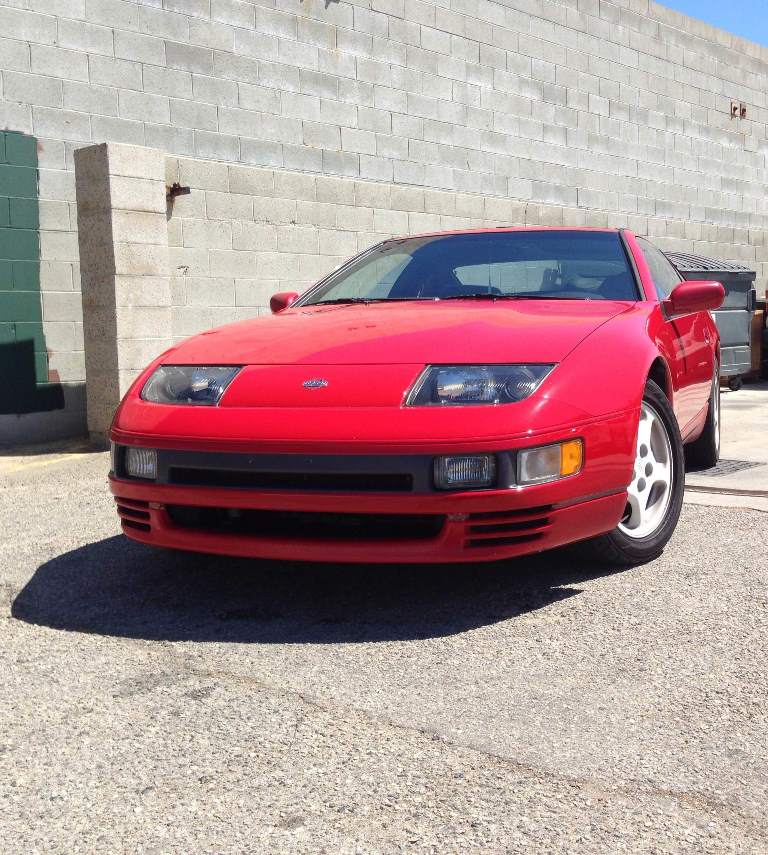
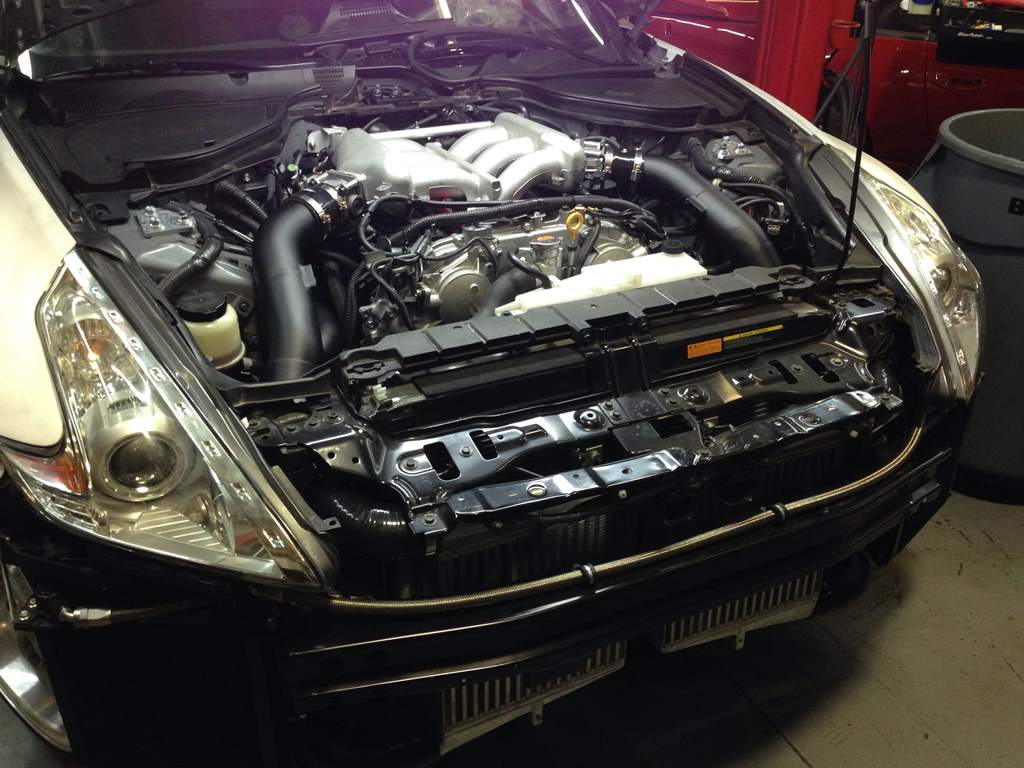
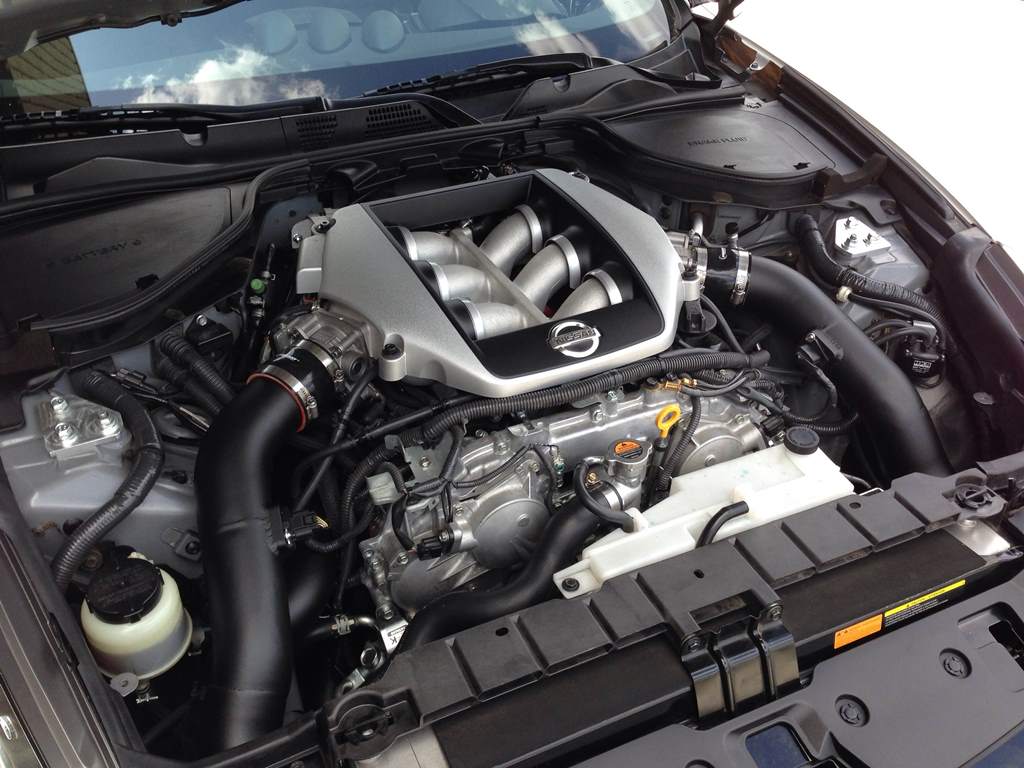
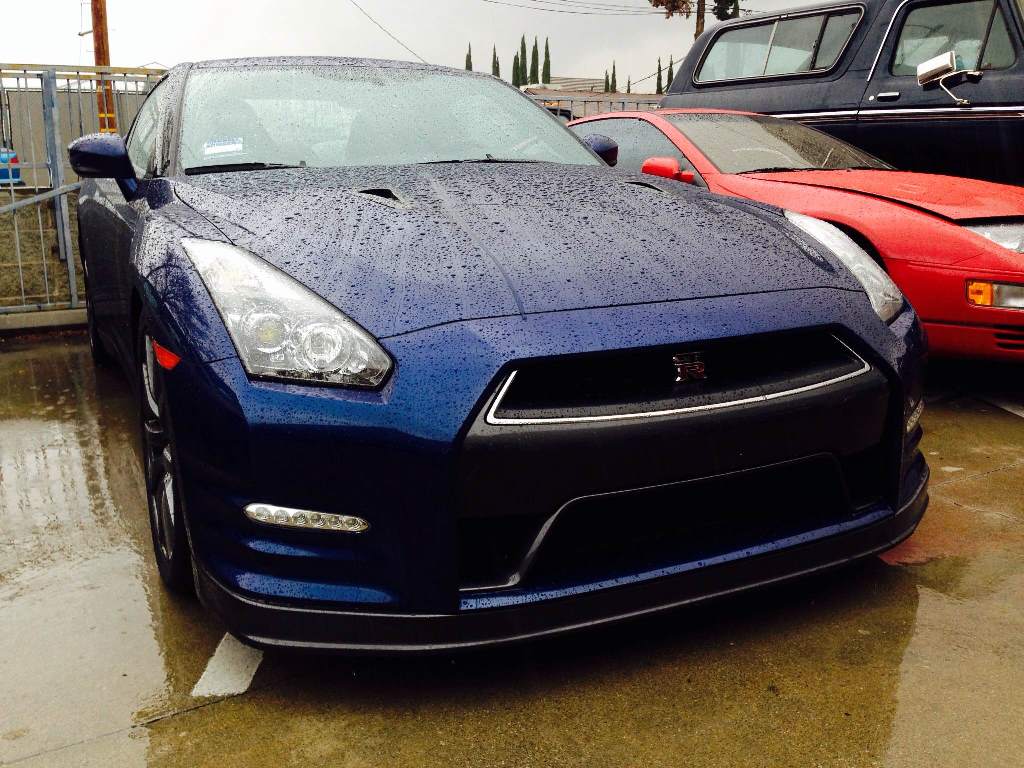
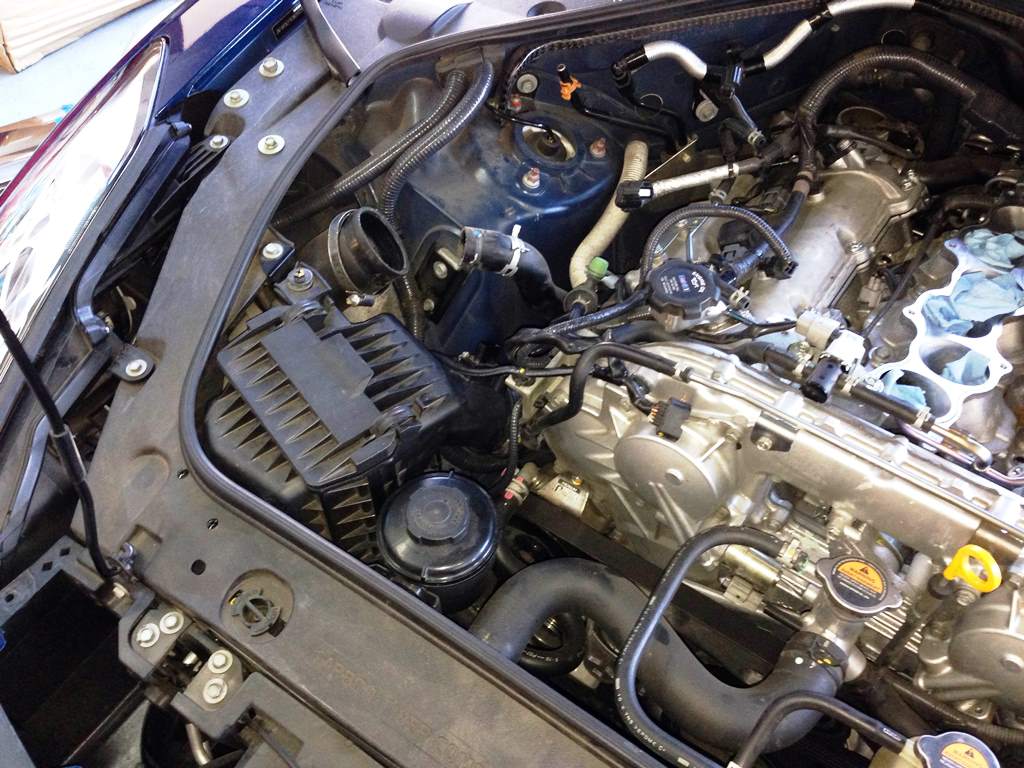
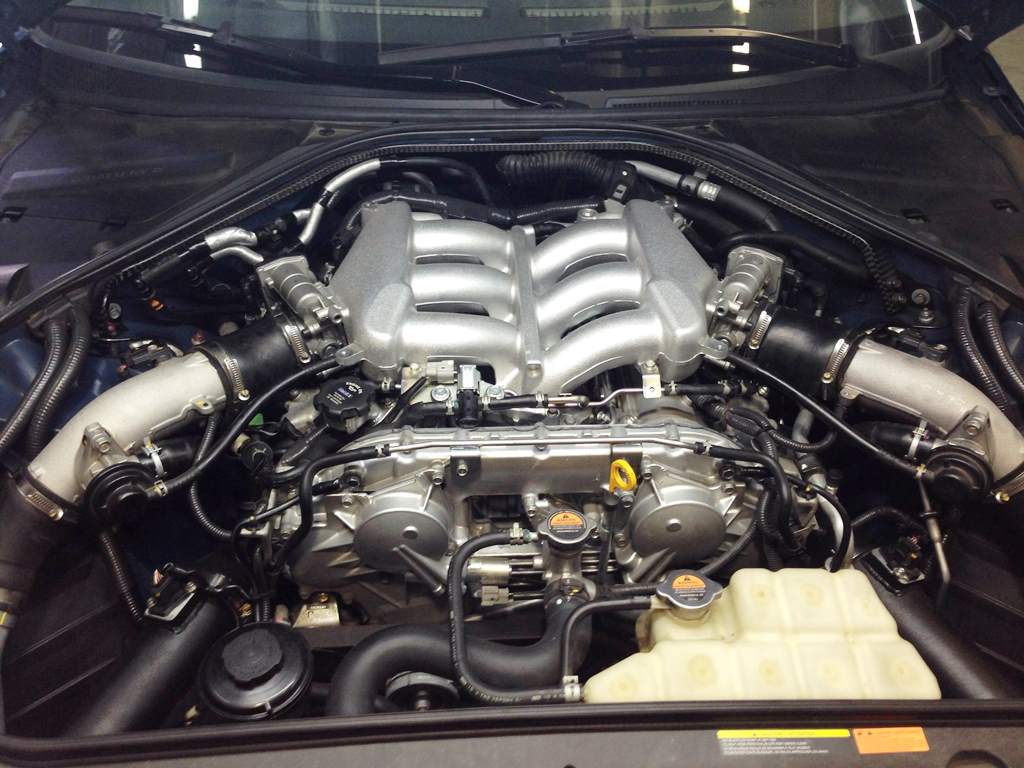
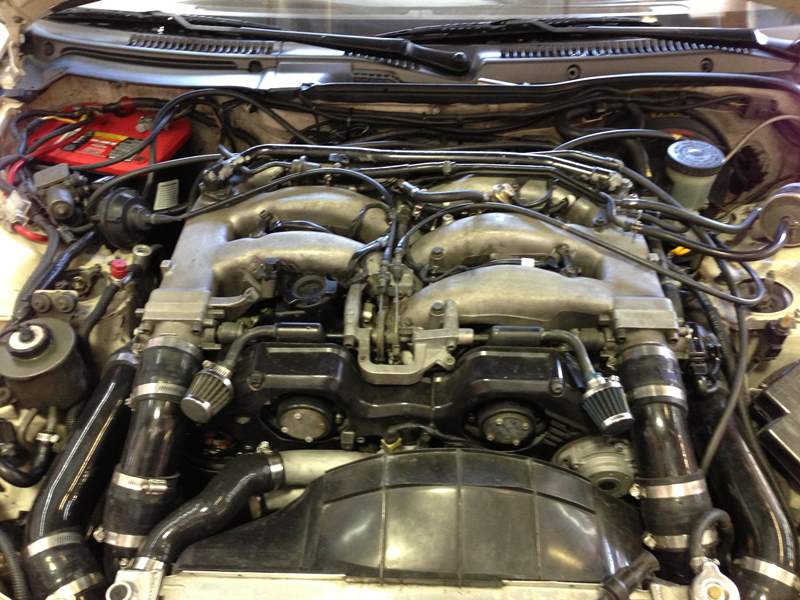
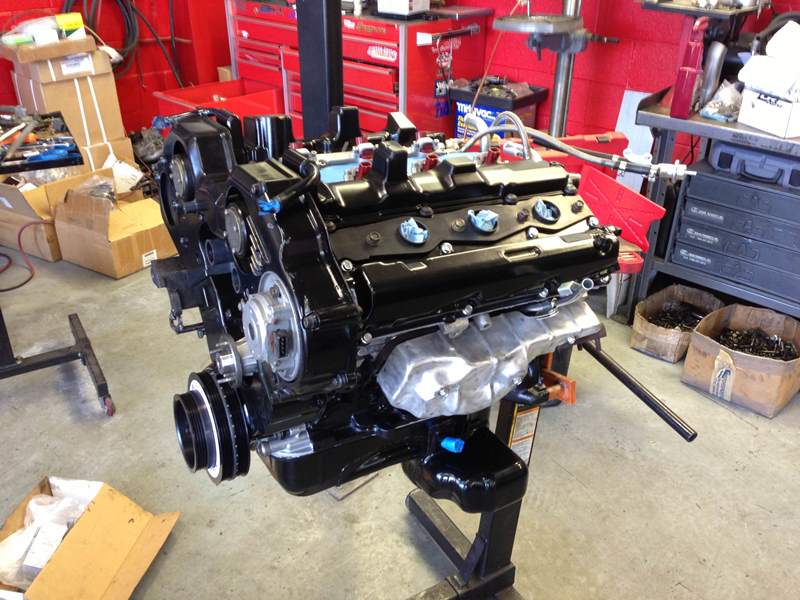
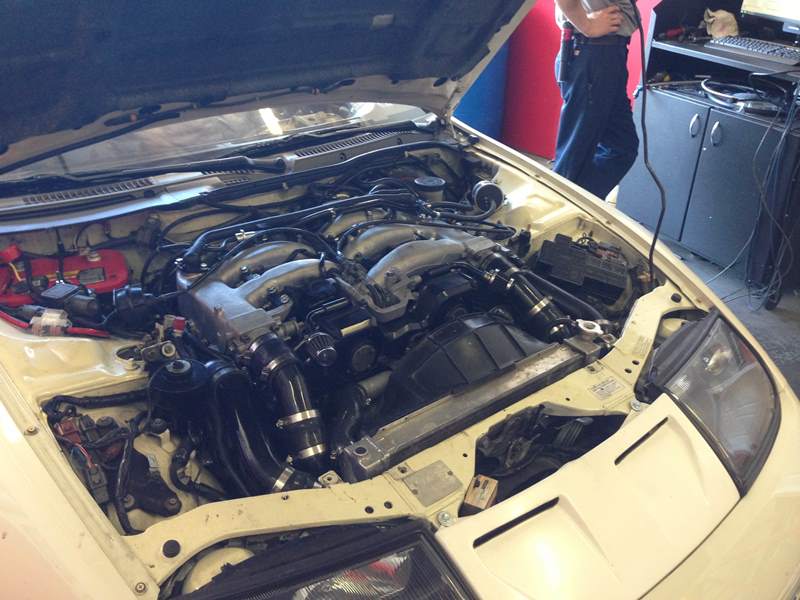
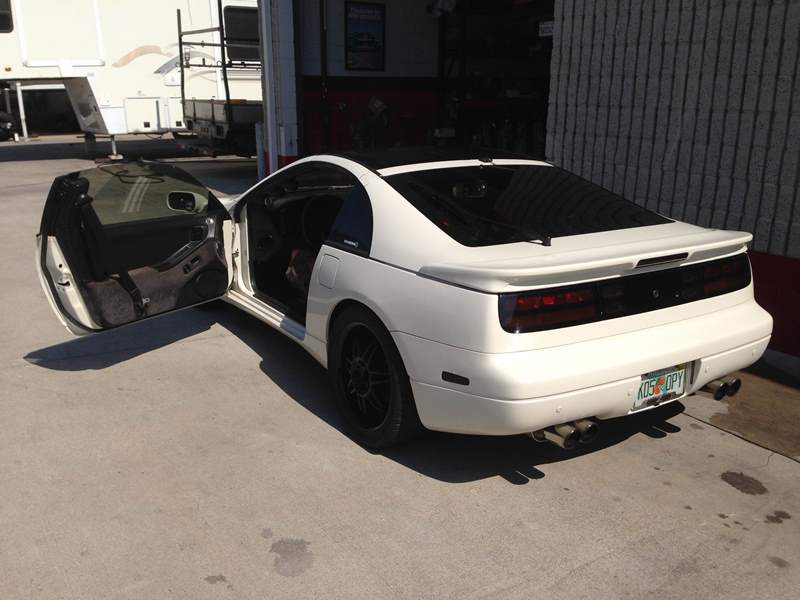
The NISMO as it sat before its twinturbo adventure.

disassembly

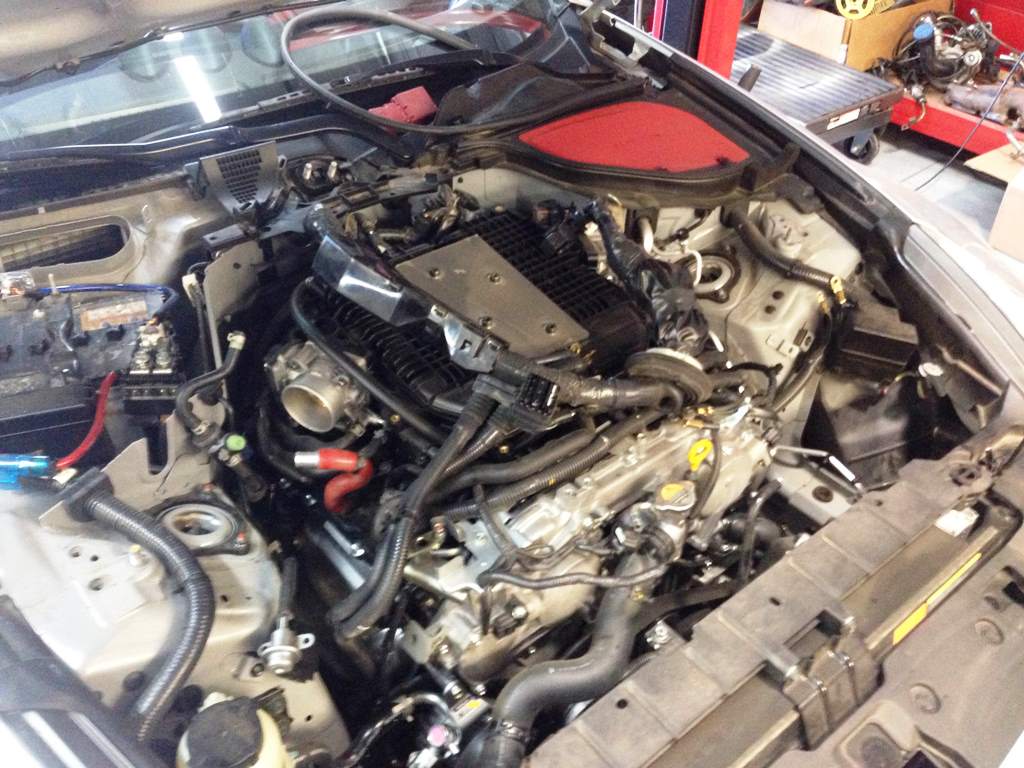
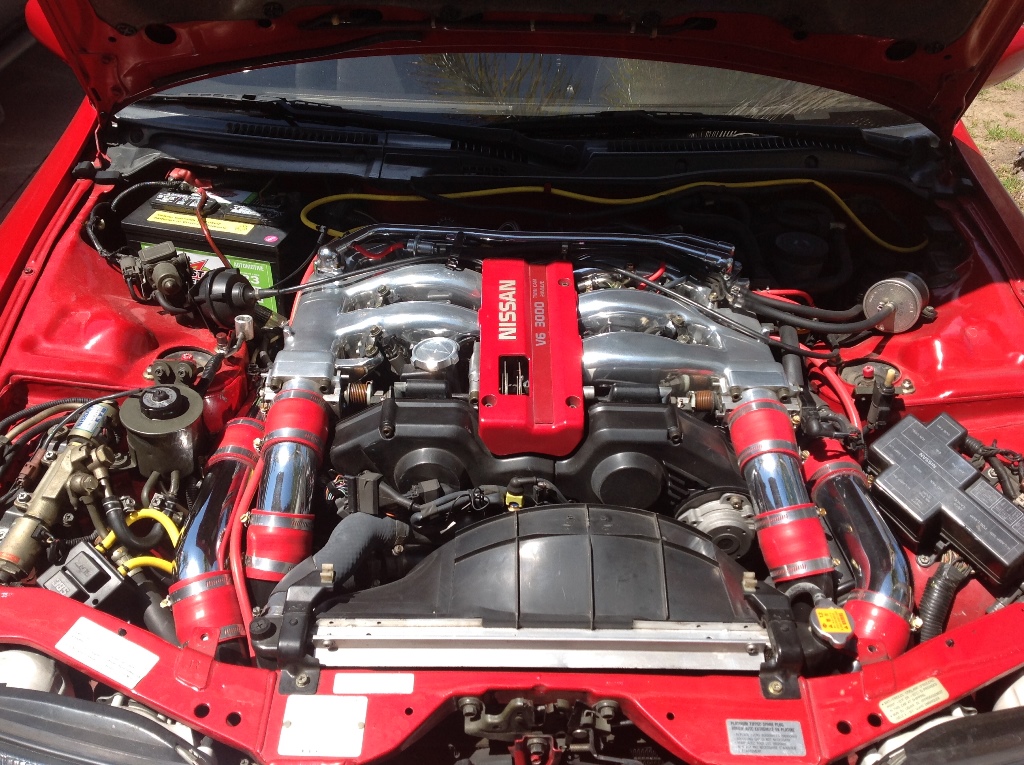
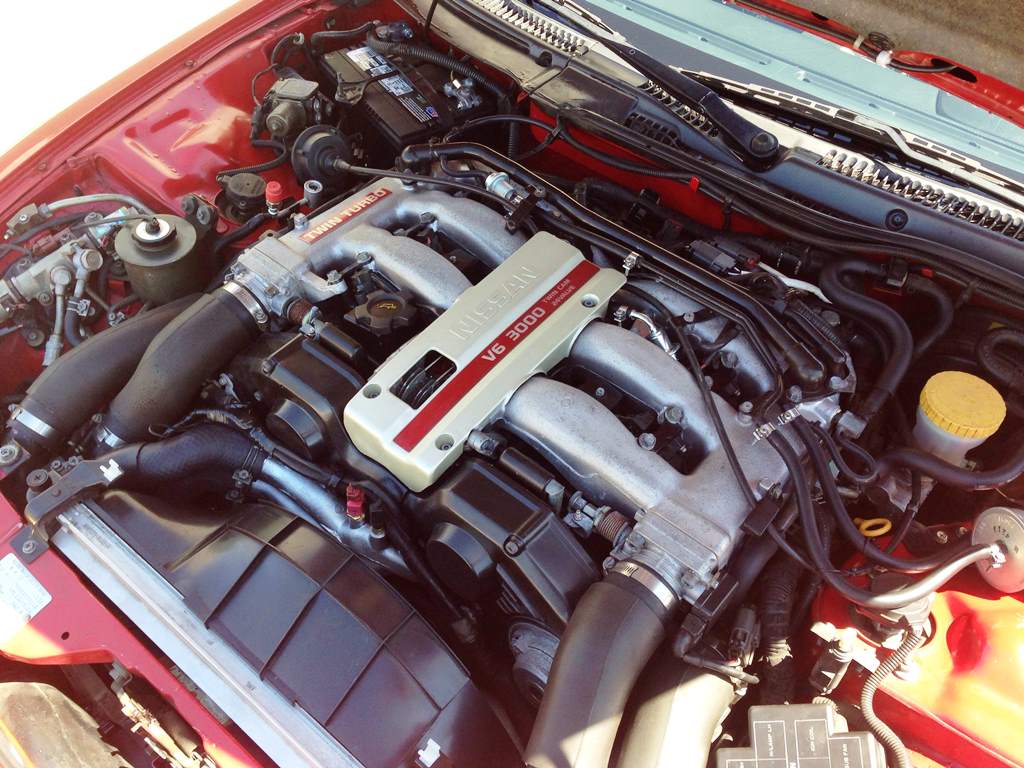
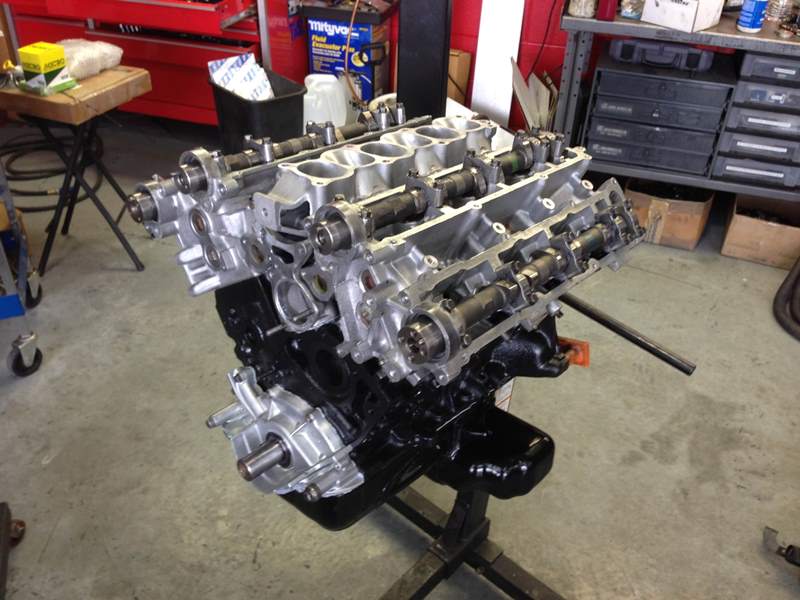
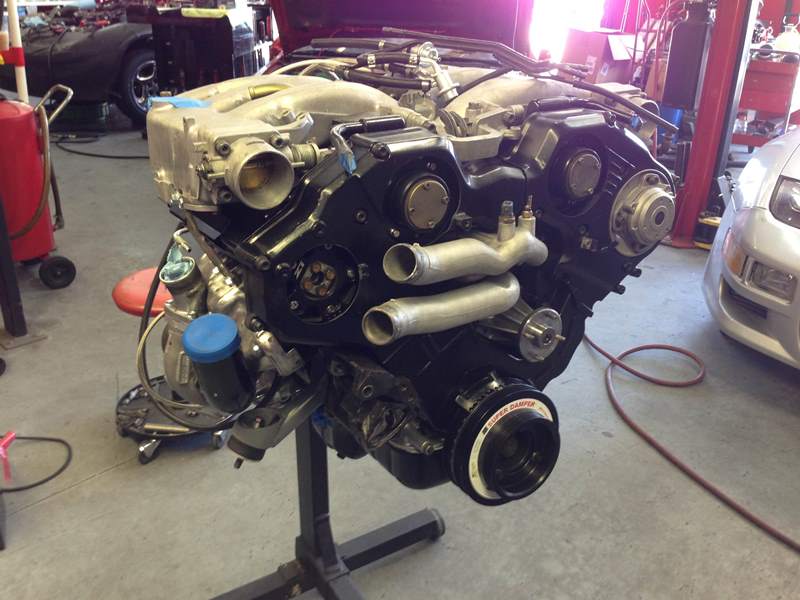
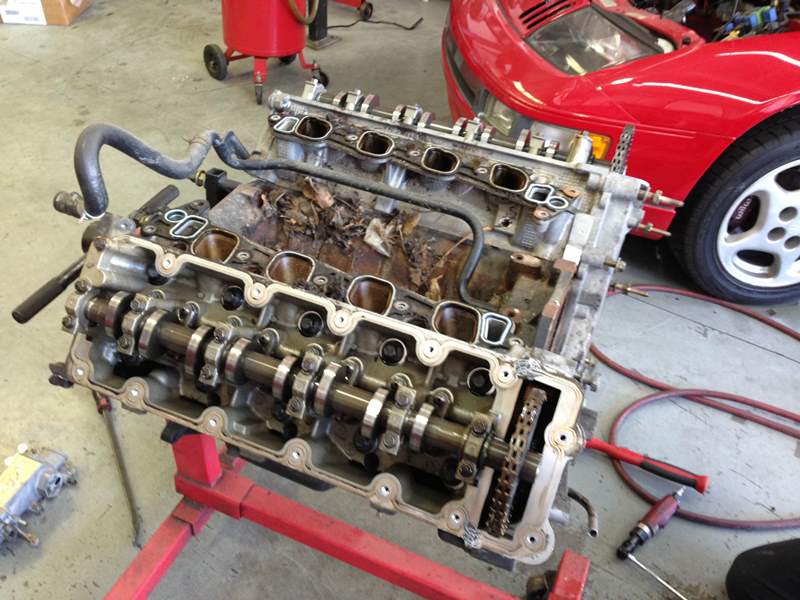
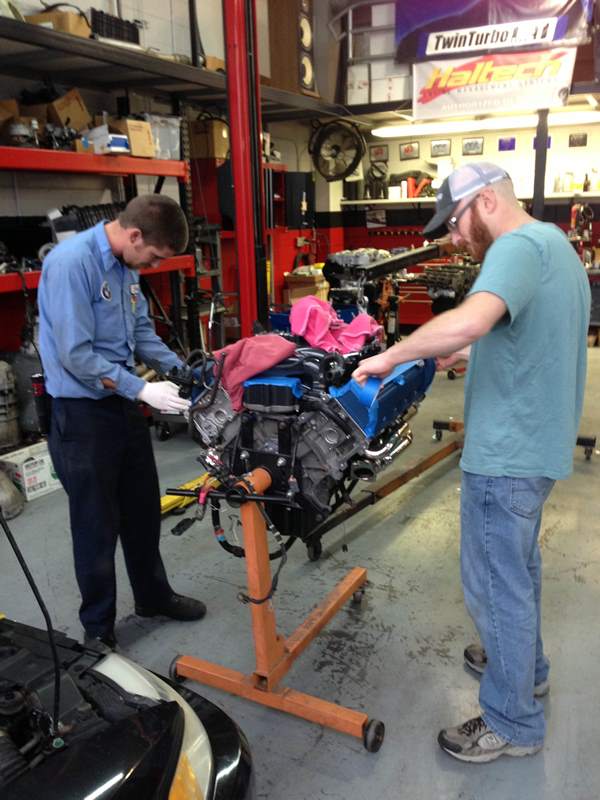
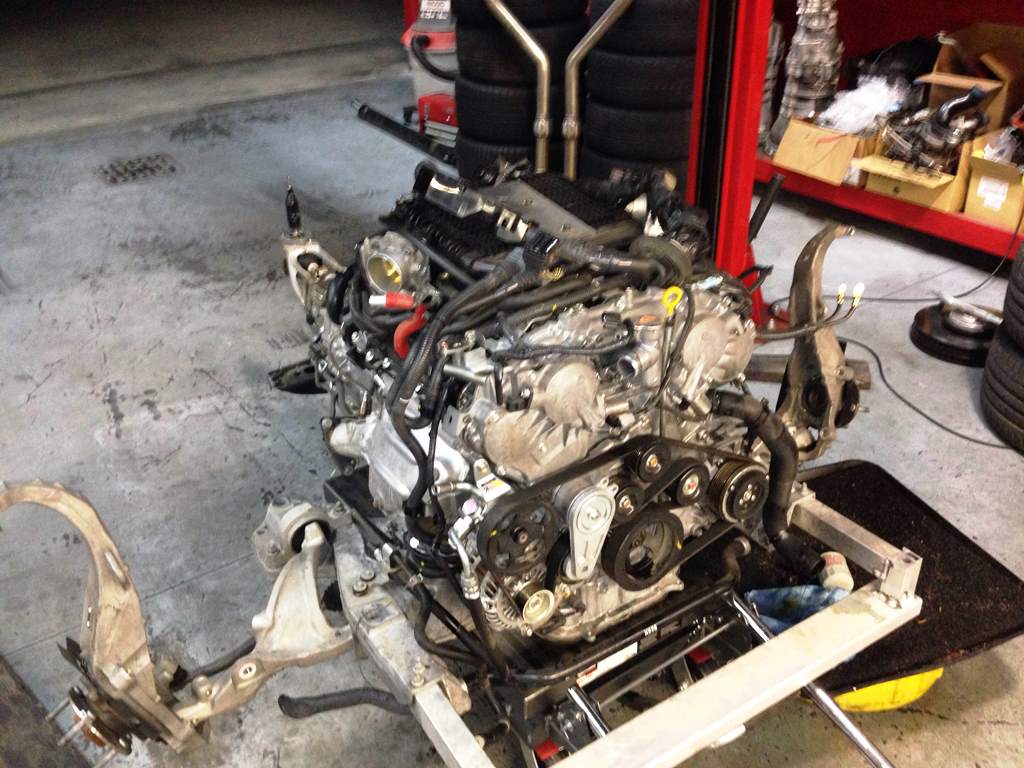
The VHR ready to leave its cozy engine bay.

engine_removed

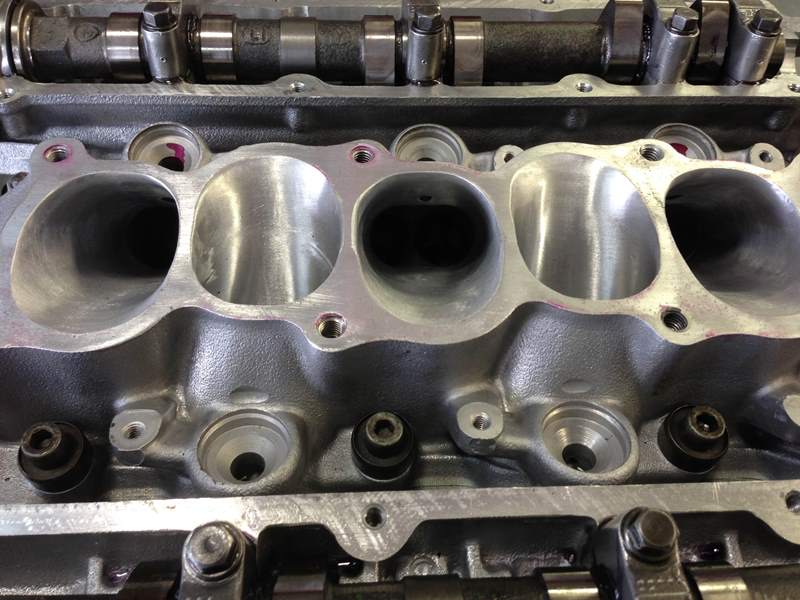
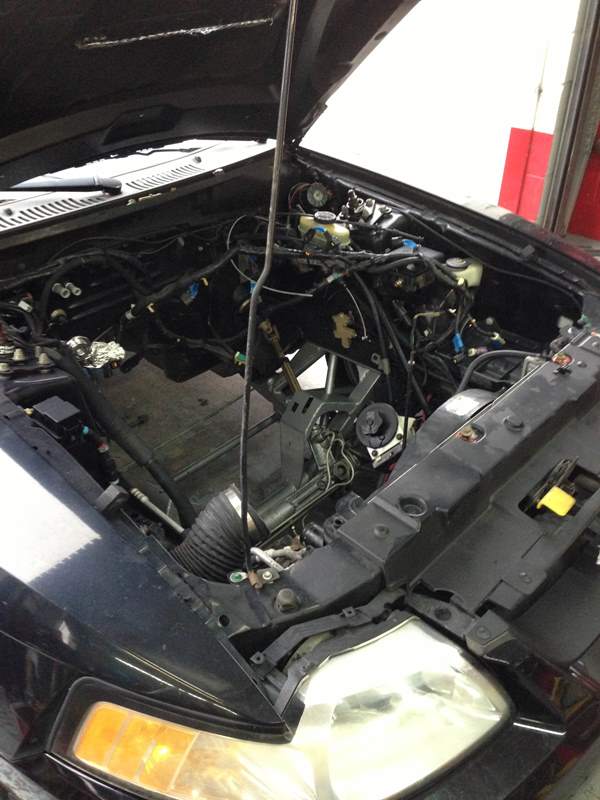
Now its time to start disassembly to make way for our twinturbo parts!

stockfuelinjectorsinrail

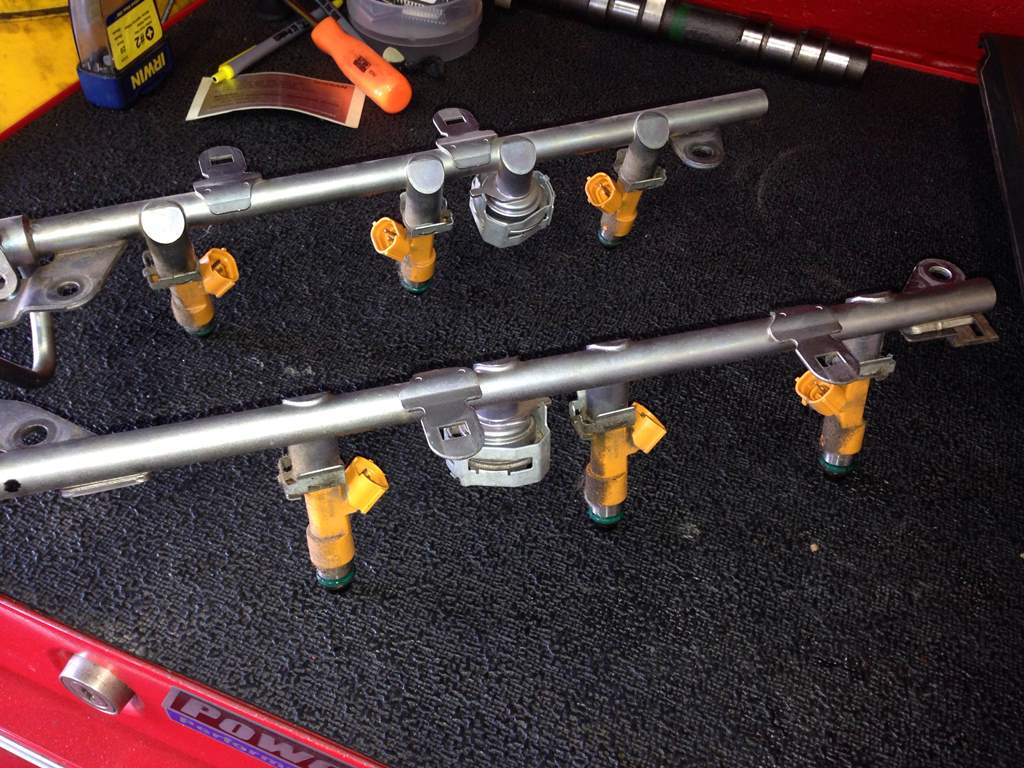
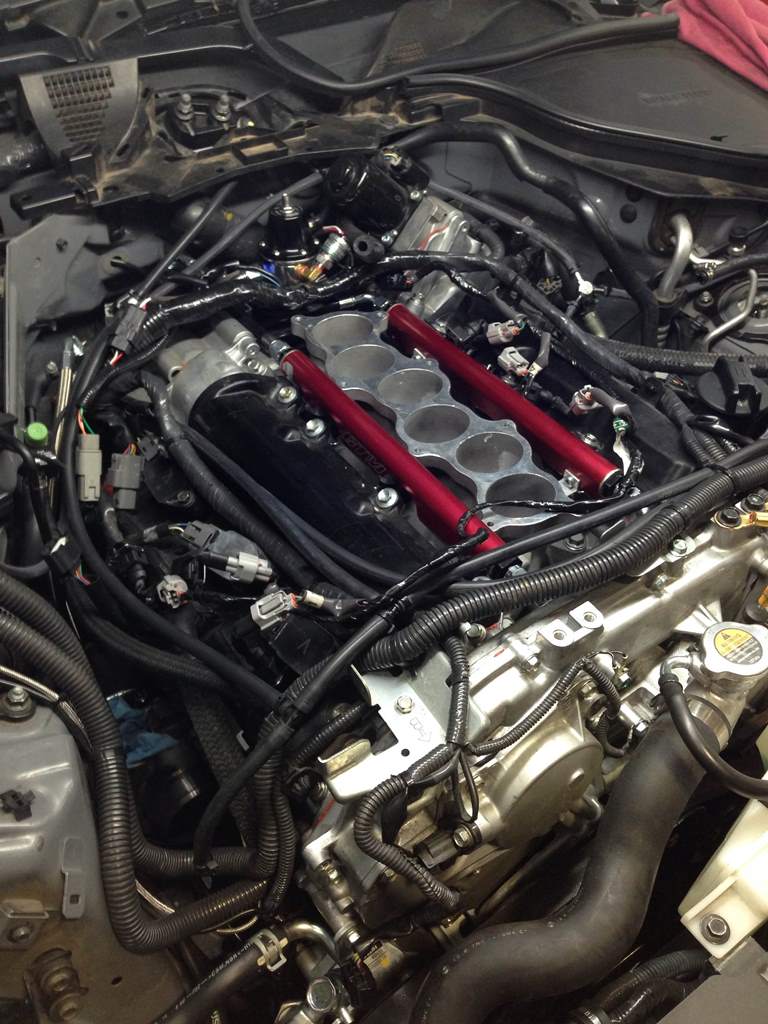
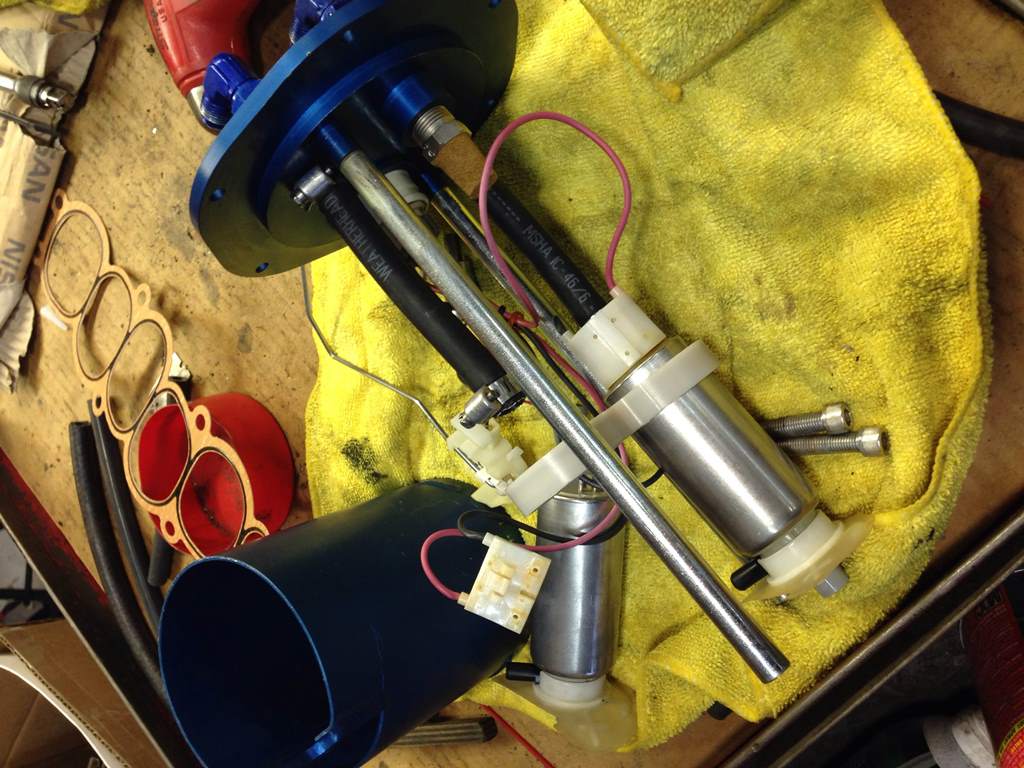
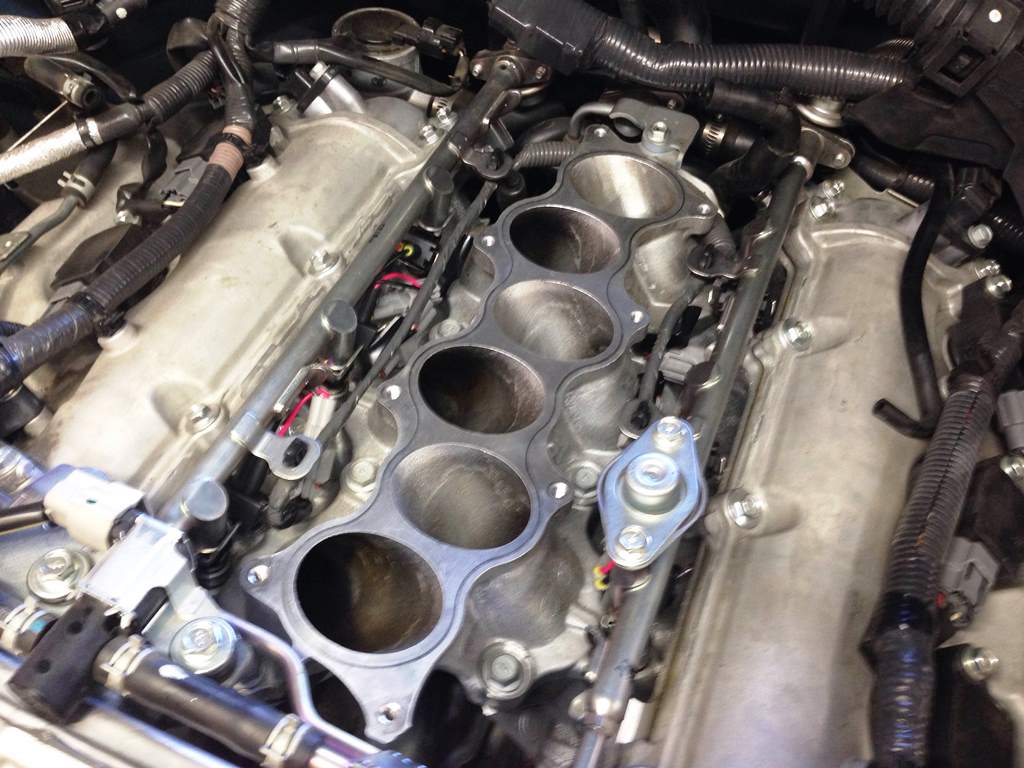
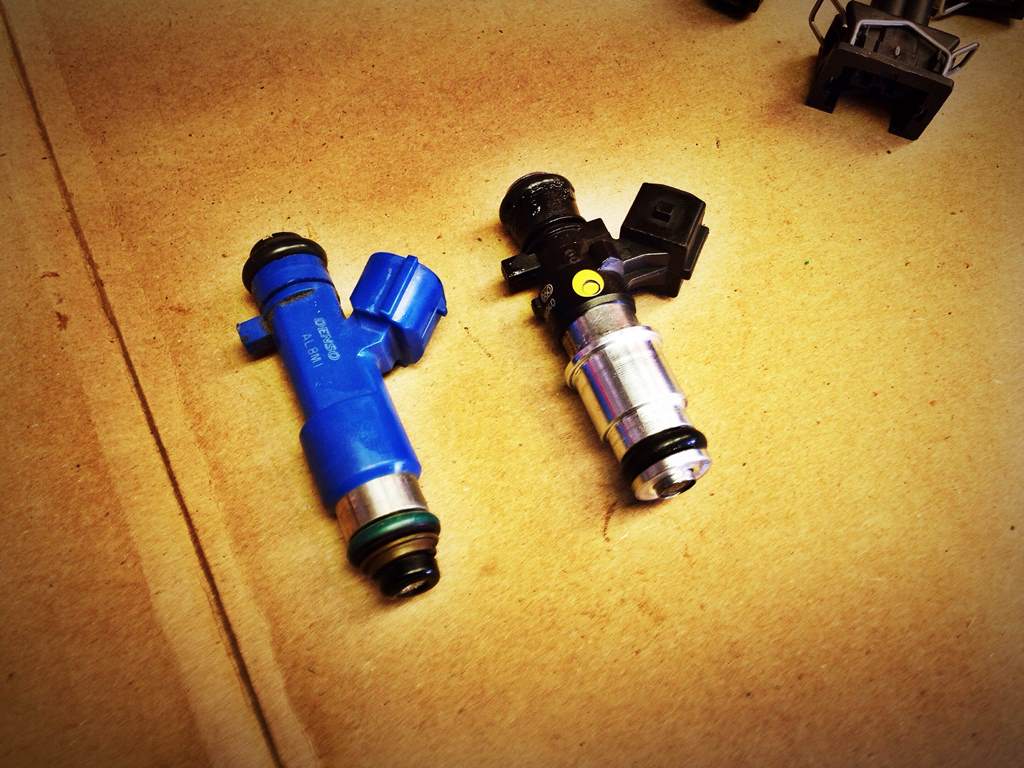
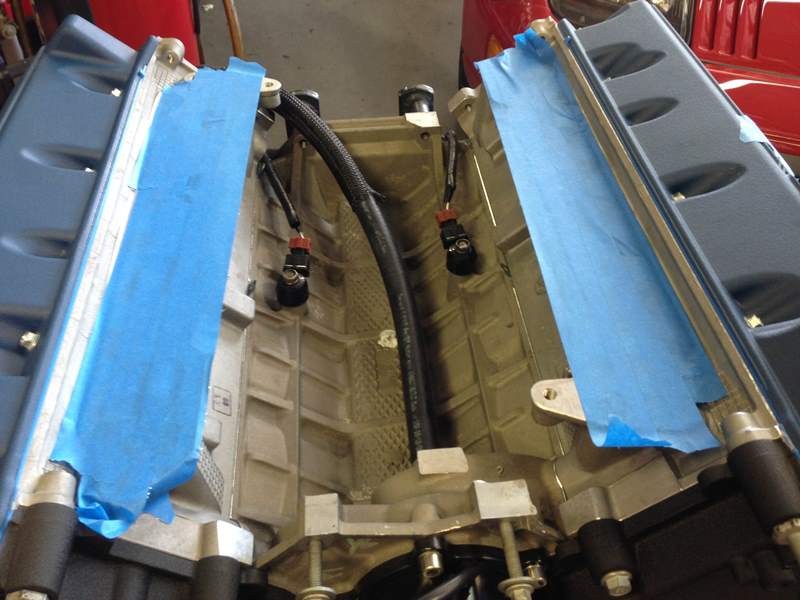
With the intake manifold removed the stock fuel injectors and rails come out.  We’ll be moving more air so we’ll need larger injectors.

fuelinjectors

Stock injector on the left and our new higher flowing 650 cc injector on the right.  Appropriate adapters for the electrical connection are provided to make it simple plug n’ play affair.

fuelinjectors_installed

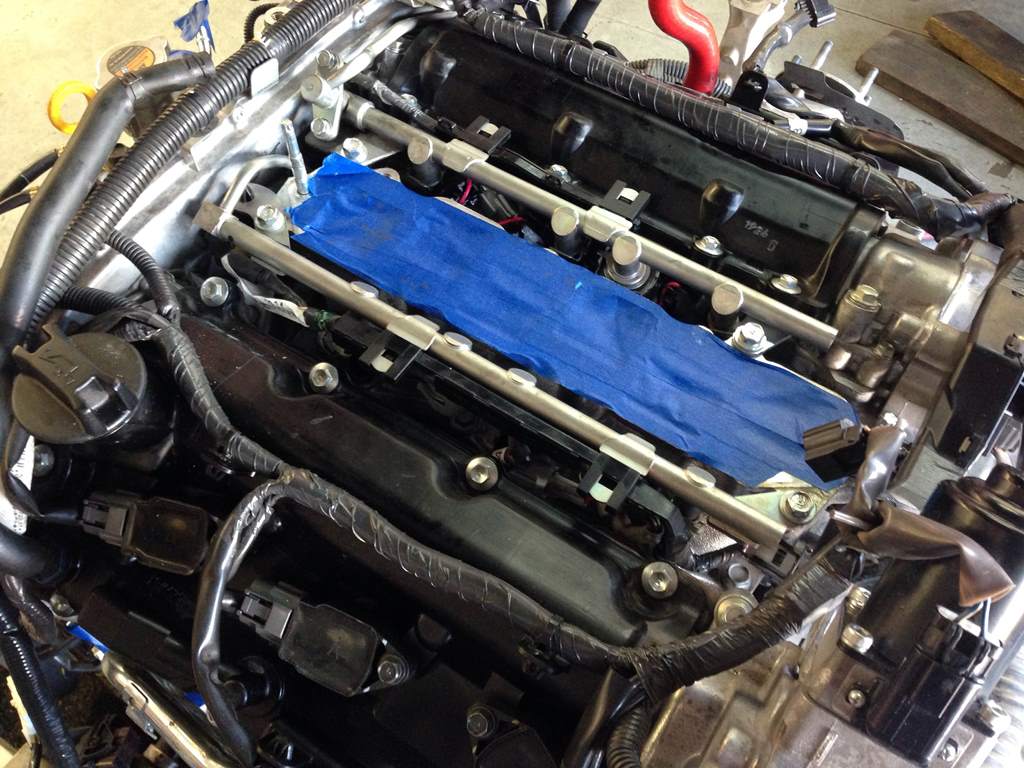
Rails, injectors, and adapters installed.

sparkplugs

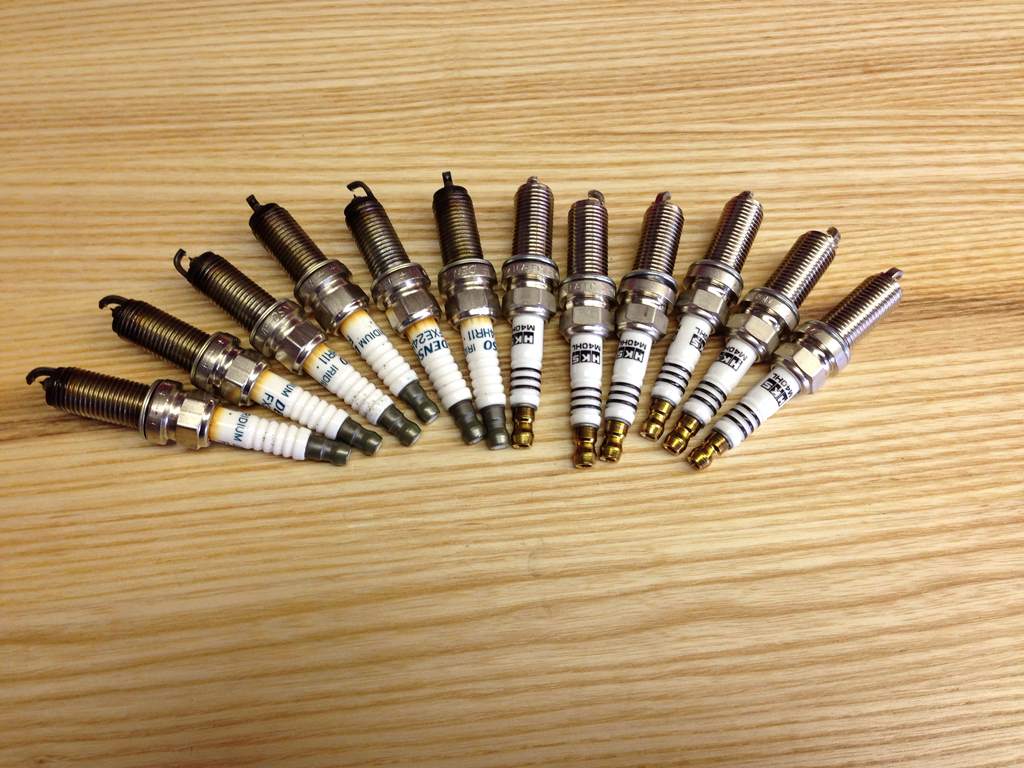
With the intake manifold removed for the injectors install, we also replaced the factory DENSO spark plugs in favor of HKS Racing spark plugs.

stock_clutch

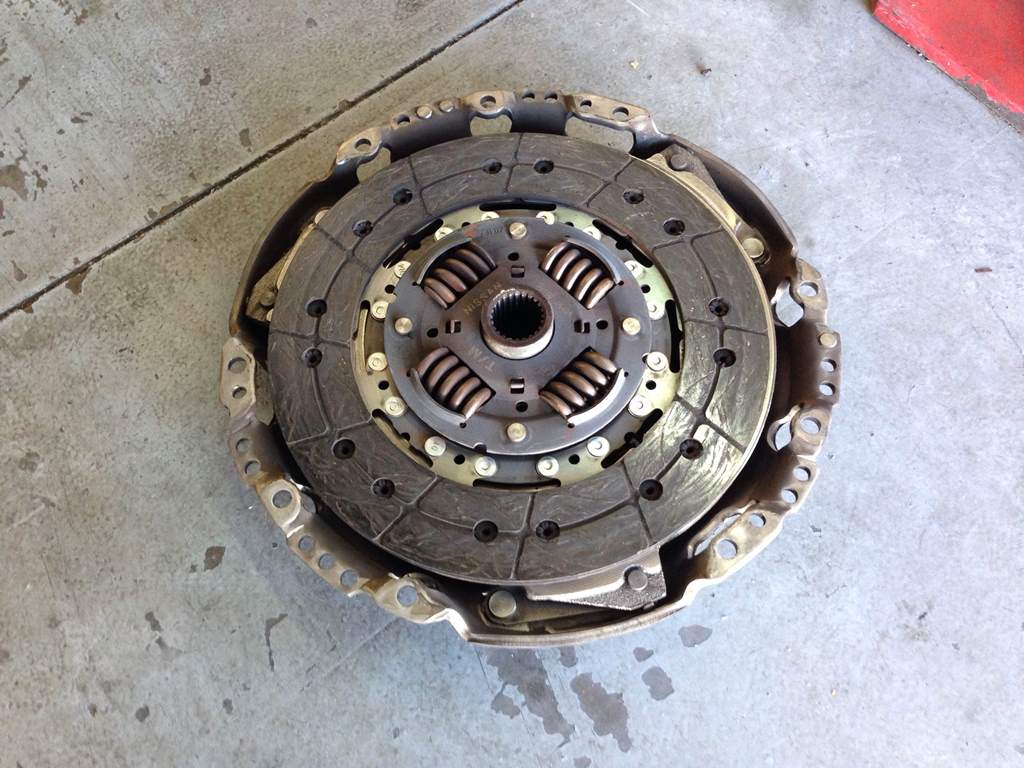
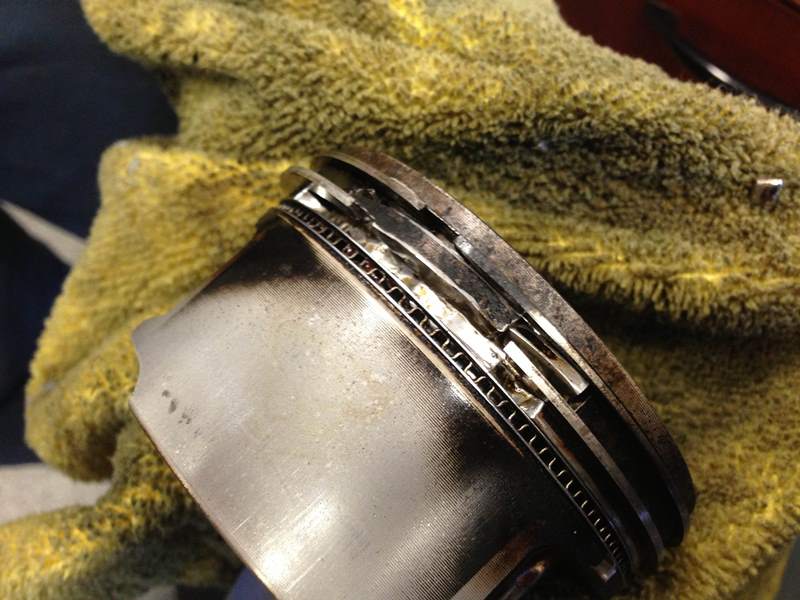
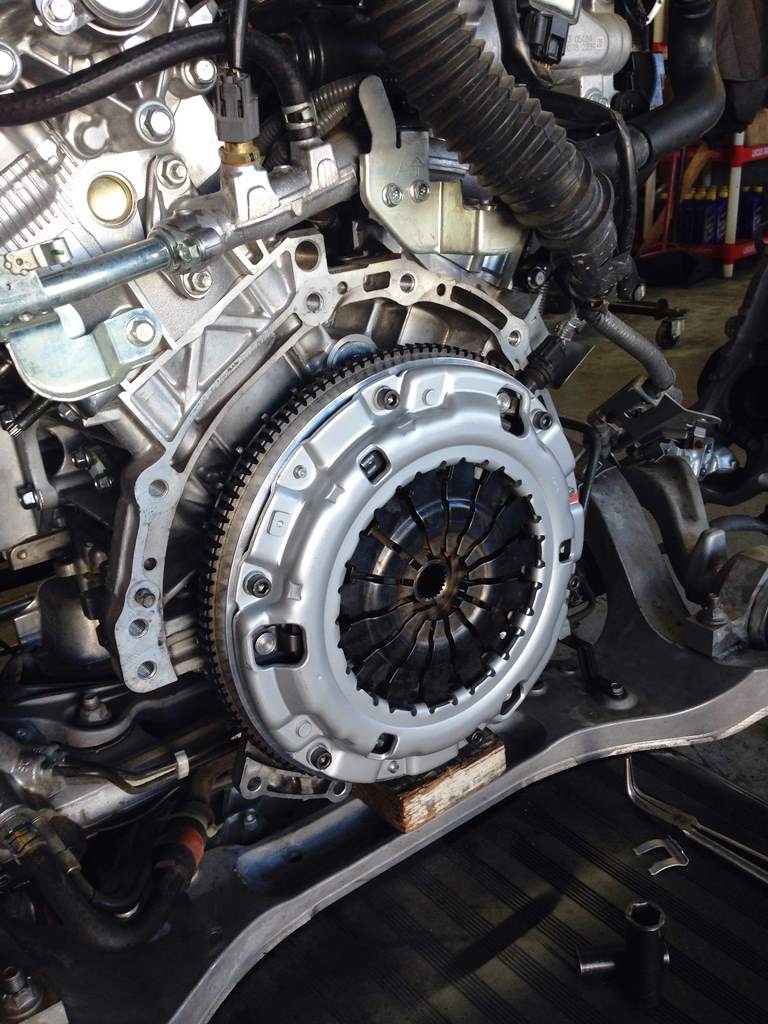
The stock Nissan clutch (disc shown on top of pressure plate).  Since we’re going to be making more power and especially torque we removed the stock system and upgraded to the SZ Max Street Clutch & Flywheel Kit.

stock_flywheel

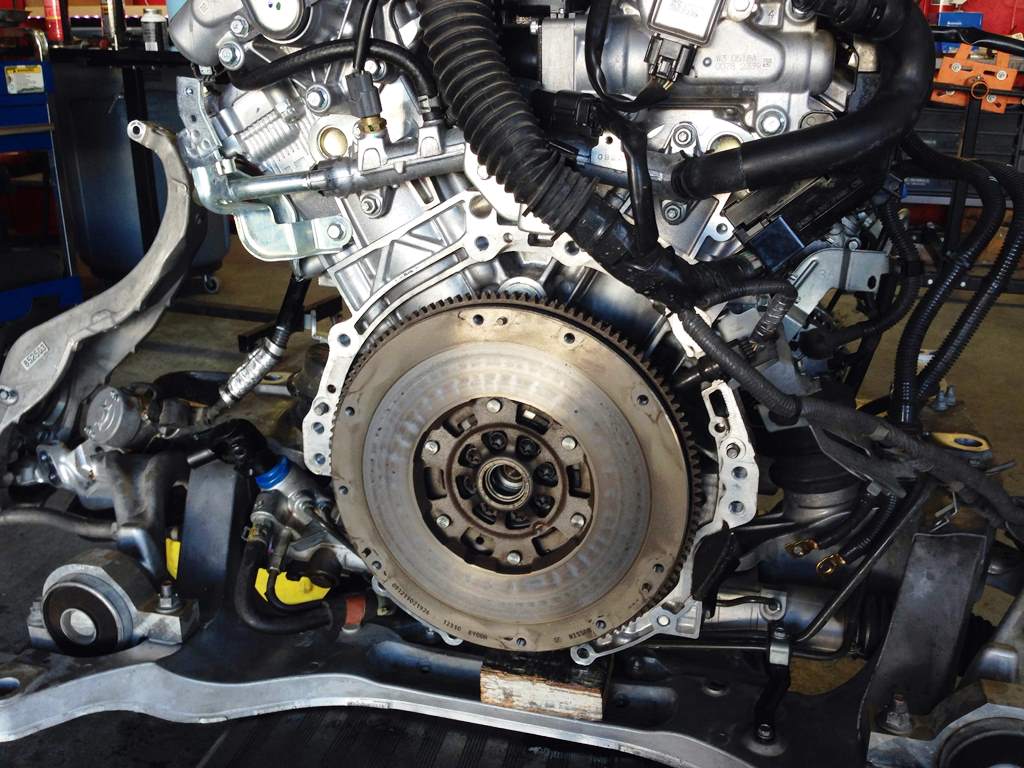
The heavy factory Nissan dual mass flywheel also gets ditched.

rearmainseal

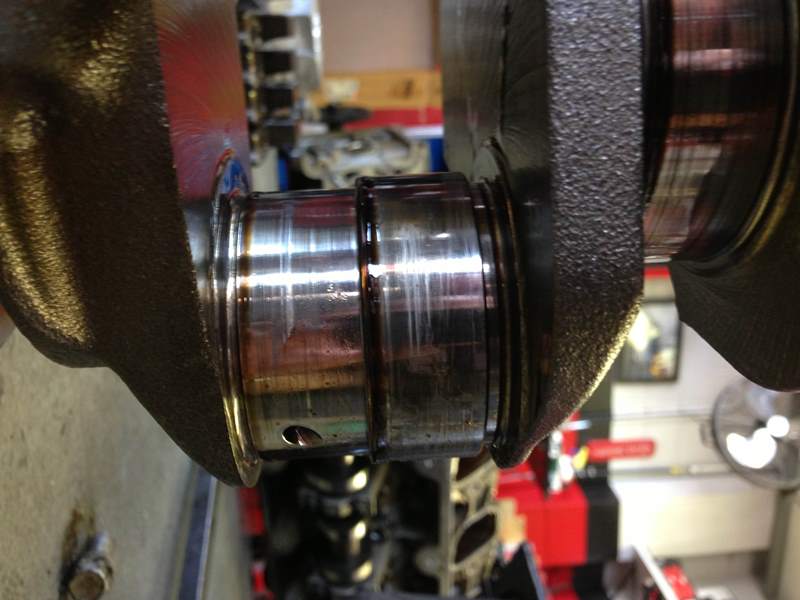
We took the opportunity to replace the rear engine main seal.  This would also be the time to replace the pilot bushing that is included in our clutch and flywheel kit.

stock_slave

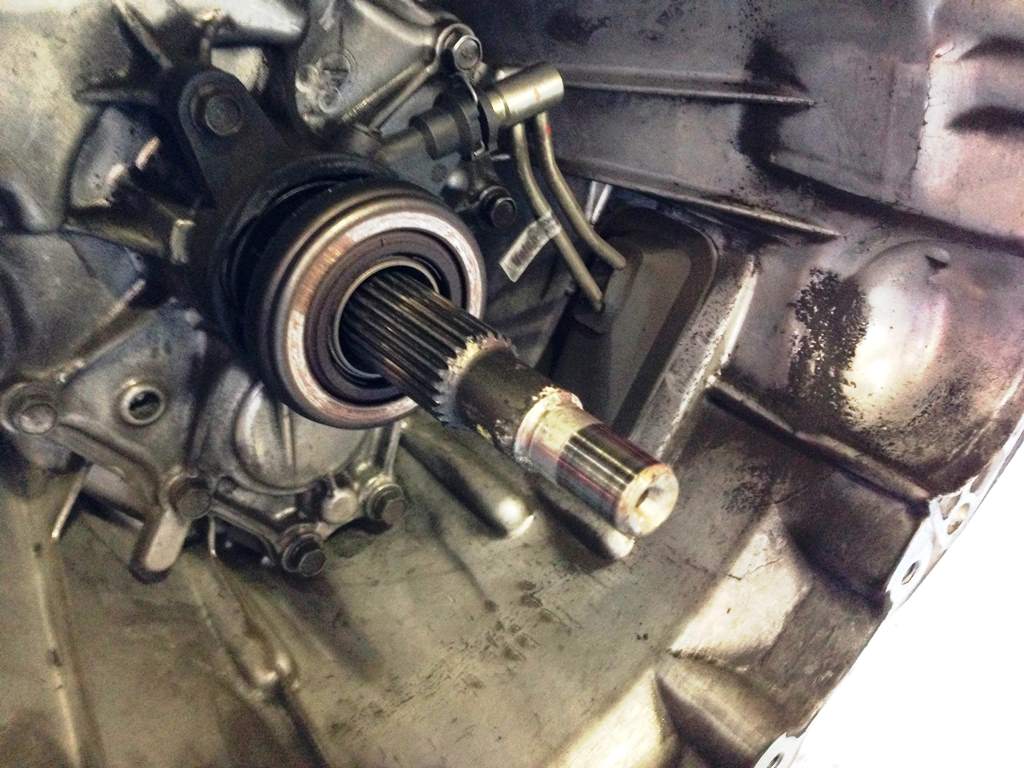
The factory cheesy Nissan slave cylinder & bearing get upgraded with our own piece also included in our kit.

sz_slave

Our upgraded slave & bearing assembly that includes SS lines and easy bolt in adapter plate.

sz_slave_installed

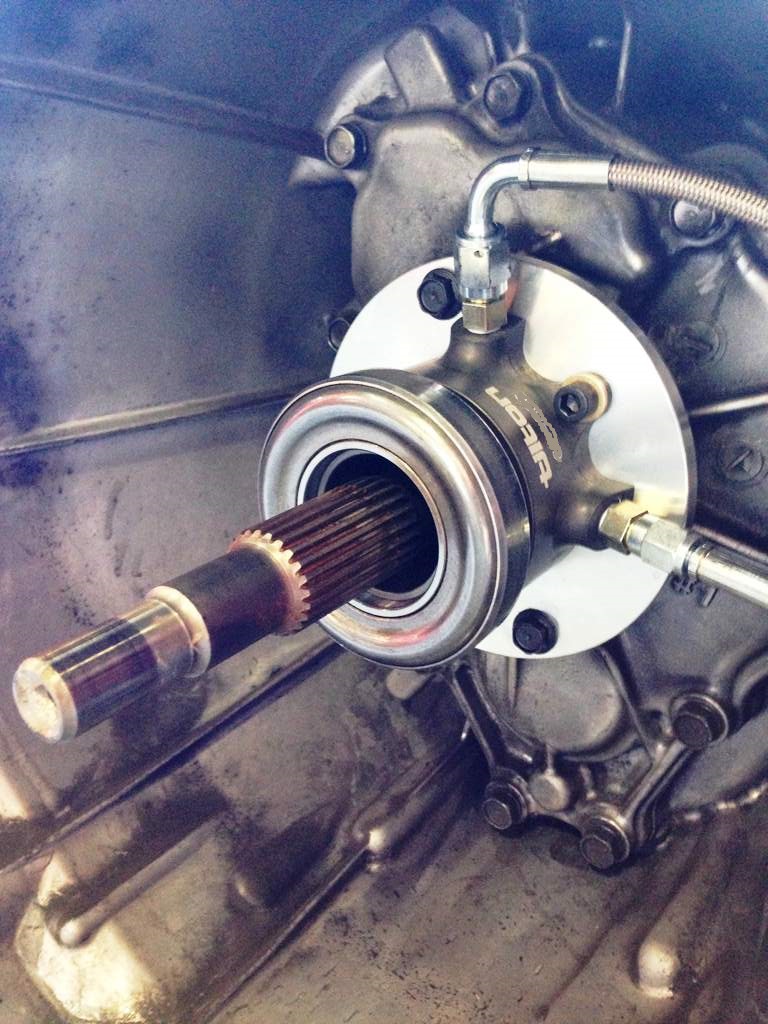
Our piece installed, ready to go.

sz_flywheel

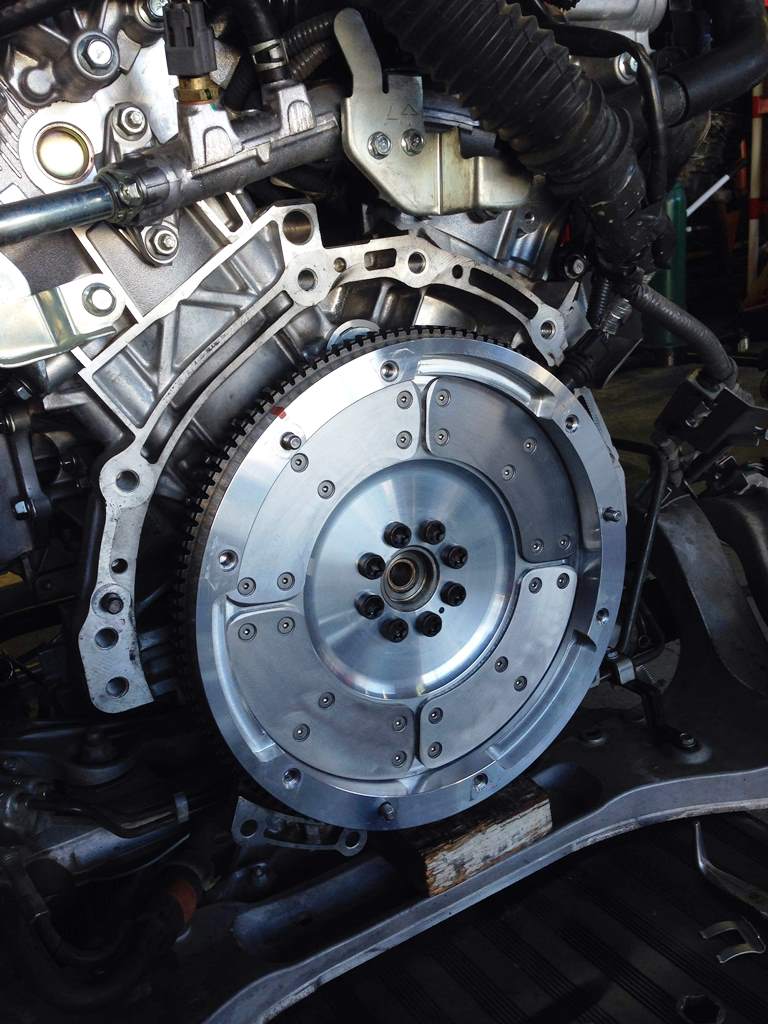
Our lightweight aluminum segmented flywheel bolted down.

sz_disc

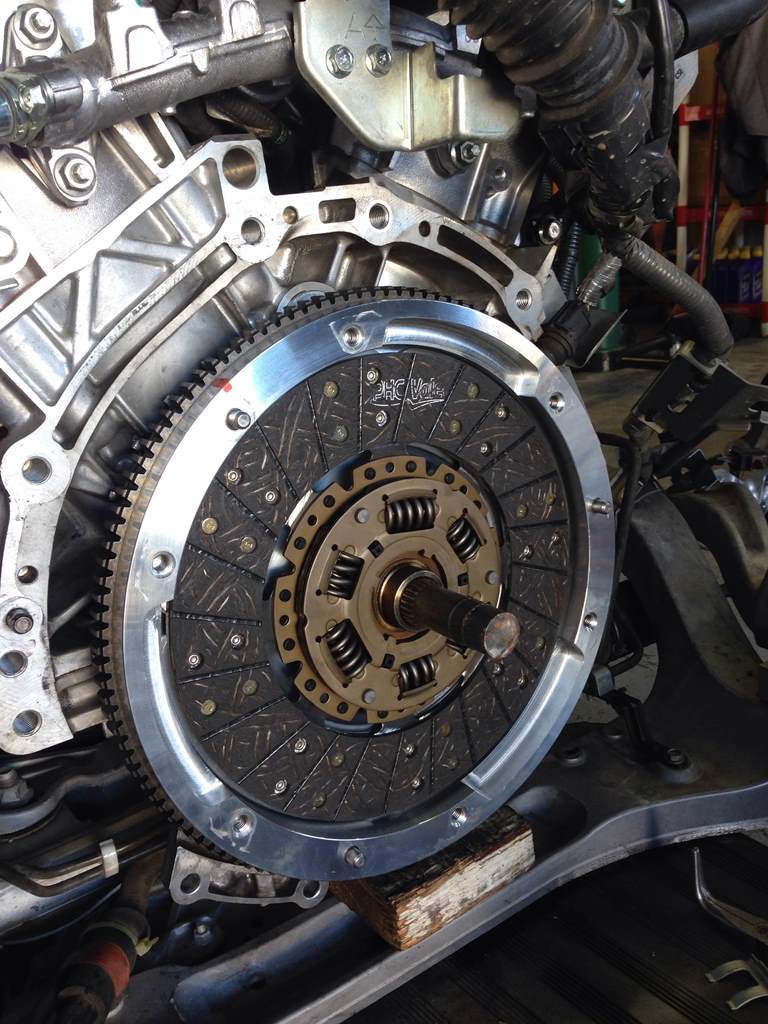
The Max Street kit uses a modified organic clutch disc for smooth engagements.  Those looking to do more aggressive driving like drag launching and slipping will want to use our 6-Puck or 5-Puck options.

sz_pressureplate

Our Max pressure plate bolted down.

exhuastmanifolds

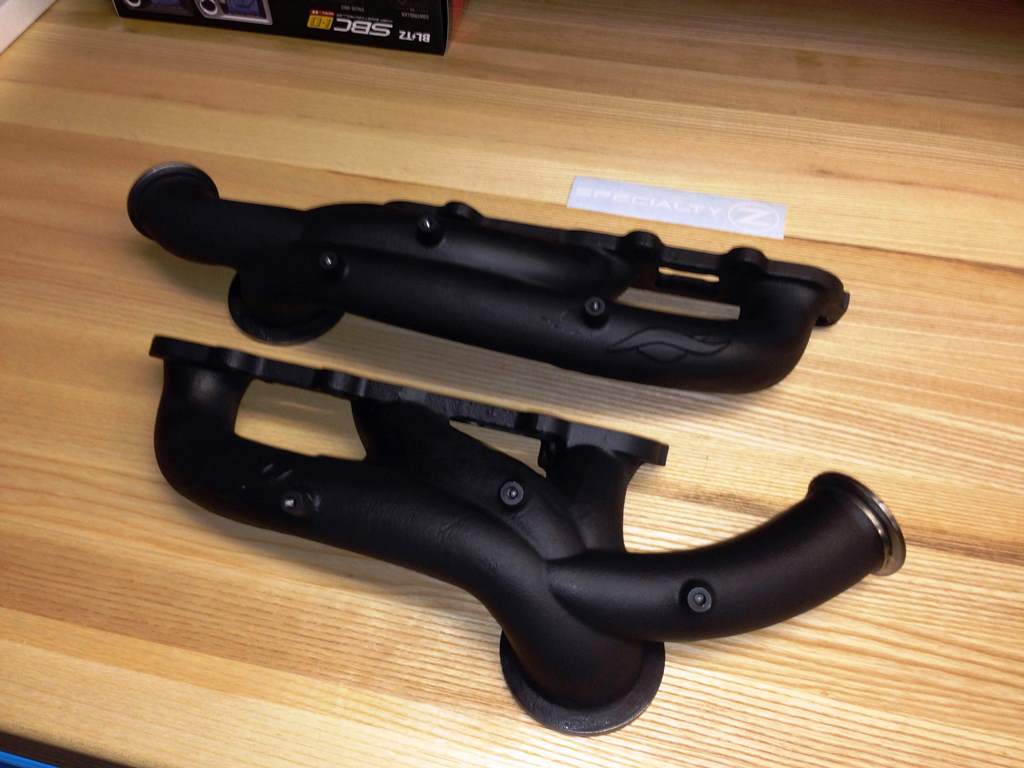
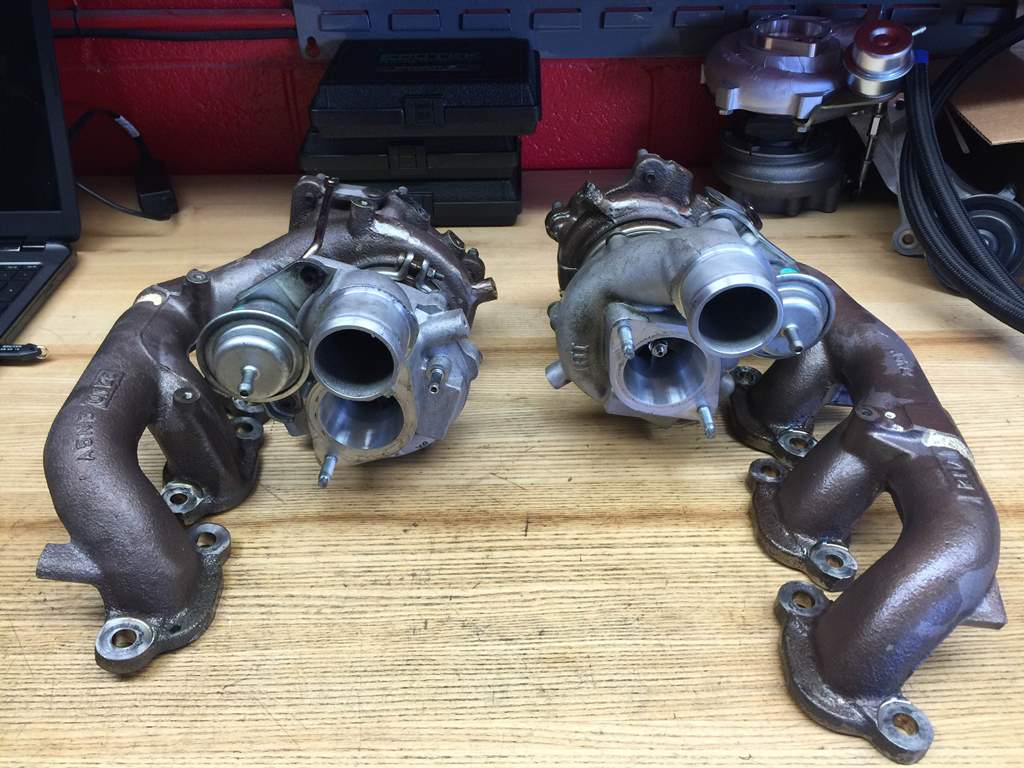
The Fast Intentions casted V-band exhaust manifolds for both the turbos and wastegates.  Beautiful merge of all 3 cylinders as one can see.

turbos

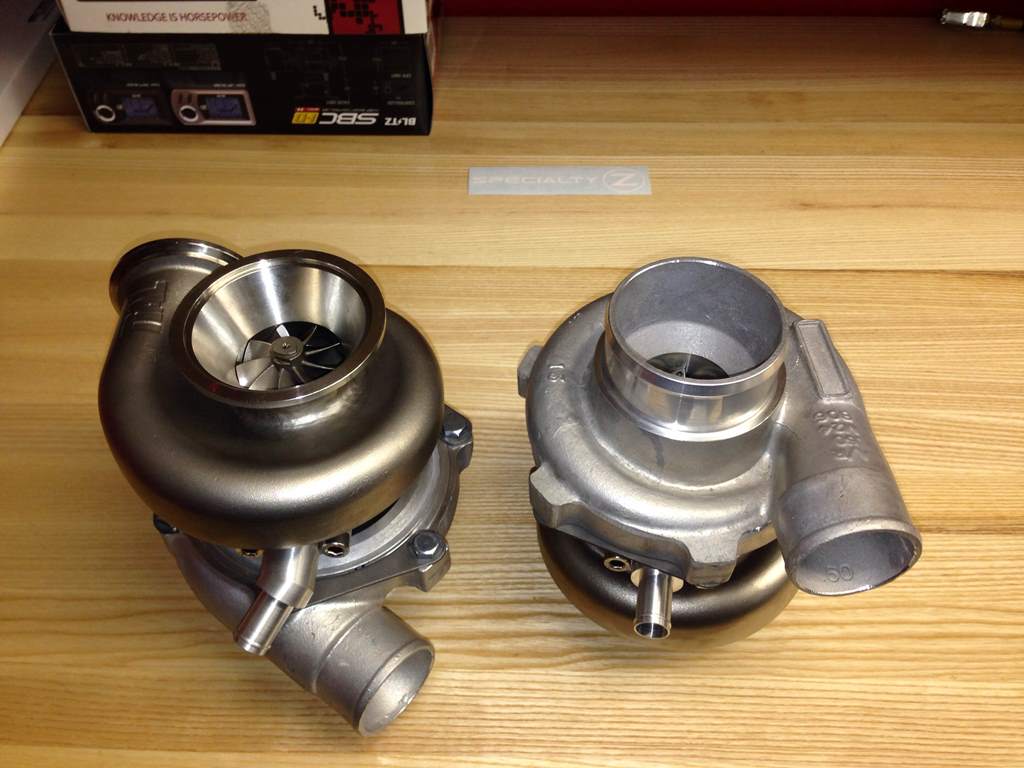
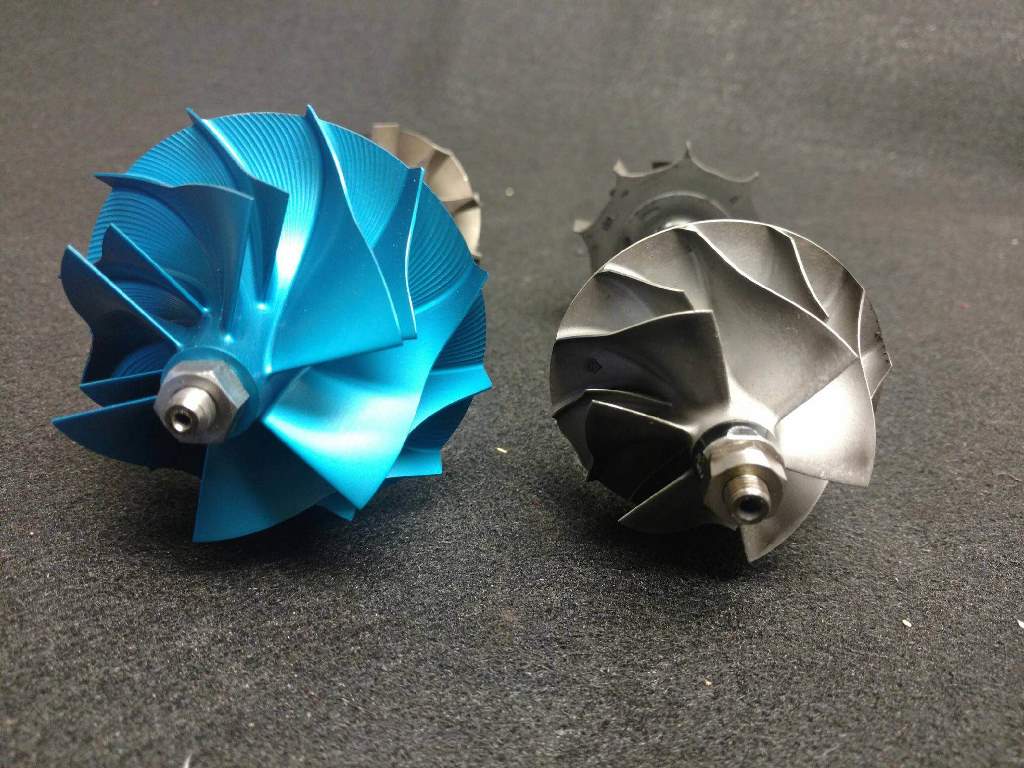
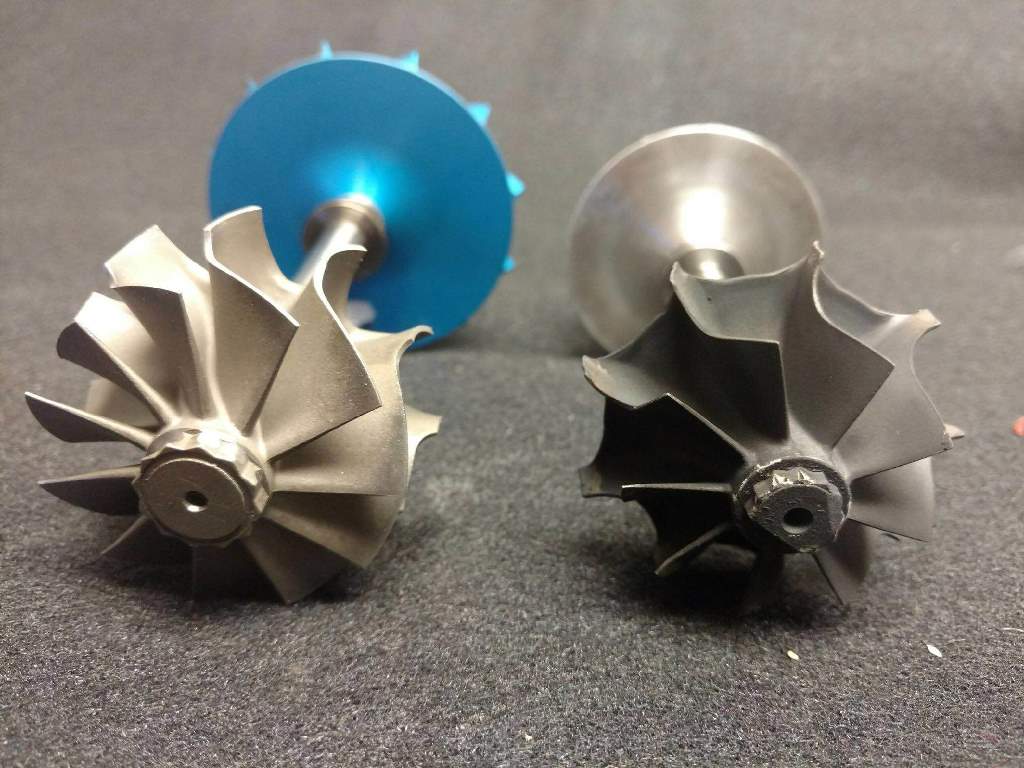
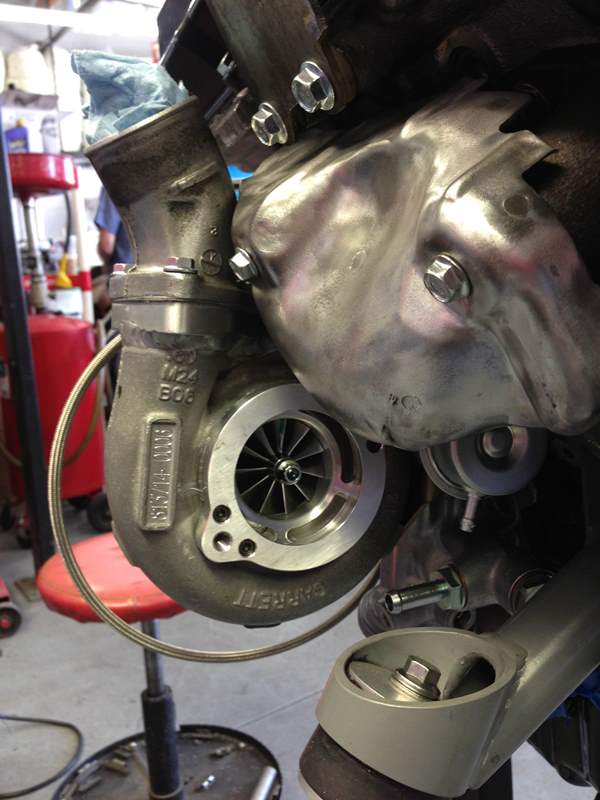
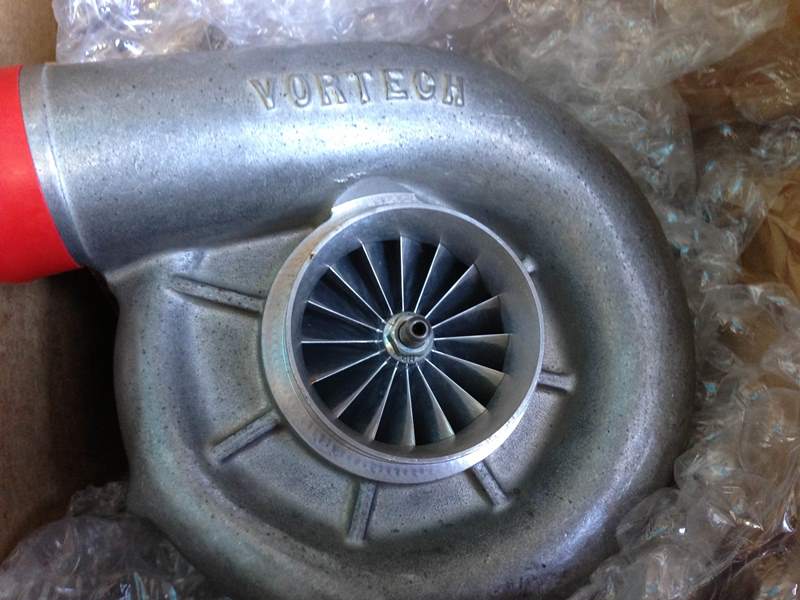
The two stars of the show, Garrett GT2860RS turbos.  Measuring 60mm on the exducer portion of the compressor wheel.  The kits also ship with the oil drain fittings installed for less guessing.  The fittings use an o-ring for sealing against the center section drain.  Notice the elegant taper used on the Tial turbine housing.  All this helps power and spool.

tial_wastegate

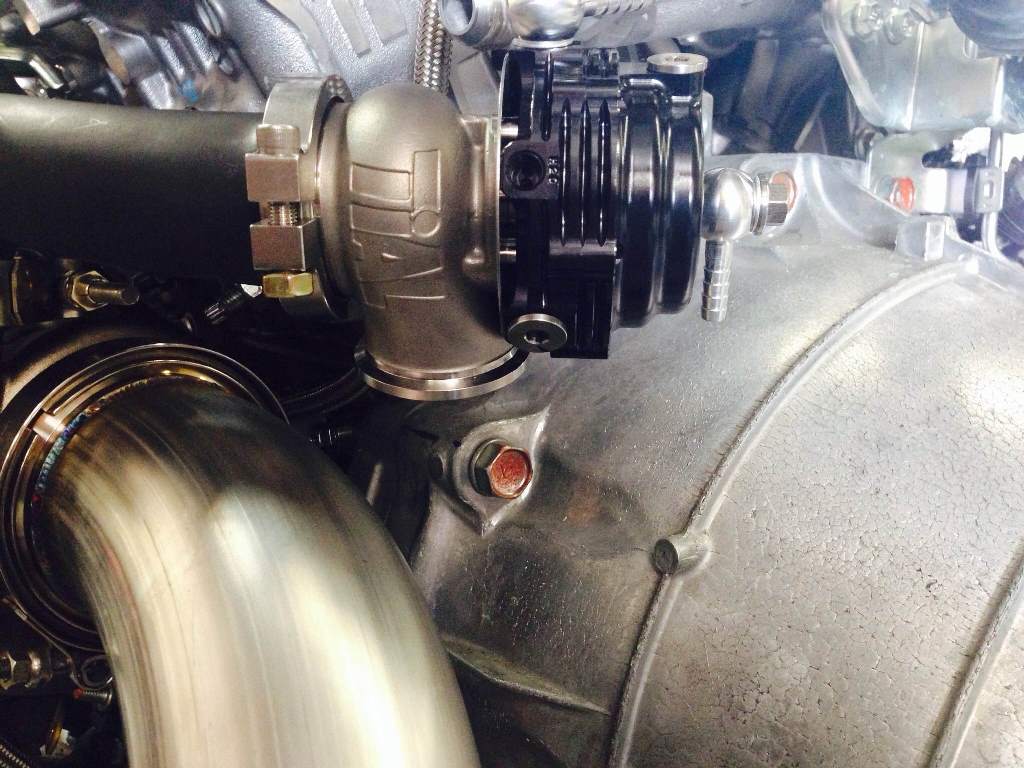
A good view of the Tial wastegate(s) used on the kit.

passengersideview

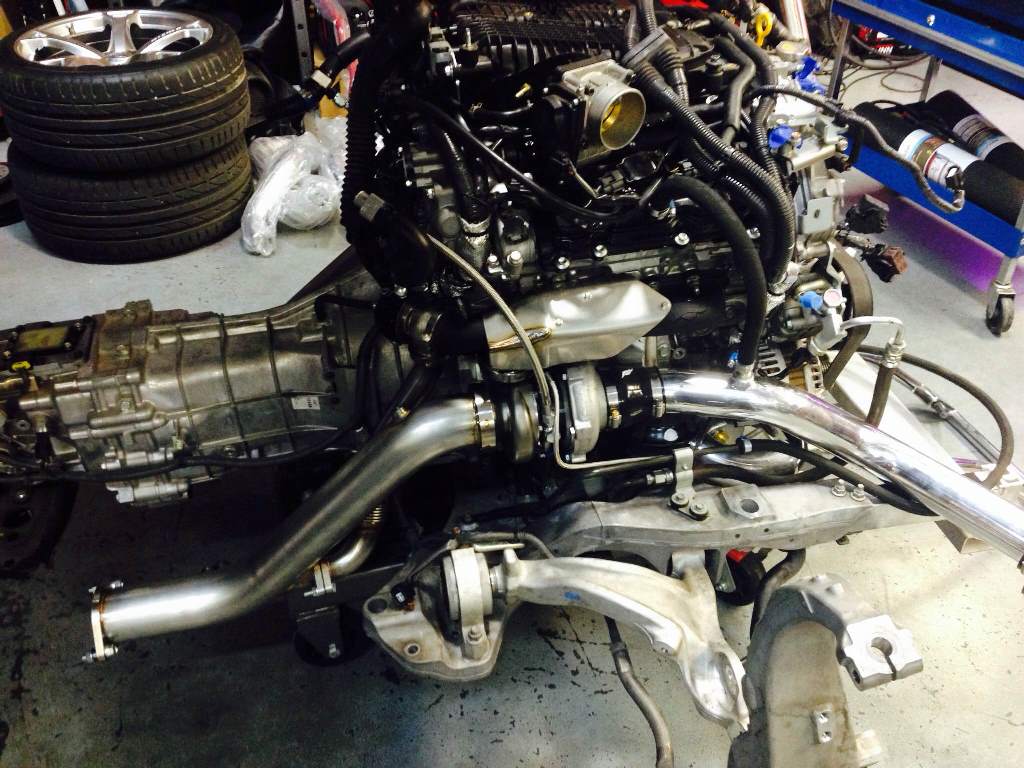
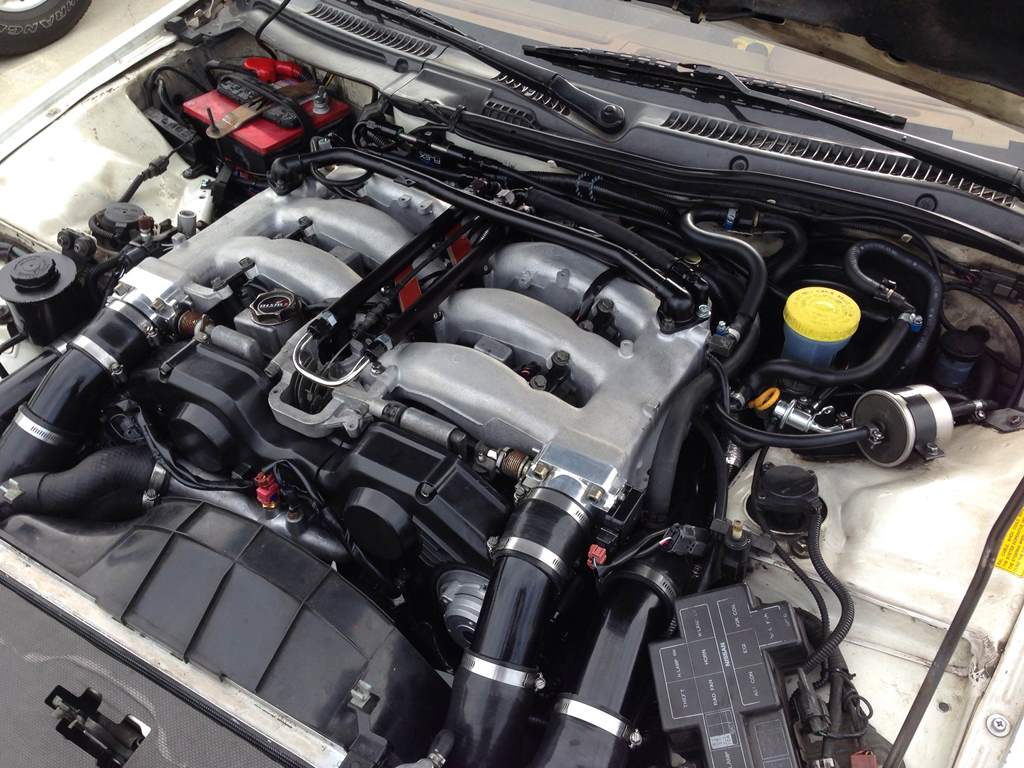
Passenger side of the kit installed.

driversideview

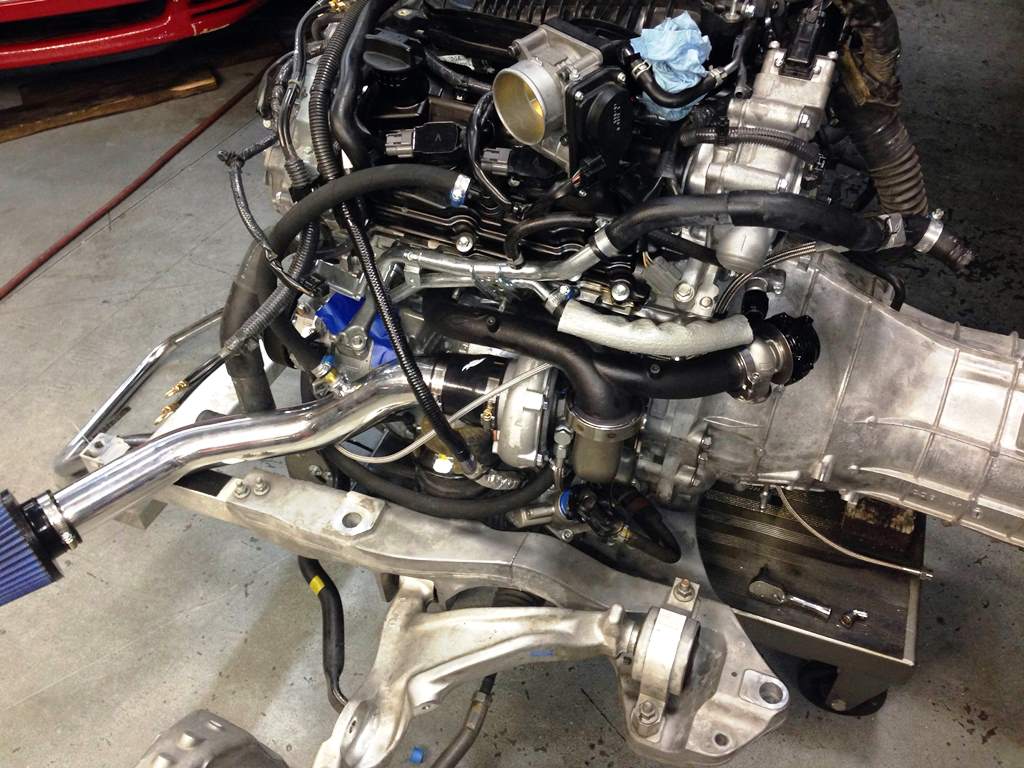
Driver side of the kit installed.

intakefrontview

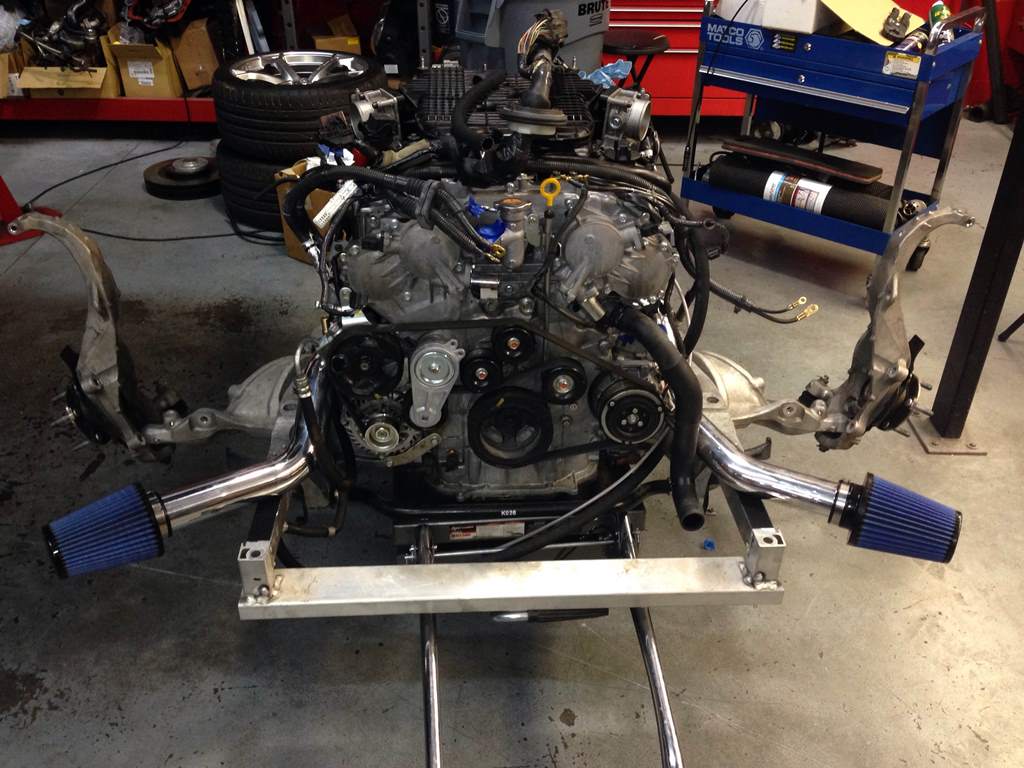
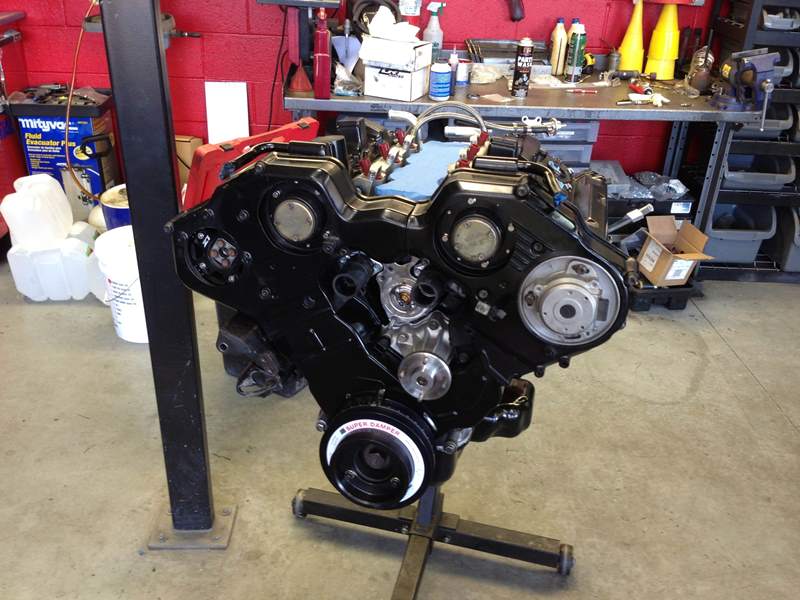
Ready to go back to its engine bay.

oilpan

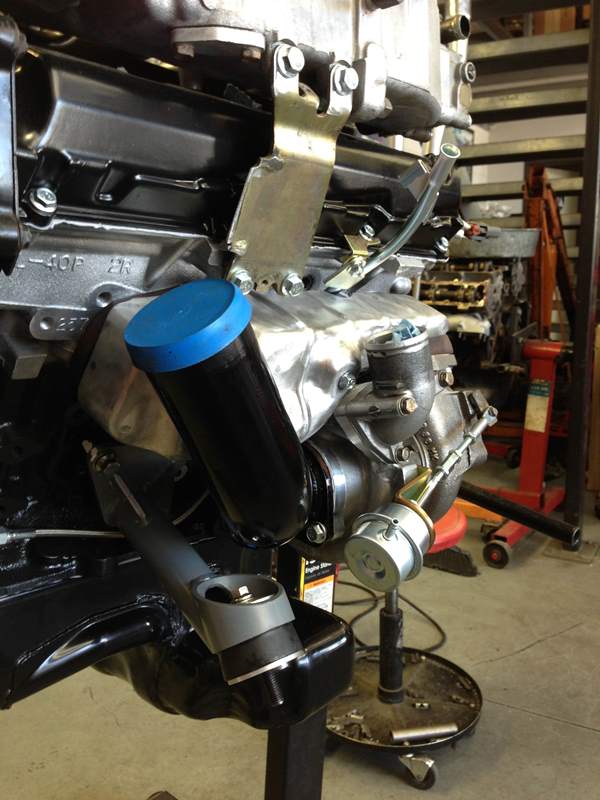
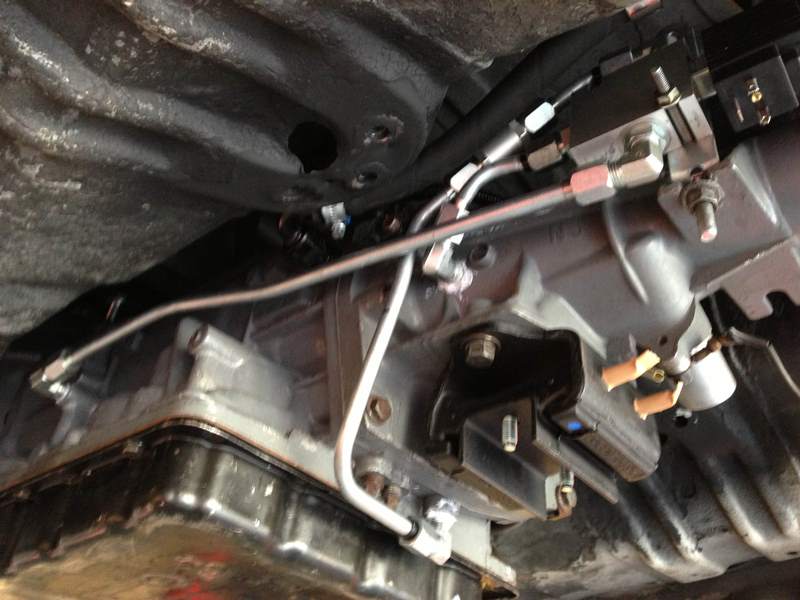
The kit makes use of the Greddy oil pan with the turbo oil drain fittings also already installed when one receives it.  Also pictured is the engine oil filter relocation which is also part of the kit.

stock_diff_bushing

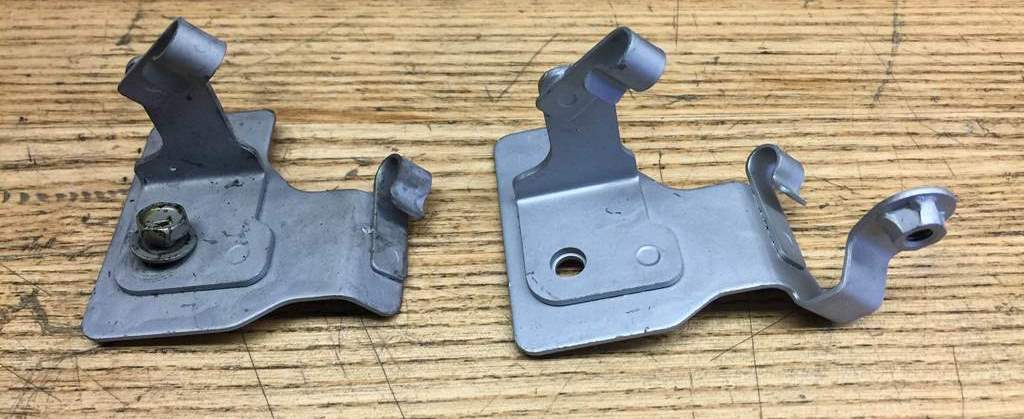
A must for any Z34 is removing the terrible squishy liquid filled differential bushings.  Only one horizontal mount is used on the Z33s and Z34s which also makes things worse for movement and wheel hop.

whiteline_diffbushing

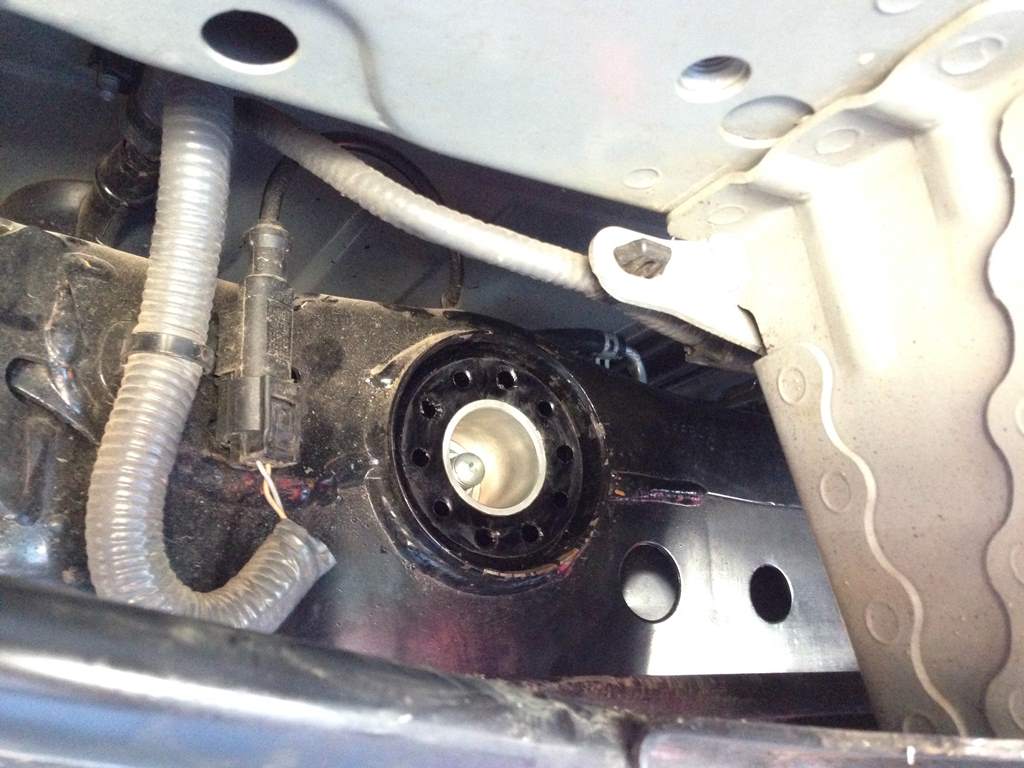
Whiteline bushing in place ready to get pressed in further into the subframe.

intercoolerfrontview

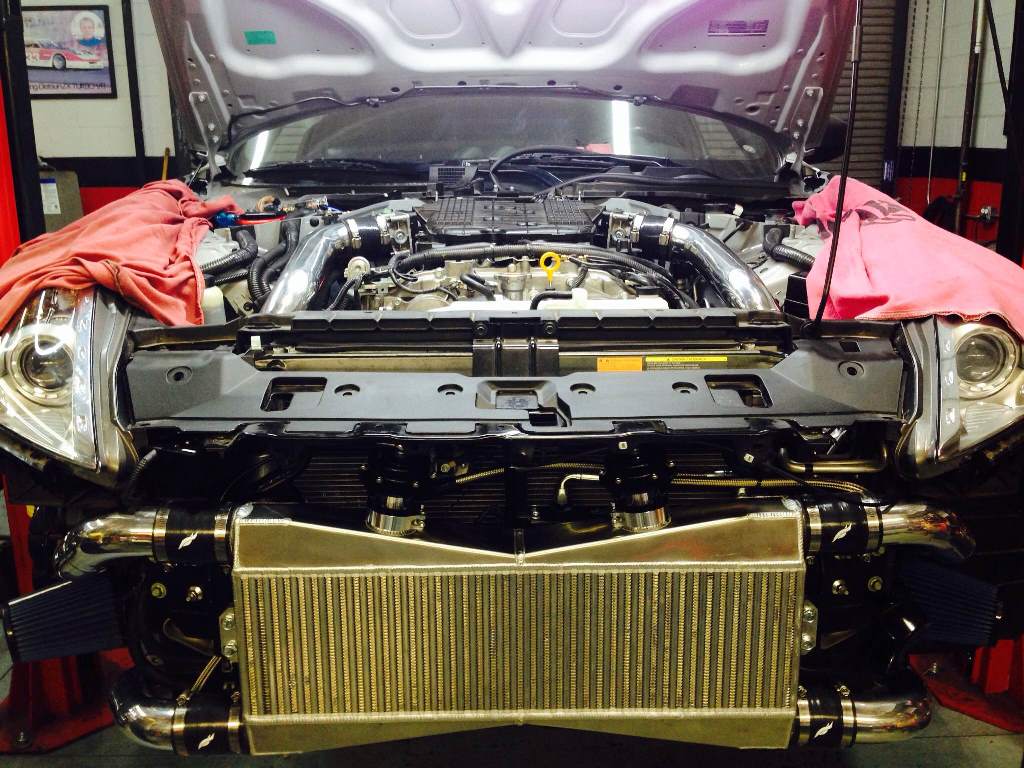
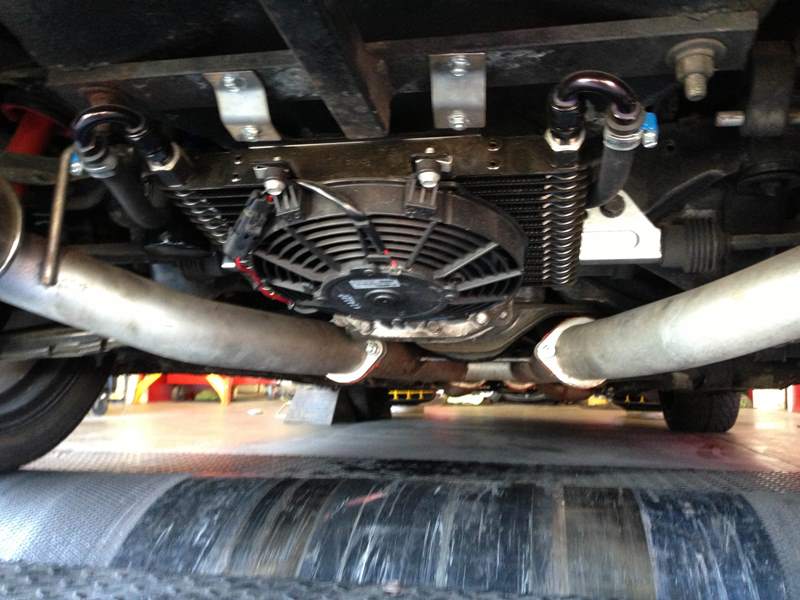
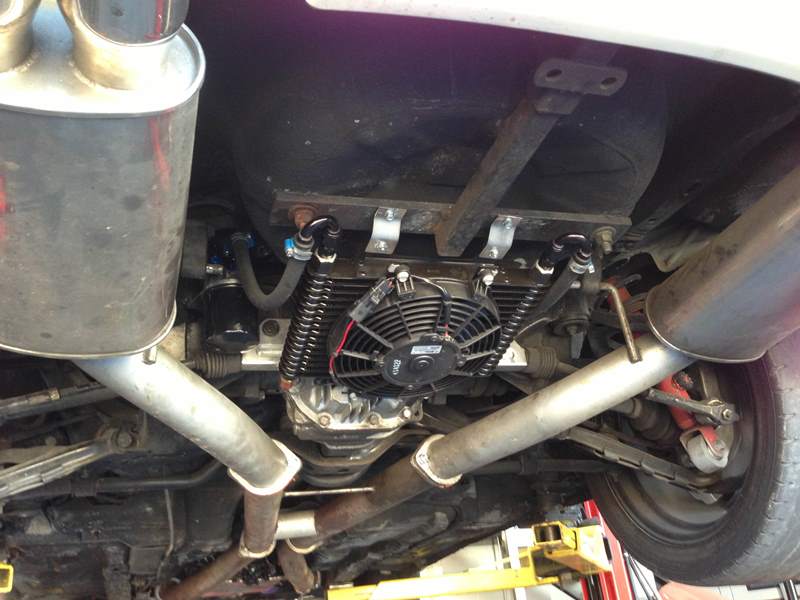
Intercooler looking mighty mean.  The Tial BOVs are also easily mounted to the end tanks of the intercooler.  This intercooler is actually separated in the middle and makes use of a divider plate to make sure all of the core(s) is used.  Behind the intercooler is the Fast Intentions 34 Row Setrab oil cooler.

intercooler_sideview

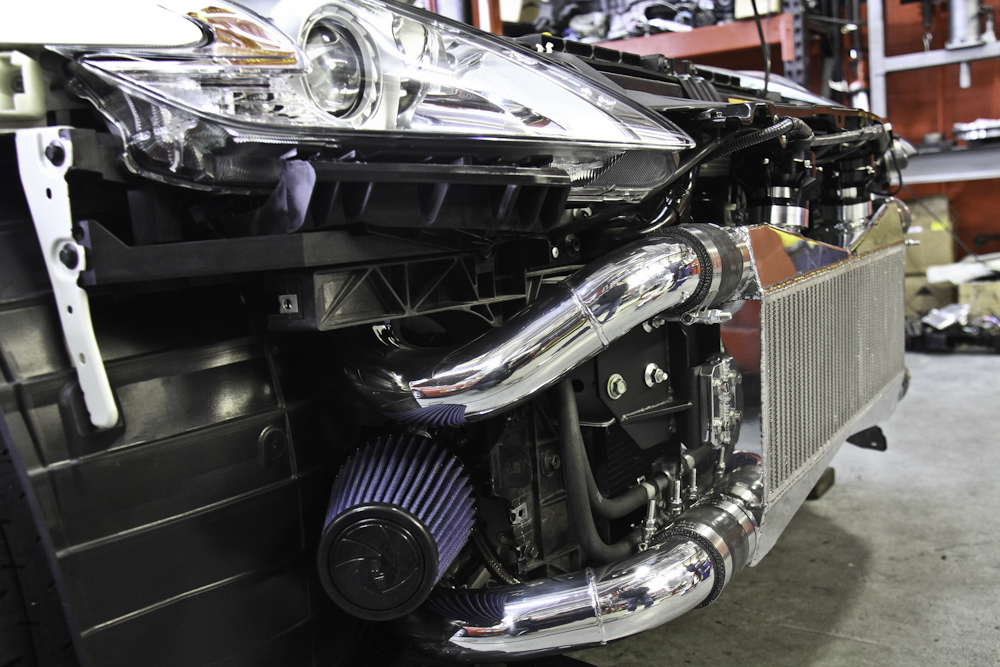
Here’s another view of the intercooler (not an actual picture of Bob’s NISMO).  The intercooler brackets included in the kit are also already painted!  Love that.  Ready to bolt in and go, less install time, and more GO time!

side_view_exterior

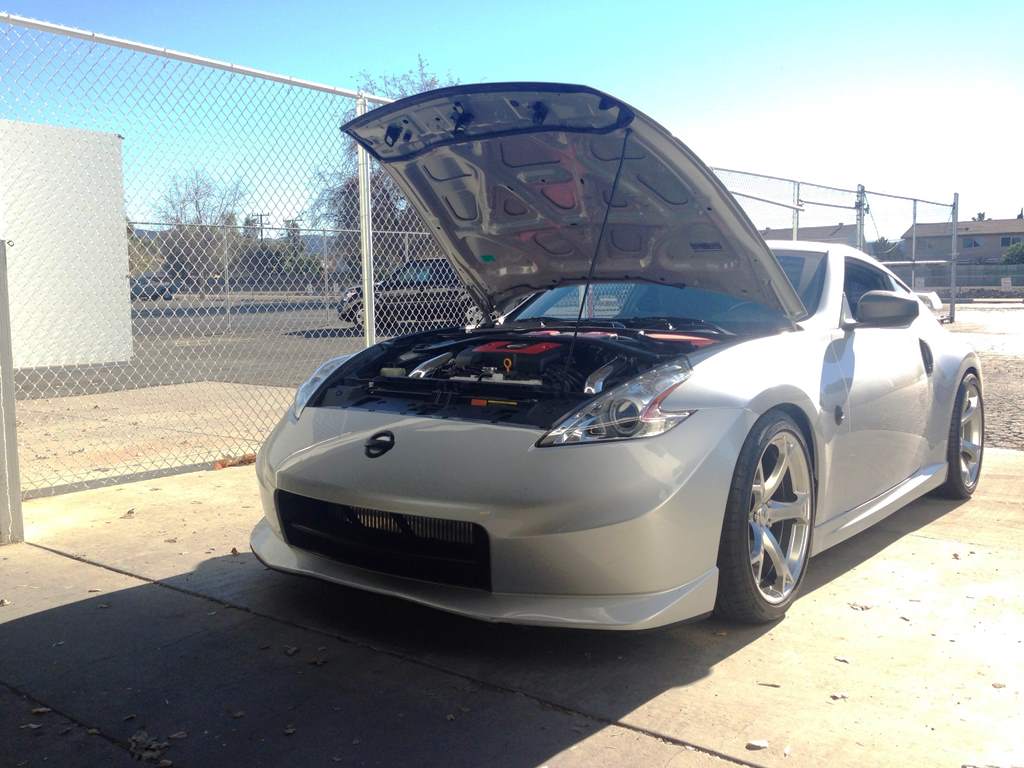
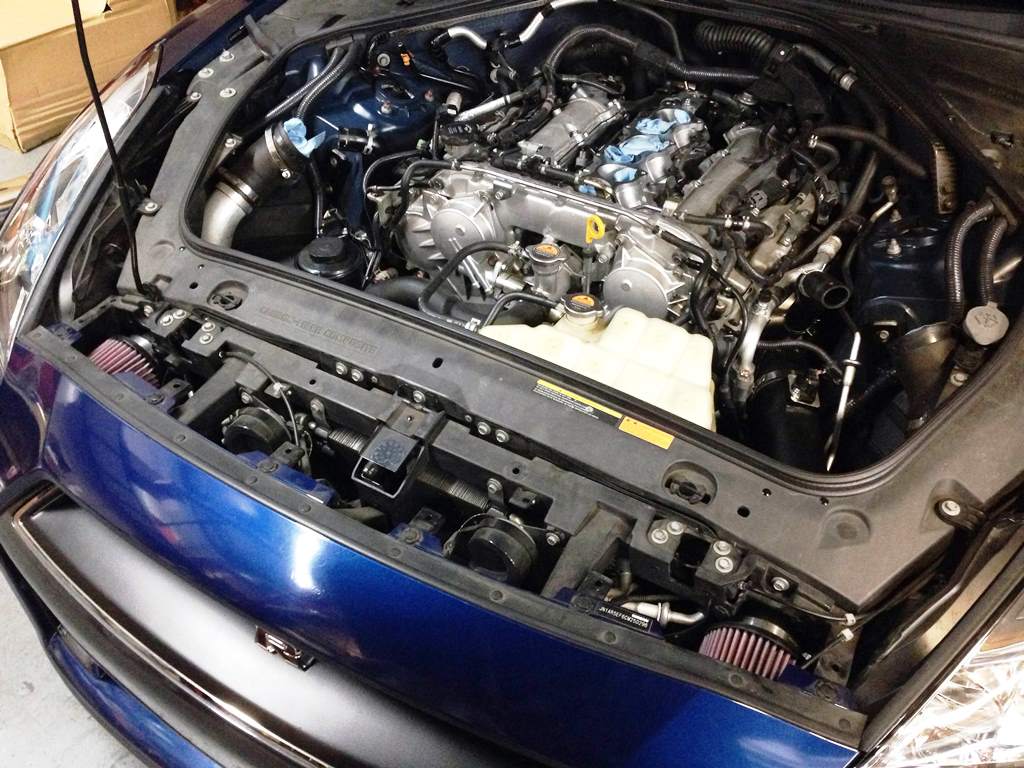
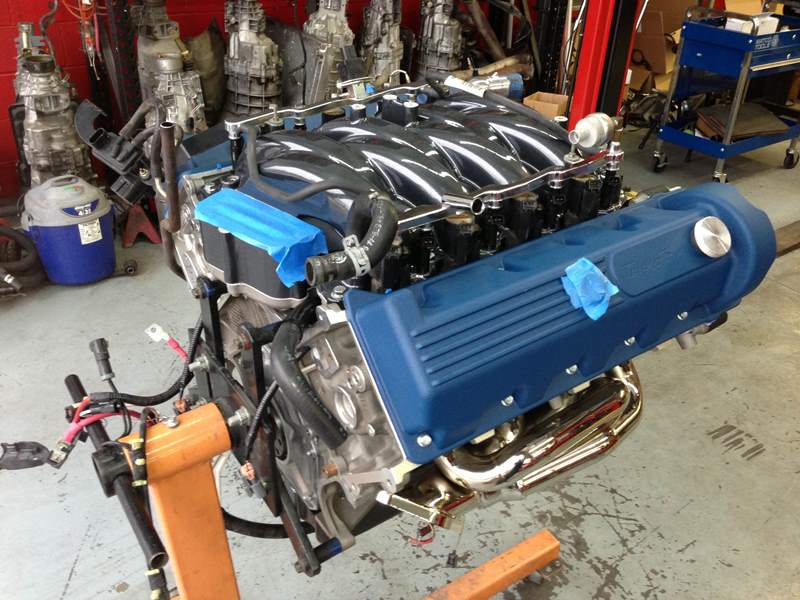
A beautiful twinturbo kit for a beautiful Z.

szdyno91

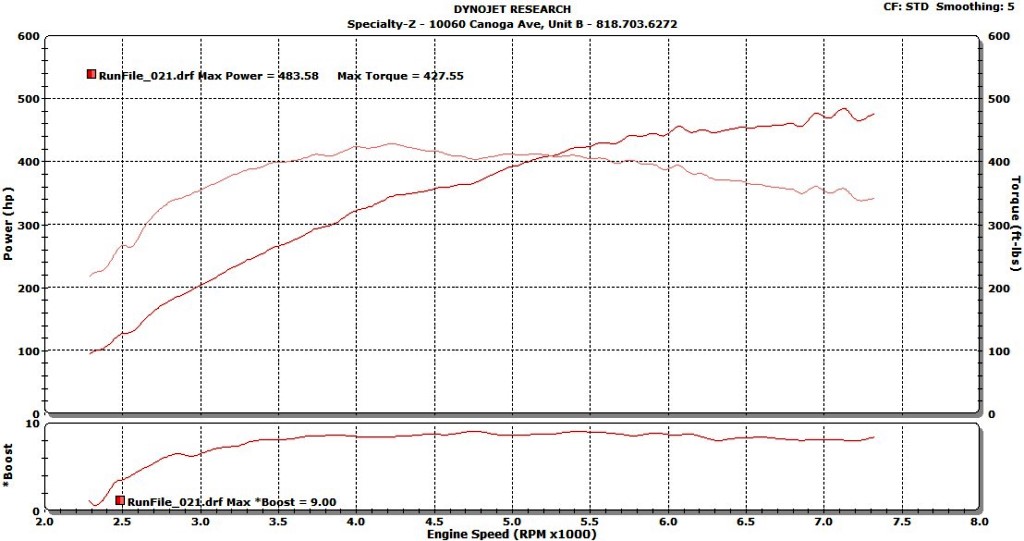
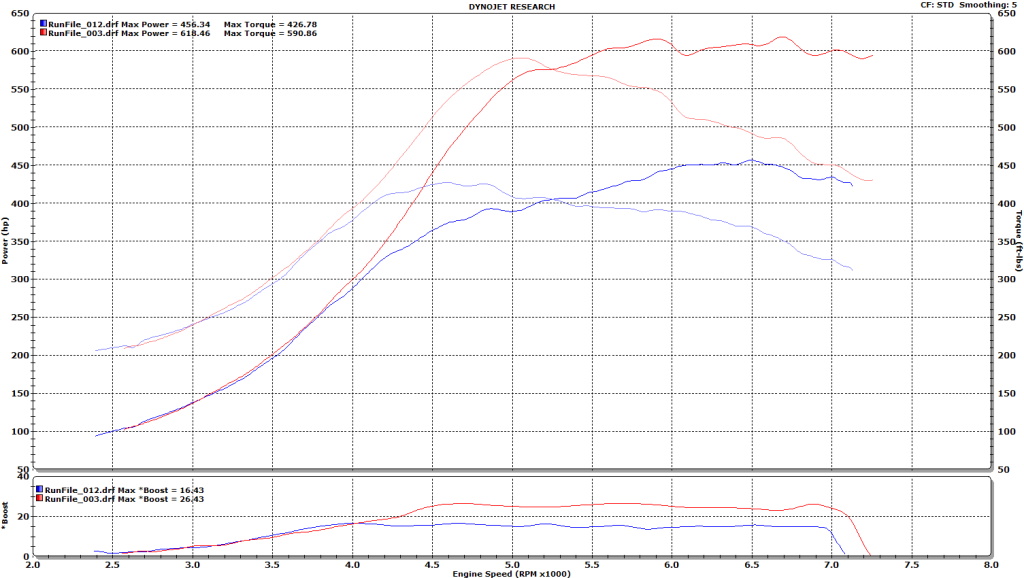
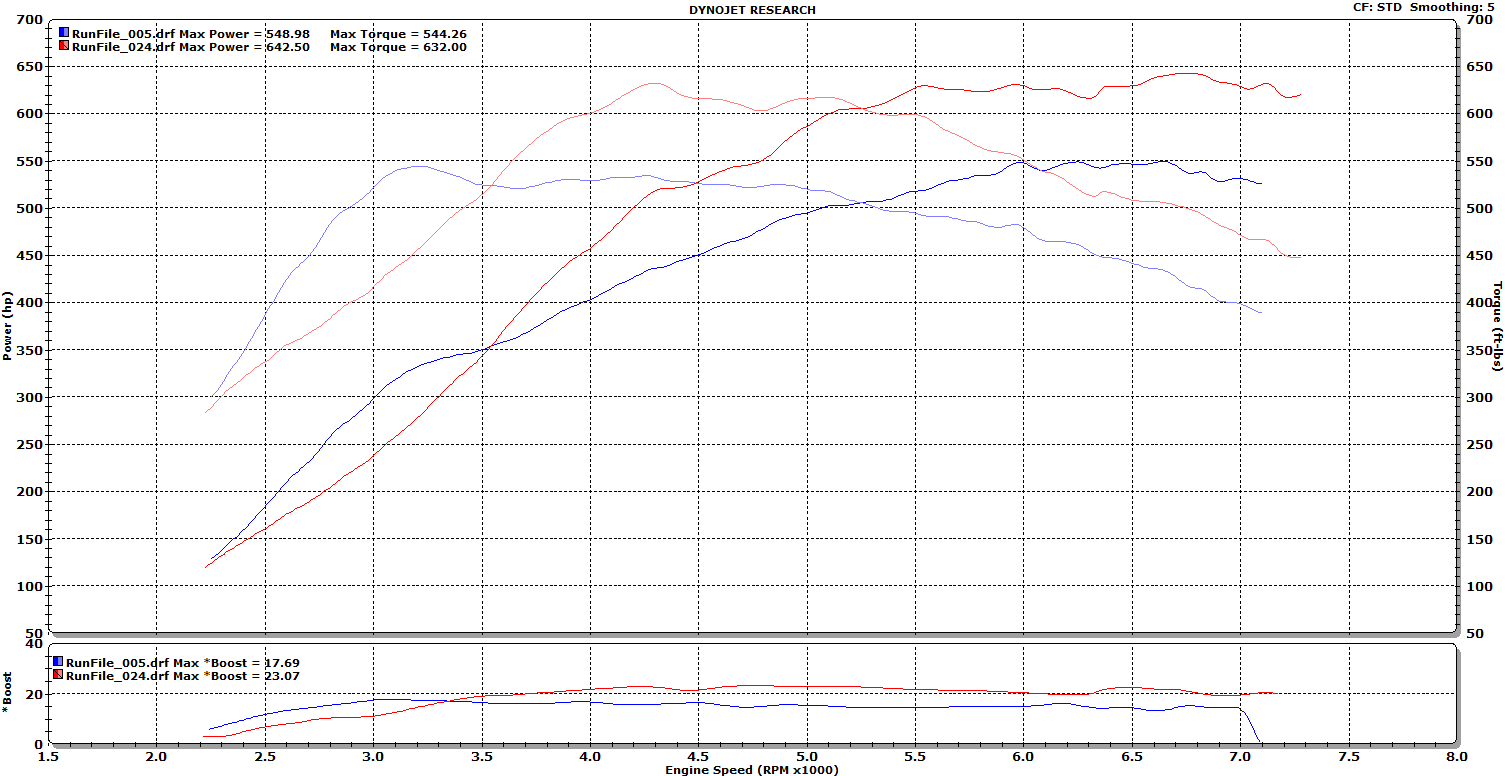
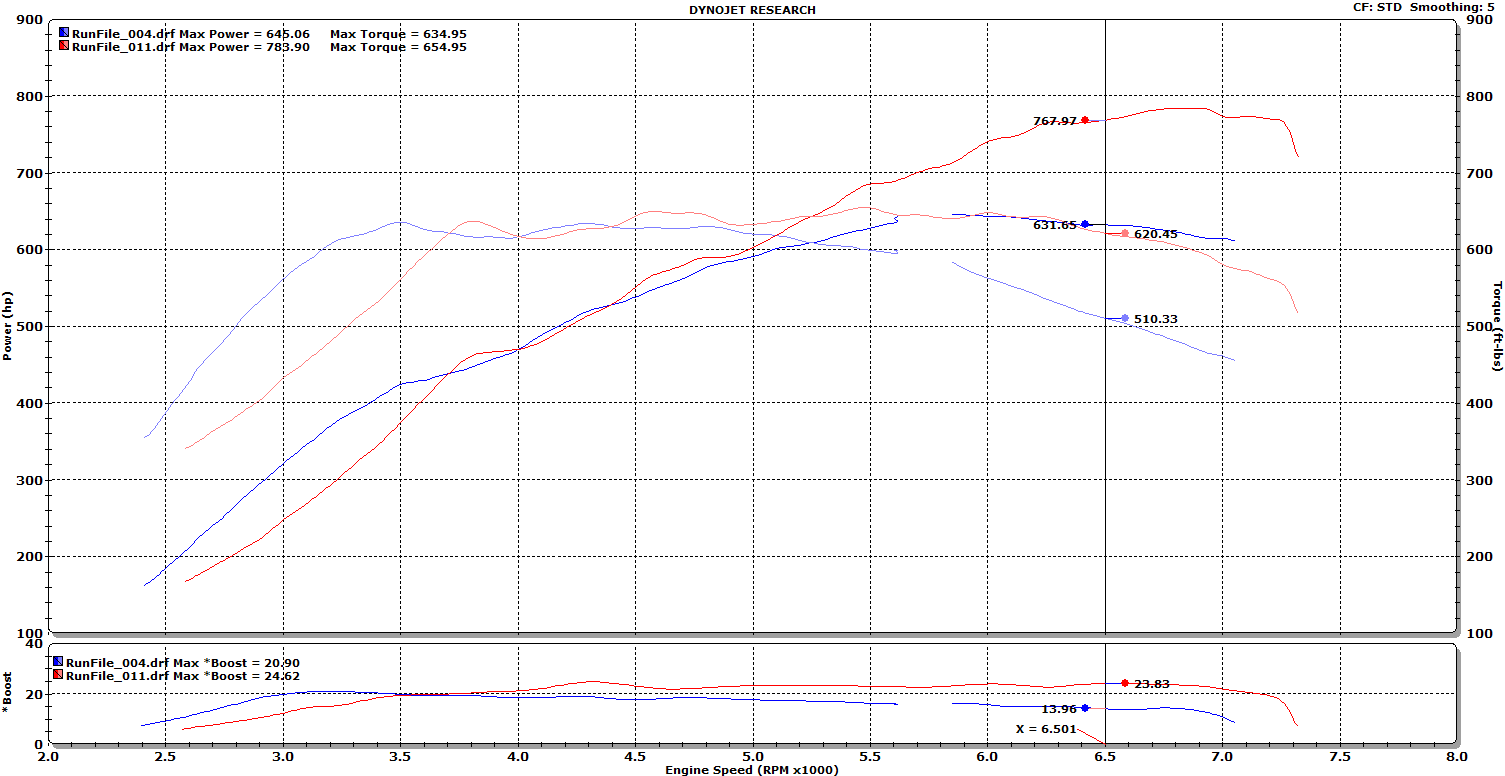
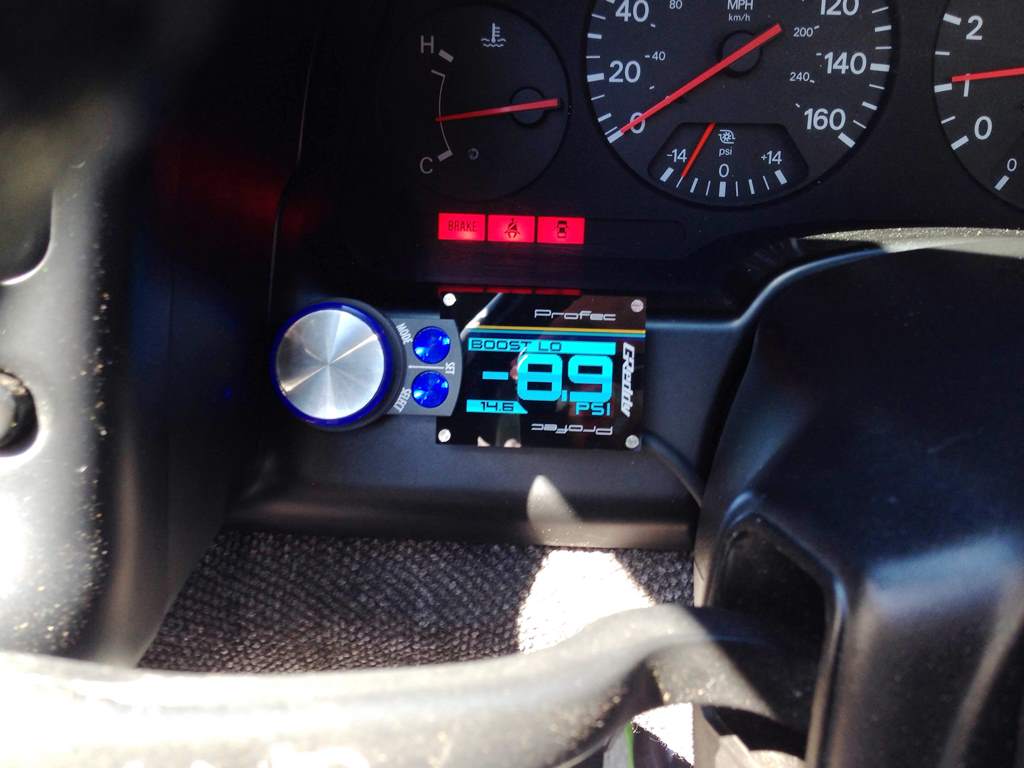
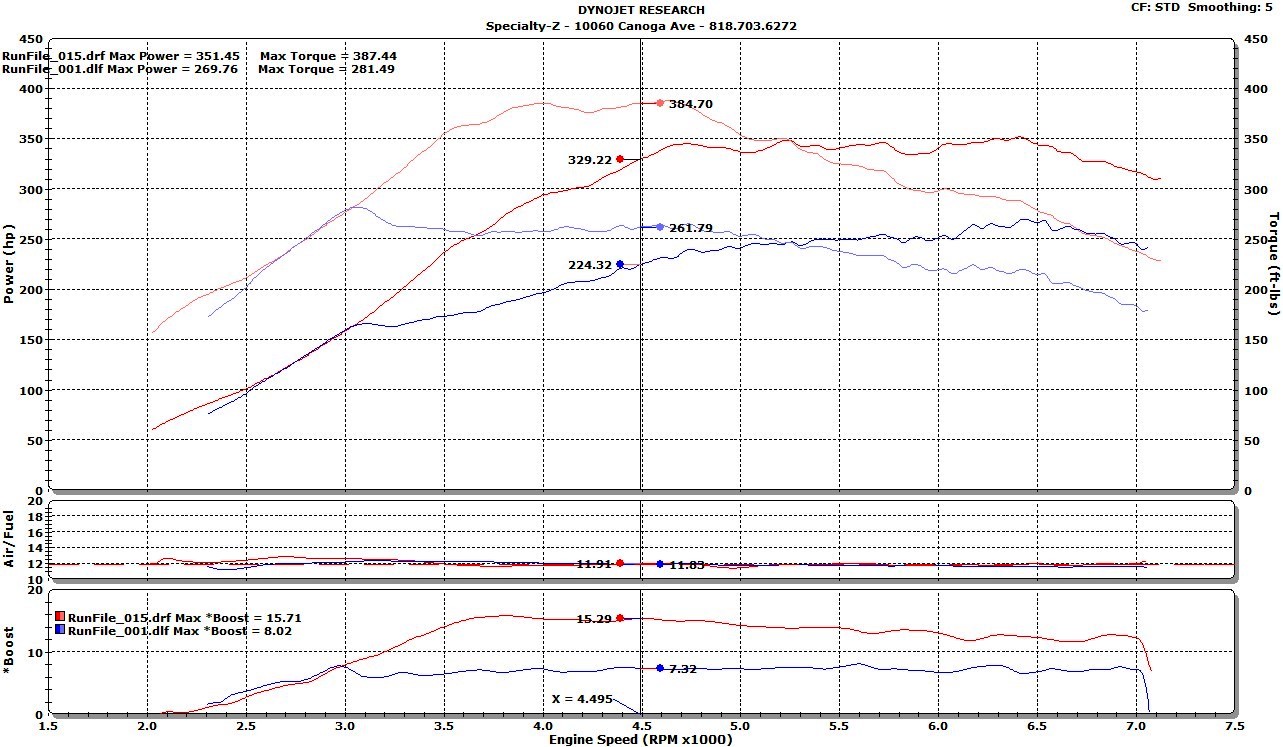
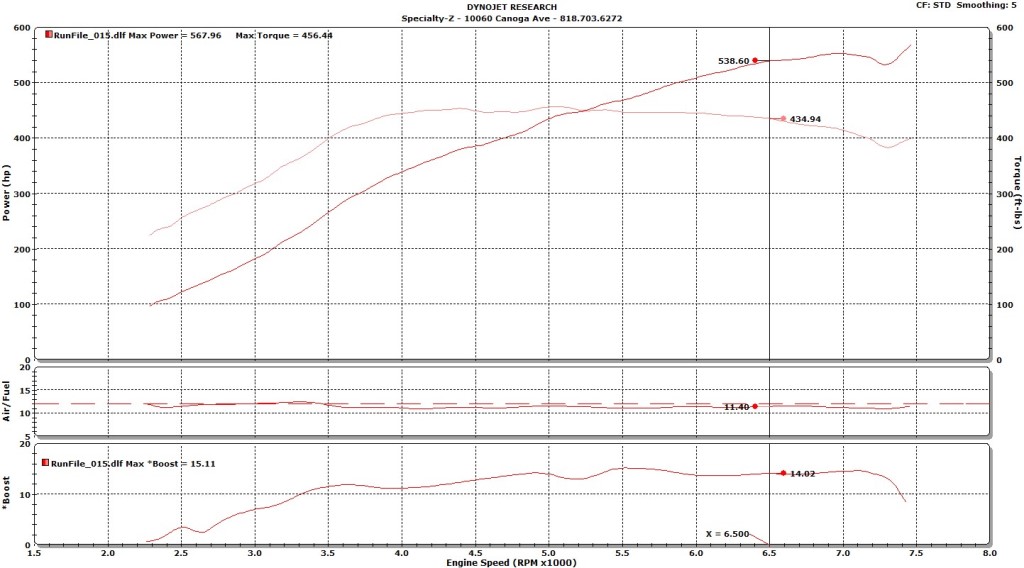
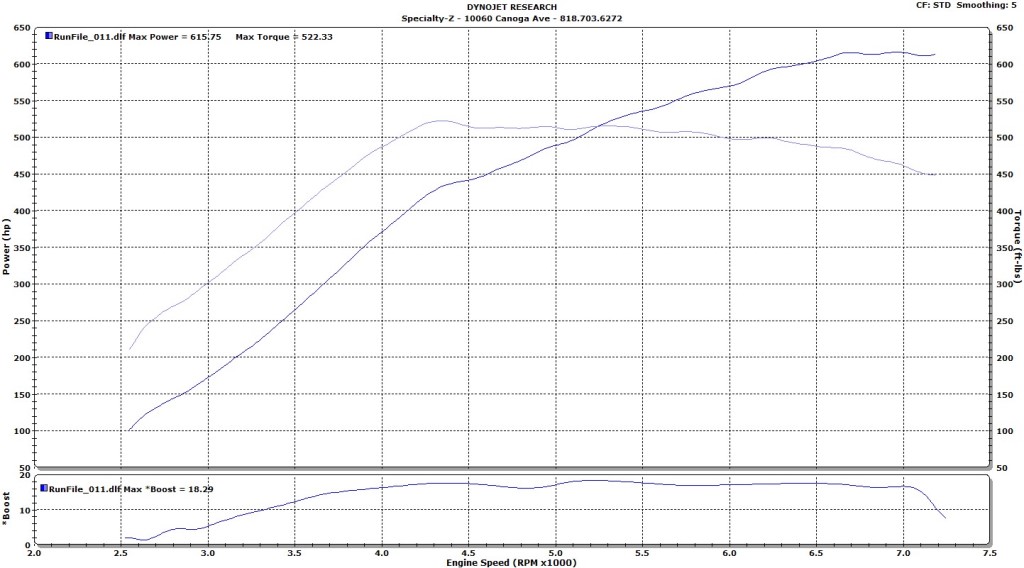
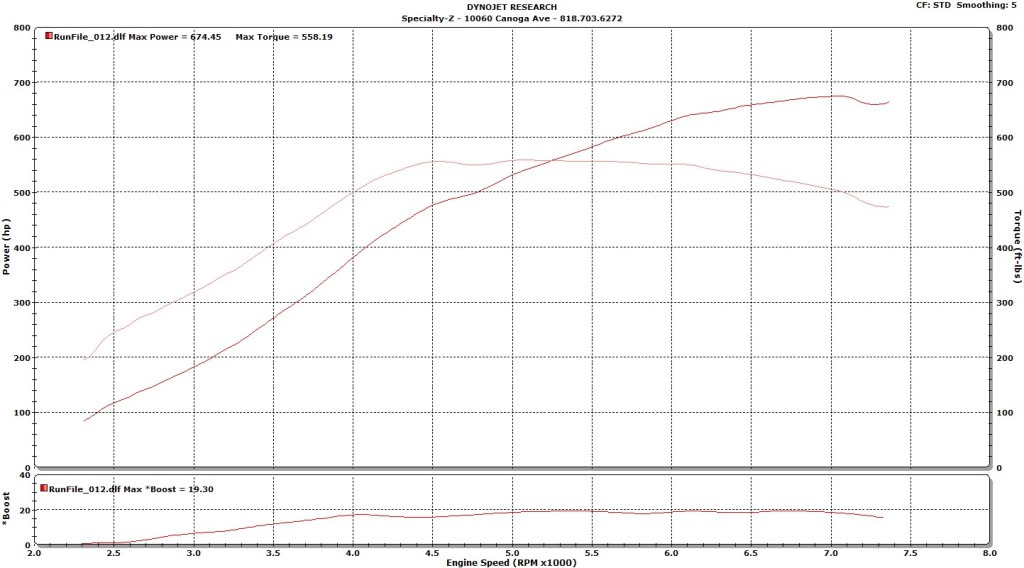
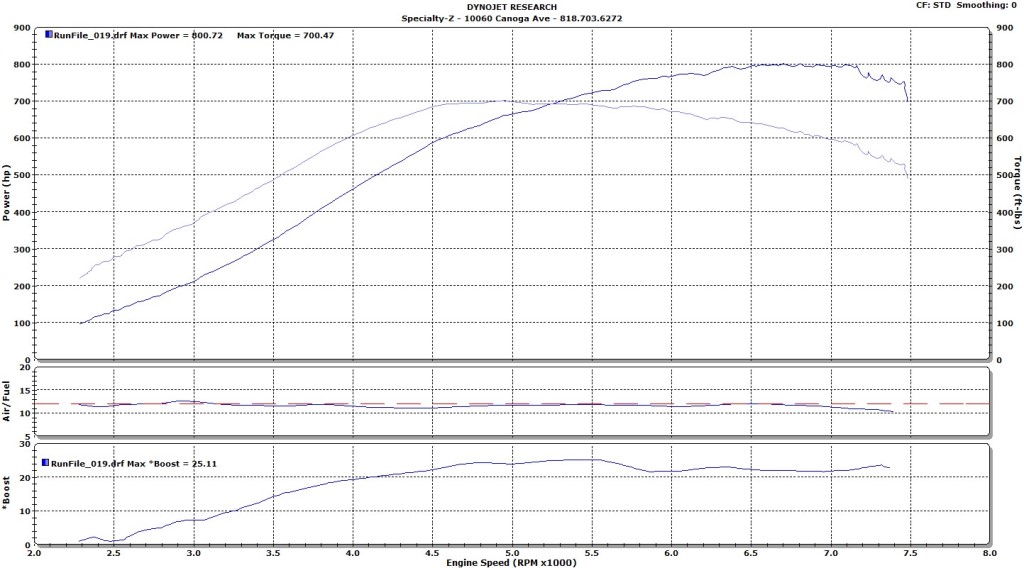
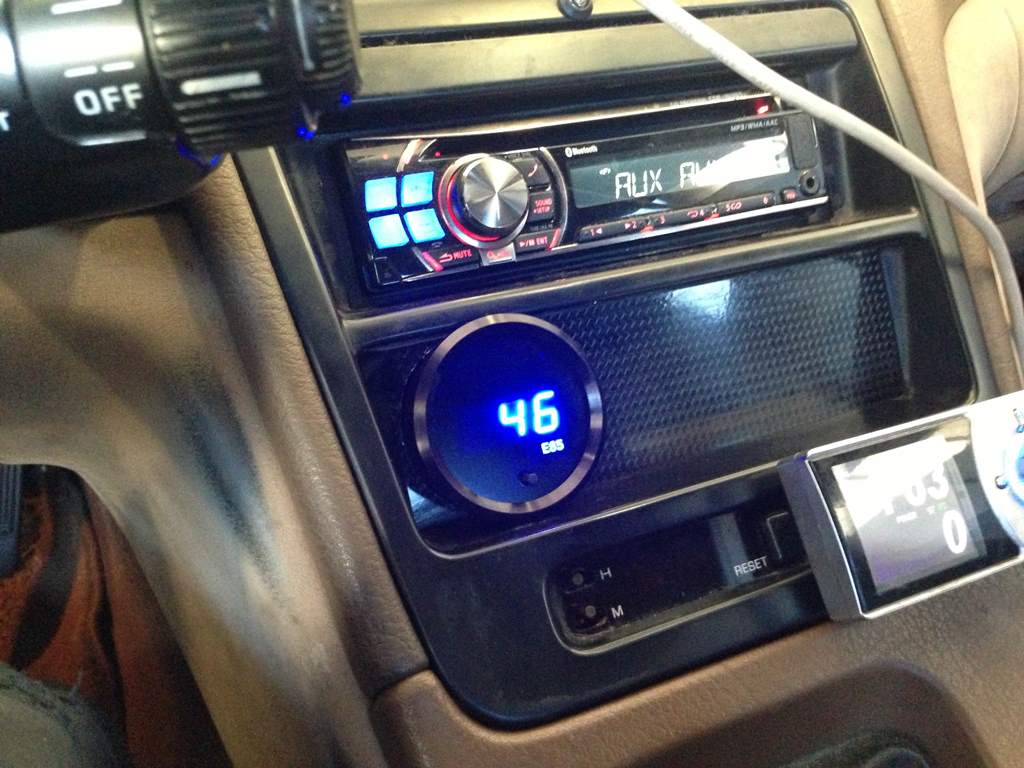
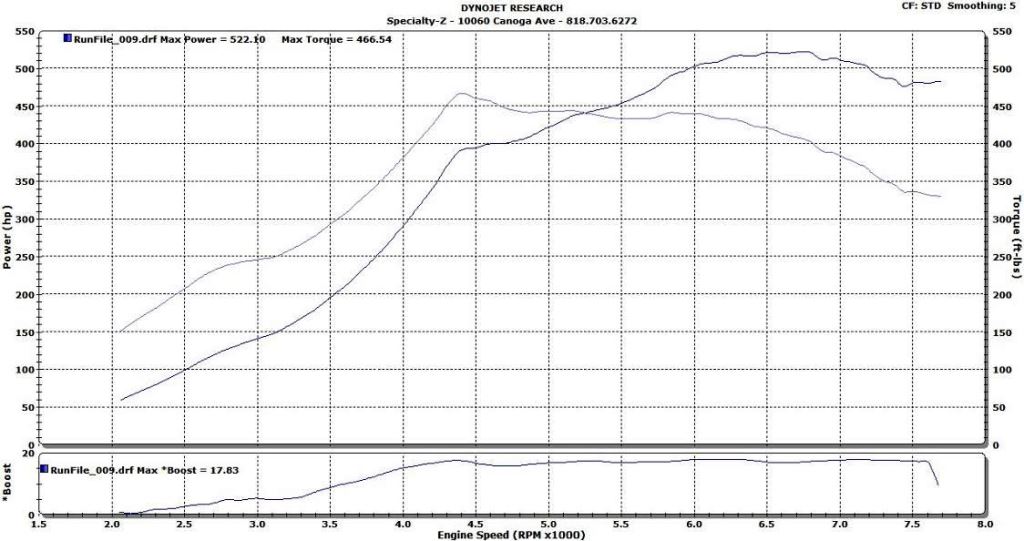
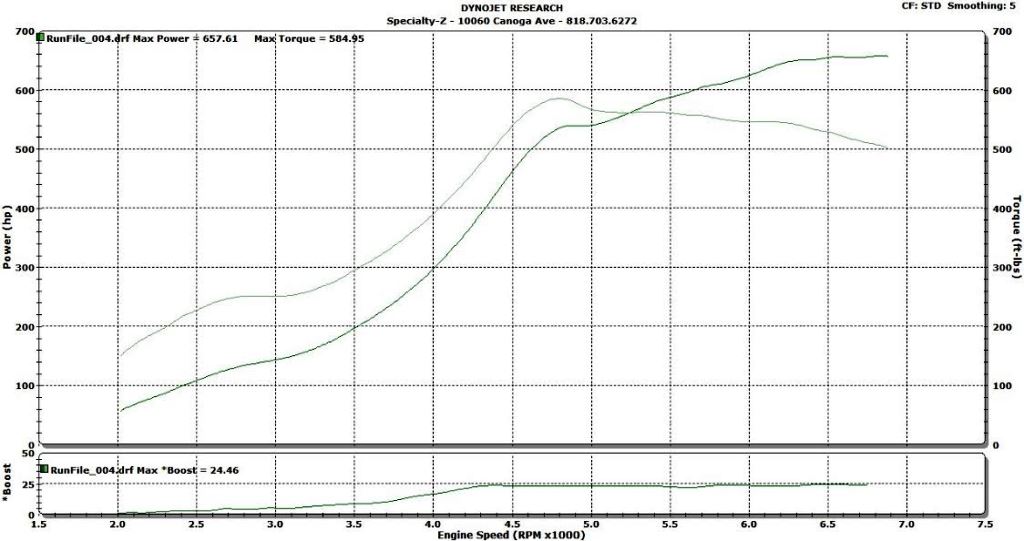
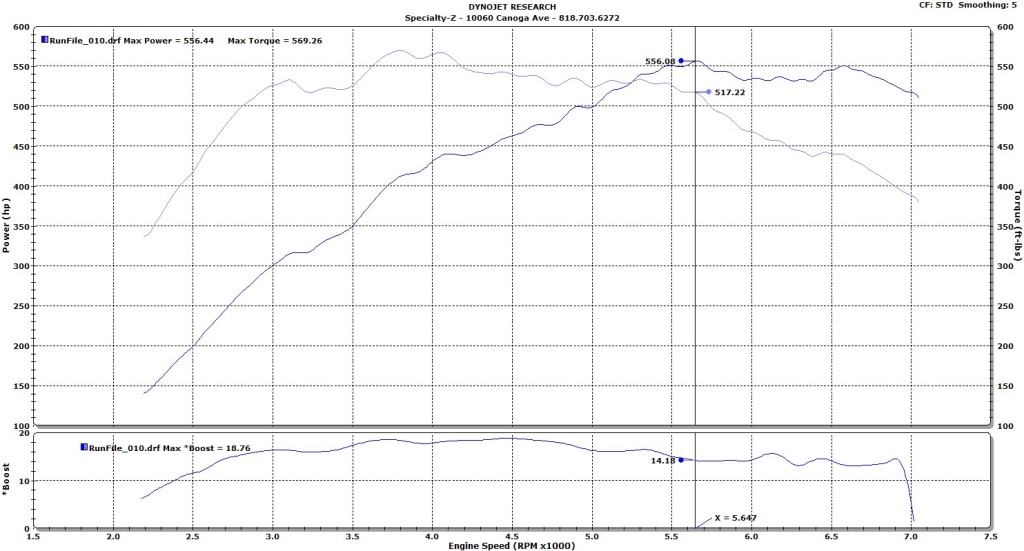
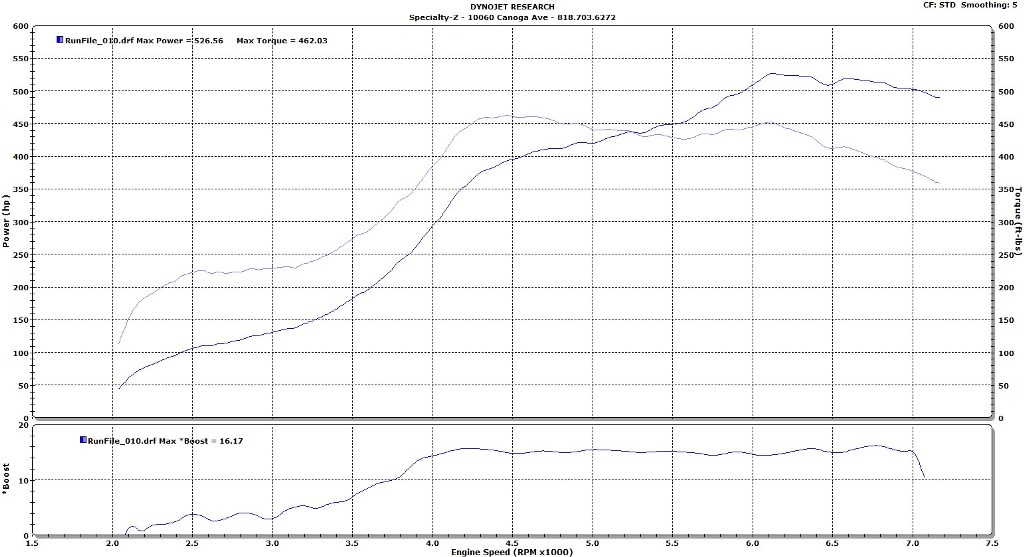
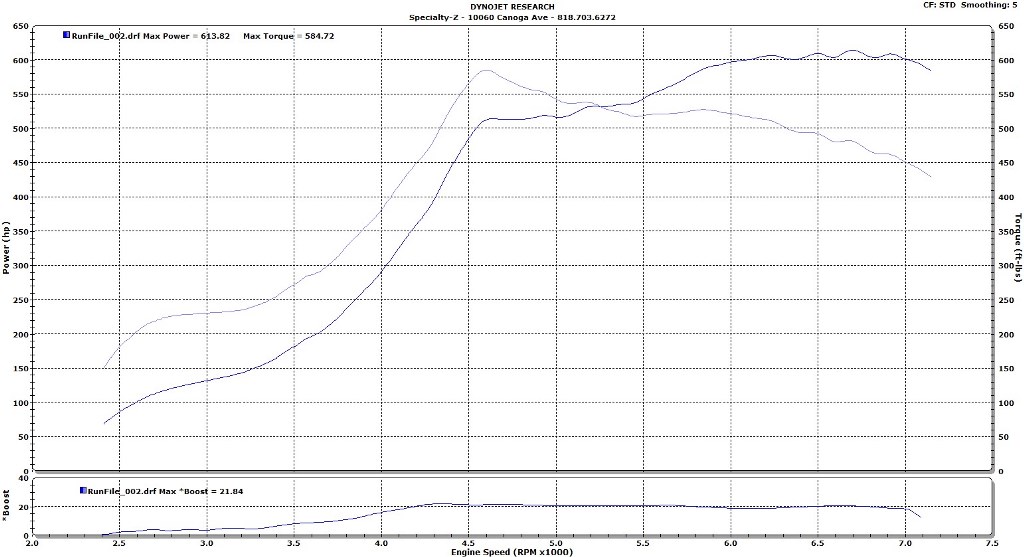
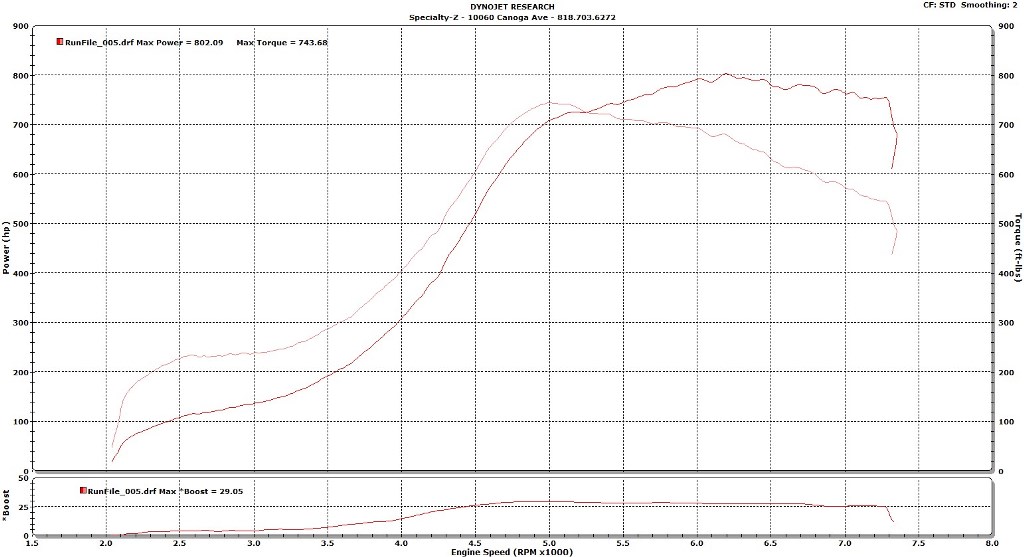
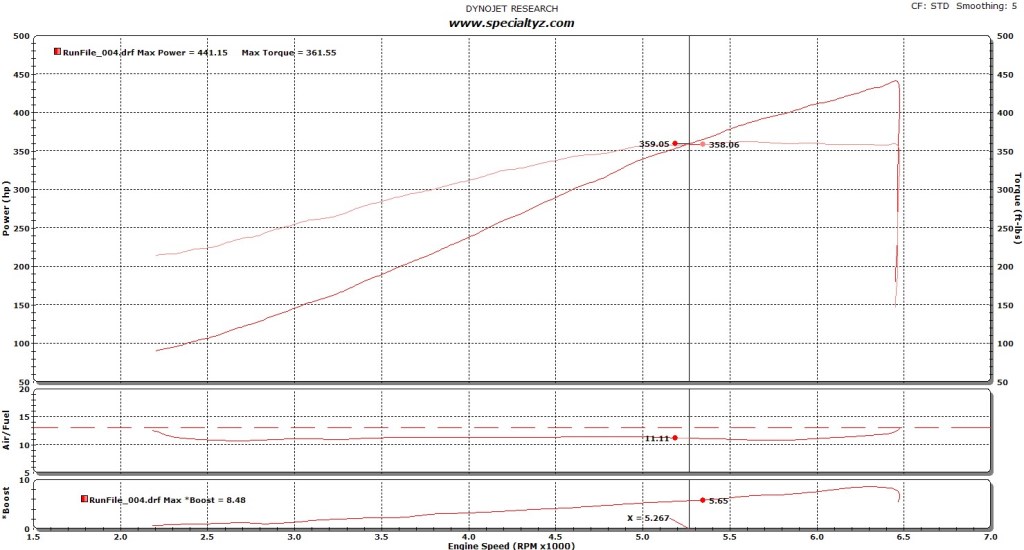
Last but not least our final power and torque numbers for 91 octane.  We installed a Blitz sbc-iD Spec-R boost controller that works also as a boost gauge.  An Innovate MTX Digital Wideband was also installed to monitor AFRs.

Mark’s 2012 GTR

gtr_wet

We previously installed down pipes on Mark’s GTR some time ago (click me to see the old blog post).  Mark came back in for a few tweaks.  One was to make the move to EcuTek from Cobb.  Since Mark is an avid drag racer, EcuTek gives him the ability to make on the fly changes to his launching RPMs.  If the track isn’t prepped as well as he’d like he can lower the launch control RPM for better 60 foots along with raising the RPM should the track and tires hold it.  Changes to launch control boost pressures can also be made.  We also made the move to allow his GTR to run on ethanol.

injectorinstall

The first order of business was upgrading the fuel injectors to allow more fuel for ethanol use.  We went with 1150cc fuel injectors and necessary adapter kit for a simple plug n’ play solution.  Injectors are installed in the above picture.

injectors

Factory fuel injector on the left and our 1150cc injector on the right.

sock

We upgraded the secondary fuel pump with a Walbro “485” fuel pump.  We noticed that the pump socks off the 2012s are much smaller than the ones off of the 2014s.  Small changes Nissan makes throughout the years.

airbox

The factory air boxes (one pictured above) was removed and replaced with open air element filters and larger 3″ piping.  This change allows us to continue running MAF sensors since now the threshold for maxing out the sensors has been moved up.  Tuned on 91 octane will get you extremely close to maxing out the factory MAF sensors.  Thankfully with EcuTek we can ditch the MAF sensors and convert to speed density.  Perfect for someone not wanting to upgrade to an aftermarket intake(s) or for those with larger upgraded turbos.

airfilters

Our new 3″ intakes installed.  You can see the air filters get moved up to the bumper area keeping them away from the engine bay and its heat. The cover for the top of the bumper is removed to show where the filters now sit.  The intake piping is hard to notice since it is powdercoated wrinkle black and we’ve acquired more “open” space with the removal of the air boxes.

enginebay

Final shot of the install.

91tune

After all the modifications were completed we tuned for 91 octane.  Making peak power on 14 psi.  Boost drops off at the top due to turbo sizing.  There are a few things that can be done to help make the stock turbos hold more but in doing so back pressure rises quickly between the engine and turbines.

SR 240Z Beautify

Spike came back for some beautification on his SR powered 240Z.  You can see his post from last year here:  Click ME!

before


Before

cleanedup

After:  We added a polished intake manifold with some blacked out pieces.  The wiring harness was cleaned up as well.  While we were at it we also bypassed the TB coolant hard lines.

Jesse’s Z32 Build

Jesse from Florida sent us his Z32 to straighten out the issues he was having with it.

photo


The way it arrived to SZ.  Hard to tell by the photo but there was much clutter and lack of detail put into it.  The Z had some sort of “built” short block.  It had stock rods and Wiseco pistons.  It came equipped with GT2860RS turbos.  It had alot of good parts but it had alot of hodge podge as well.

photo (1)

We turned to an IPP Stage 4 Long Block that comes with CP Pistons & Carillo Rods.  We swapped over the existing JWT 500 cams and HD valve springs.  A new set of lifters were also added.

photo (2)

Port matched lower plenum.

photo (7)

Existing 300Degree Rails and Nismo 740s were also swapped over along with adjustable BDE Intake Cam gears,  Z1 Exhaust Gears, BDE Low Pro Motor Mounts, and MSP Manifolds.  An ATI Race Damper replaces the cheap copy underdrive pulley.  Valve covers were painted black to give it a clean and refreshed look.  We fixed several plenum coil bracket bolt holes and one needed to be completley re-welded, drilled, and tapped to save it.

photo (8)

photo (9)

We switched over to the JWT GTX63s, note the anti-surge housing.

photo (10)

Ash inlet piping that was opened up to match the turbo’s inlet size.

photo (12)

Ready to go into its home!  Z1 throttle bodies already installed onto the intake manifold.

photo (18)

We also used Jesse’s Z to proto-type our trans brake for the Nissan automatic.  It also has our racing AT trans package.

photo (15)

Real estate in the front of the car was non existent so we installed a new trans cooler\fan in the rear of the car along with an external trans filtering system.

photo (3)

photo (14)Cleaned up and on the dyno!

91

91 Octane Tune, we didn’t have 93 Floridian fuel so we used what we had.  Stellar performance out of an automatic Z on pump fuel!

100

100 octane fuel for 613 whp!  21 psi of boost.

Q16

Q16 for just enough to break into 800+ whp!  Ready to run 9s at the drag strip and ready for daily driver action.  No compromises.  With the use of dual fuel pumps we were able to get the 740s to squeeze enough fuel out and keep it safe.  Jesse will use our ECU switching device to make use of all his tunes with no fuss.

https://www.youtube.com/watch?v=H-Mip0KH0BU&feature=c4-overview&list=UUGF0ohSpE-ld_6MeVhmTvdg

Final dyno tuning run on Q16.  You may need to copy\paste the URL to view.

photo (17)

Getting picked up to go home to Florida!  Thank you again Jesse!

SZ After Hours: Mustang Edition

You may wonder why a Mustang made it’s way into SZ.  It was my first performance car I purchased when I got my first job in high school.  It’s what got me into cars.  I started modifying it in my teenage years and it gave me a very rudimentary introduction to the world of automotive workings.  I added a Vortech Supercharger Kit shortly after buying the car.  Back then the kits would only supply you with larger injectors and a piggyback Super Chips PCM module.  At that time California had 92 octane so it survived for over 20,000 miles.  After that California went to 91 octane with MTBE and the 4.6 2V engine in the Mustang lost its engine, add to the fact that its factory fuel pump and piggyback PCM were also recipes for disaster.  It developed rod knock and low compression in a couple cylinders.  The car sat for over 7 years until this year when we breathed life back into the pony.

photo


It sat for so long we had to dig it out of the dirt it was sitting in.  Rats and other animals called the engine bay home.

photo (1)

The old engine ready to come out.  Blower was taken out prior to pulling the engine.

photo (12)

In the valley of the engine is where home was for all the critters.  Some of the wires on the harness were chewed up thanks to our friends.  The old engine was torn down for scrap metal.

photo (13)

Crankshaft chewed up.

photo (14)

The main culprit of the low compression.  Rings\ring lands destroyed.

photo (6)

Our engine replacement came in the form of a brand new MMR longblock.  The new block is aluminum vs cast iron to save a tremendous amount of weight.  Updated PI heads were added along with larger valves and Comp Stage 1 Cams.  Diamond Pistons and rods, along with a forged Cobra crankshaft were added.  Wrinkle blue powdercoated Trick Flow Valves and Trick Flow Intake Manifold was installed.  C&L throttle body was added as well.  We went with Siemens 60 lb\hr injectors and 90mm Lightning MAF.  BBK shorty headers bolted to the heads which then lead to a Bassani X-Pipe with high flow cats and finally to a Bassani catback.

photo (3)

We added two Nissan knock sensors to monitor for knock.

photo (5)

LJ & Jonathan carefully tape up the valve covers prior to dropping the motor.

photo (4)

While we had the motor out we upgraded to a tubular K-member and front coilover conversion.  This saved us over 80 lbs of weight.  The K came with all the parts for the swap and included tubular a-arms.

photo (2)

While things were moving along on the engine, we sent the V1 head unit to 928 Motorsports for a rebuild and upgraded to their billet wheel that looks very similar to Garrett’s GTX wheels.  We left the base pulley size as we were not planning on running an intercooler.

photo (7)

With the new intake manifold we had to move the alternator out and away from the engine.  We also wired in our Meizre electric water pump at this stage.

photo (8)

We were set back a few days.  Turns out that the 1999 timing cover is different than the new engine’s 2000+ timing cover.  This forced us to buy a new bracket from Vortech.

photo (11)

Finished product.  An Anderson Powerpipe replaces the old generic accordion hose for better breathing.

seb99gt

We were impressed with the results!  It isn’t a Z but it’s still fun to drive.  441 whp on 91 octane.  For a V8 the torque is lacking but that’s what you get with a centrifugal blower and turbo compression pistons.  We used the SCT tuning software to tune it.  SVT Focus pump and Kenne Bell Boost a Pump send fuel to the Siemens injectors.  We’ve increased the rev limiter to 7250 so we hope to break into the 460 whp.

photo (10)

Not so bad looking after a great detail from Jerry @ MVP.  I want to thank Matt @ Performance Evolution, LJ, Jonathan, Rob @ Z Car Garage, Tony @ Fast Intentions, and Jack @ Muscle Motors for the help, parts, and suggestions.  Last and not least, my wife Sonia who was pregnant throughout this project and we had it running 2 weeks before our daughter was born.