This kit is designed to allow one to run full engine oil capacity, prevent smoking from the exhaust, and prevent oil from accumulating into the inlet/charge piping. Since most turbo kits drain back into the lower oil pan, the oil level in the pan is higher than what the oil drains into. This can and will cause oil to back up and accumulate back into the turbo center section (CHRA). This kit is designed to work with the Fast Intentions Twin Turbo Kits for the VQ37 (370Z/G37) applications.
Thank you for purchasing this kit, below you will find the supplied parts and instructions. As with most aftermarket parts installations, please do not rush the install and be patient! It is highly recommended this install be done by a competent qualified technician. Do not cut corners! Take pride in your workmanship.
Install tips/instructions:
Start by draining the engine oil.
If you already have the TT kit installed, you will need to remove the front bumper to get access to the pump’s mounting location. This kit will fit either setup for using a tow/crash bar or just the intercooler.
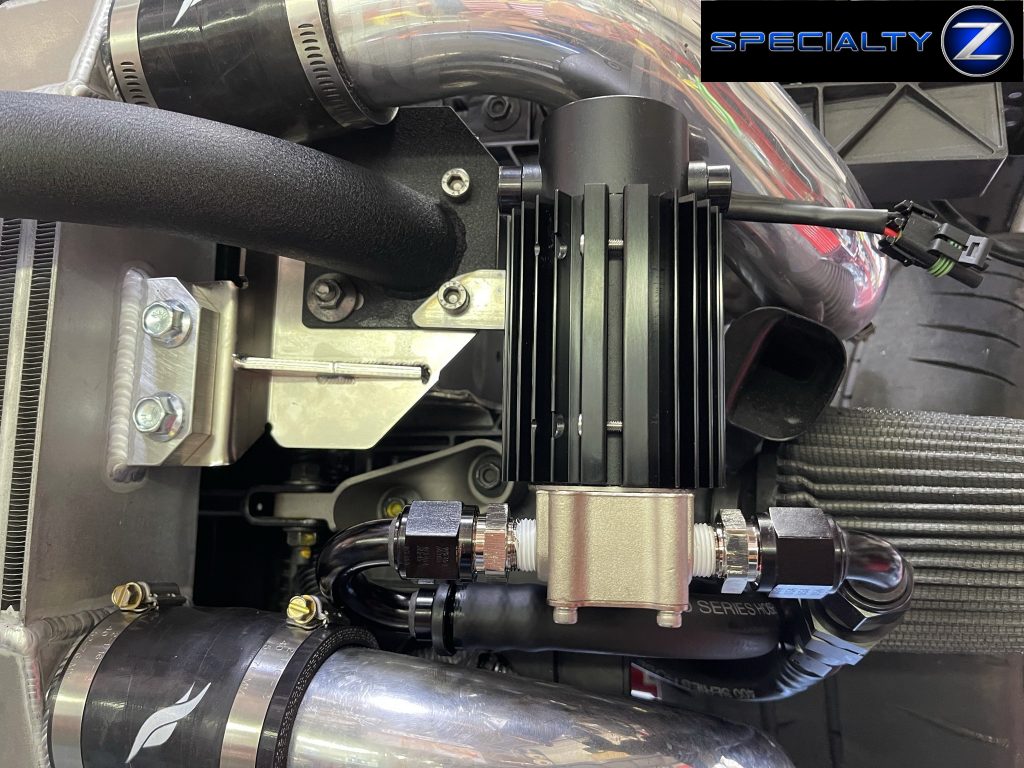
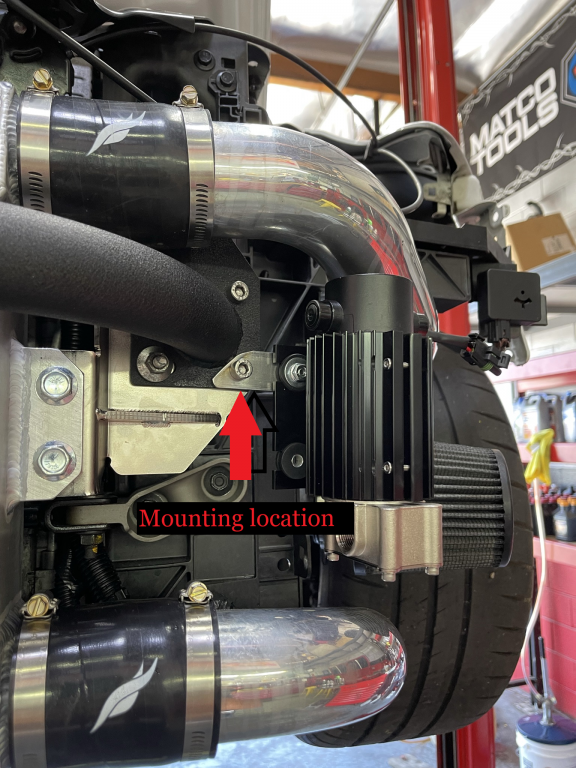
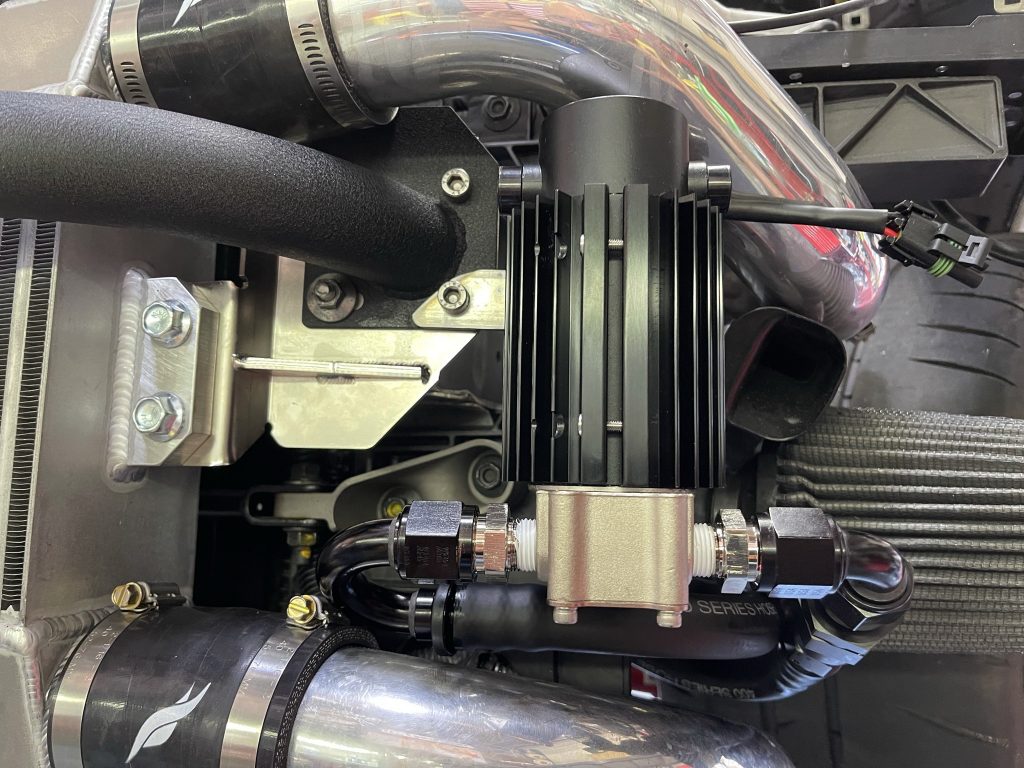
Remove the bottom outside bolt (driver side) of the tow/intercooler bracket. This is where the bracket holding the pump will mount. The fitting portion of the pump will be on the bottom and the main body/heat sink at the top. The top of the pump will mount closely to the upper intercooler pipe so try to get as much room as possible to prevent touching/rubbing.
Use Teflon tape on the threads of the fittings that are included with the pump itself. Be sure that the tape is not on the inside of the fitting! Only on the threads! Tighten to the pump. It is HIGHLY recommended to use engine oil or Marvel Mystery oil to “pre-lube” the pump, so it does not run dry on first start up. I recommend doing this after you have one side of the inlet/outlet with an additional push on hose fitting installed so you don’t make a big mess all over your floor.
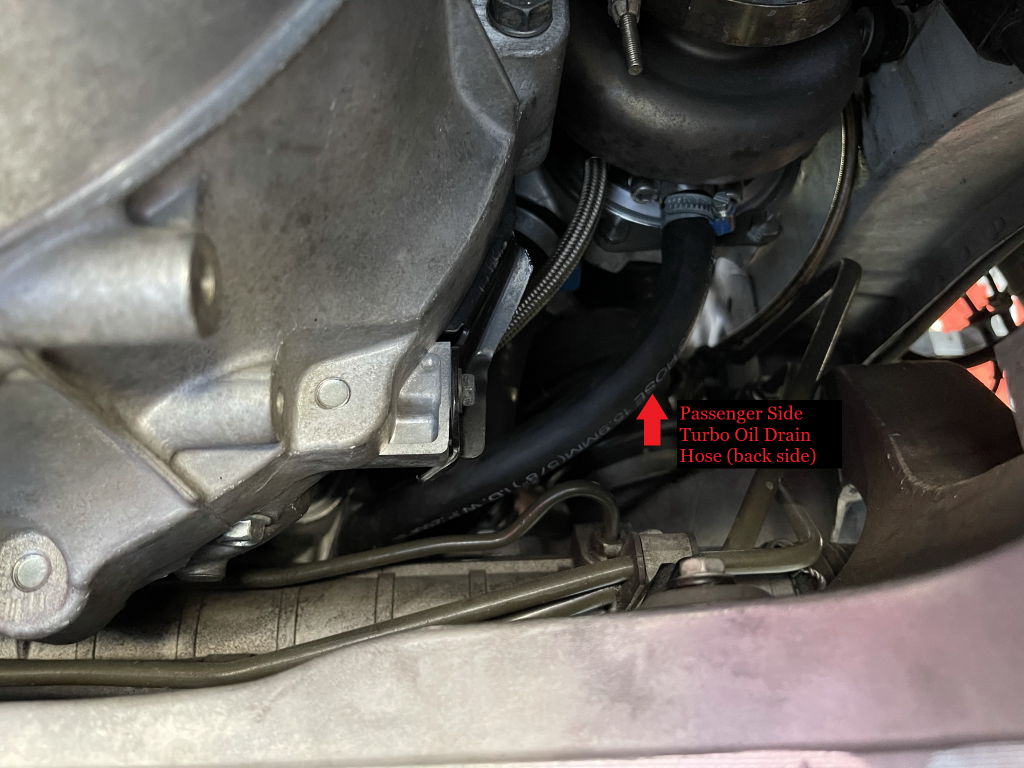
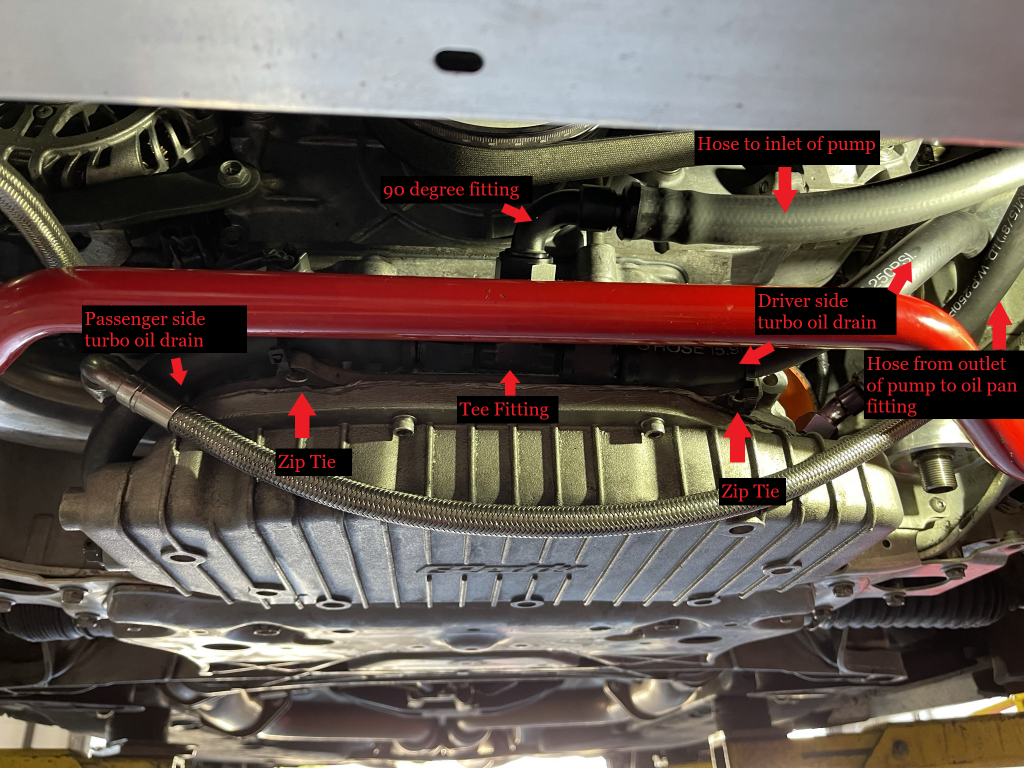
With the pump mounted, your attention will next focus on removing the incredibly hard to get to brass fitting on the Greddy oil pan. To do this you will first remove both of the existing oil drain hoses off both turbo drain fittings and oil pan fittings. Hold onto the clamps supplied with the TT kit. You will reuse three of the four clamps. Two for the drain hoses that go into the fittings off the turbos and one for the brass fitting on the driver side of the oil pan. The push on fittings DO NOT require clamps once they are seated on the push on barbs of the fittings. Keep in mind there will be relatively low pressure in the system anyway. One side of the pan will be capped (passenger side) and the other side will remain (driver side). Remove the passenger side brass fitting. You can use a 15mm wrench or 5/8” wrench. You may need a stubby wrench for better access. Once this fitting is removed, use your finger to pull out old remaining silicone or tape. You will install the 3/8” NPT plug. I recommend using grey silicone on the threads. The plug will run a decent amount into the oil pan so be careful that you DO NOT thread it past into the oil pan so that it falls in! It should be nice and snug and does not need to be over tightened.
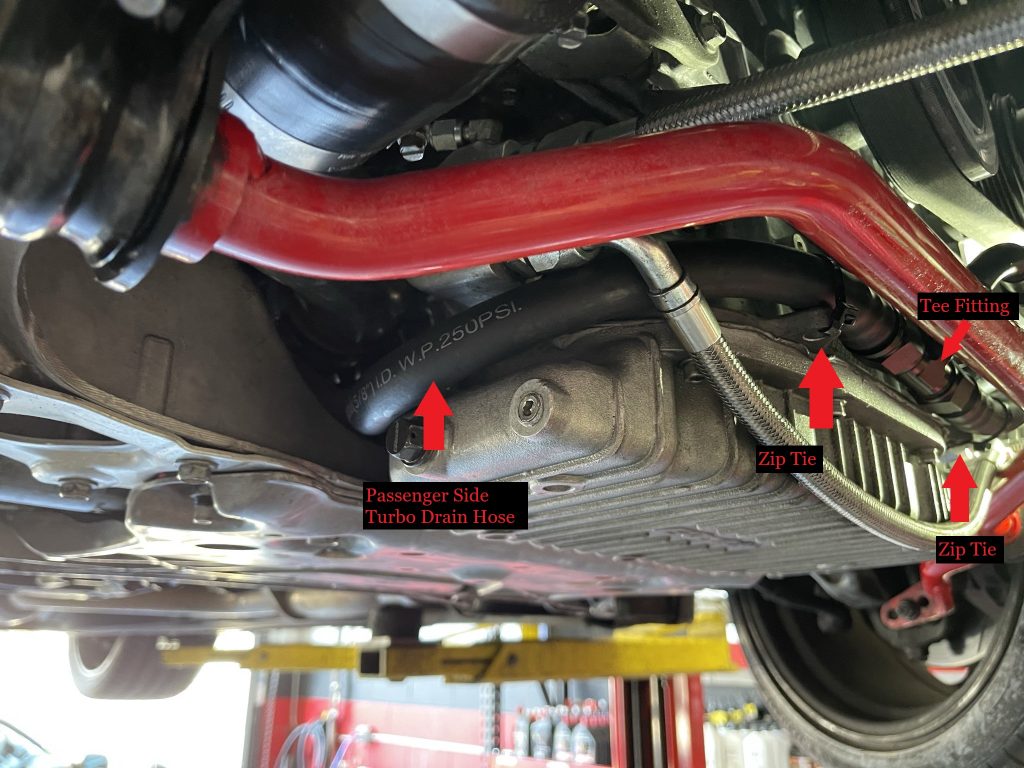
The next step is to run the new hoses for the turbo drains. Use one 31” length hose for the passenger side, it will route like the old hose you removed. It will go underneath the silicone coupler off the compressor outlet and route to the front of the engine above the Greddy oil pan. Next install the driver side hose (26.5”), for this you will want to lower the front sway bar down and remove the intercooler pipe off the driver side for better access which you may already have done when you removed the old drain hose on that side. This hose will route similarly but it will go over the top off the now removed intercooler pipe and route to the front of the engine by the passenger side hose. Take the tee fitting which will have the push on fitting already installed and tightened. The tee will install with the outlet side pointing towards the driver side of the car. Using silicone paste (not the sealant!), liberally coat the barbed fittings and inside of the hose(s). Start with the passenger side and push the hose and fitting until it bottoms out. Next push the driver side on and bottom it out. Now that both turbo drain hoses are routed and installed to the tee fitting, take two zip ties and secure the hoses/fittings to each pass-through opening on the engine/secondary oil pan. The fitting will angle out away from the engine slightly as to not get close to the crank pulley.
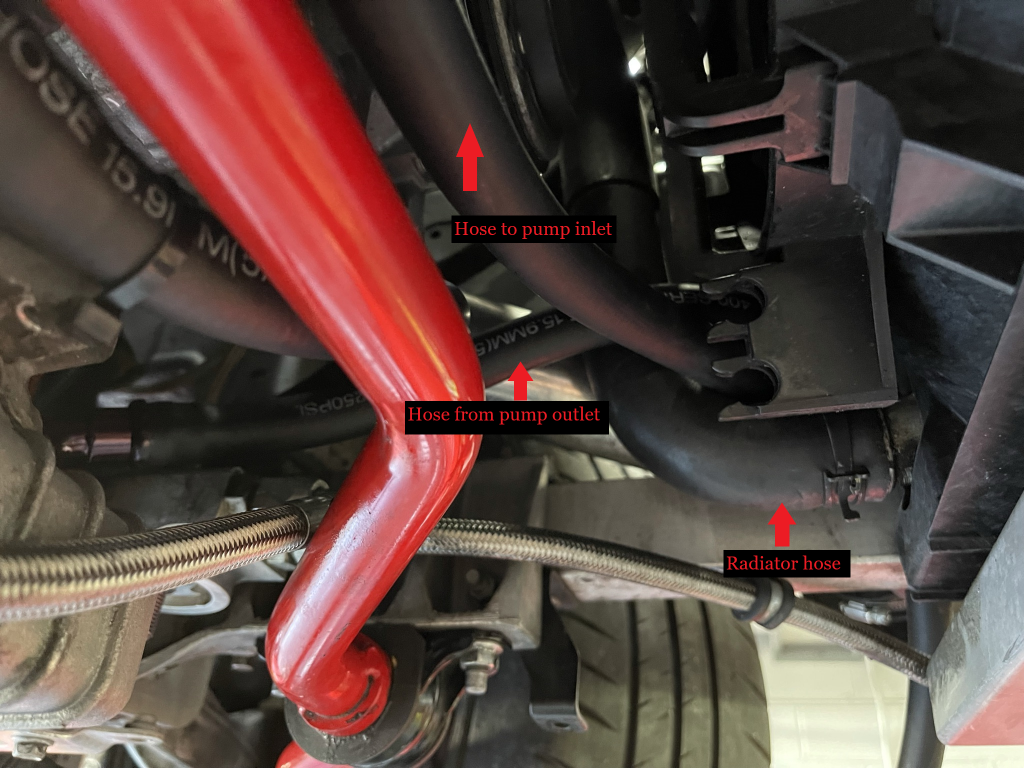
Move back to the pump itself and install the other 31” hose onto the 180-degree push on fitting. Once the hose is installed, thread the 180-degree fitting to the inlet of the pump (inside fitting) and route the hose so that it runs underneath the pump and by the inlet/intake pipe of the turbo kit. It will run past the radiator hose and onto the center of the tee fitting which is the 90-degree push on fitting pointing towards the driver side. Push the hose on and allow it to bottom out on the fitting. Remember that hose clamps are NOT required on these fittings.
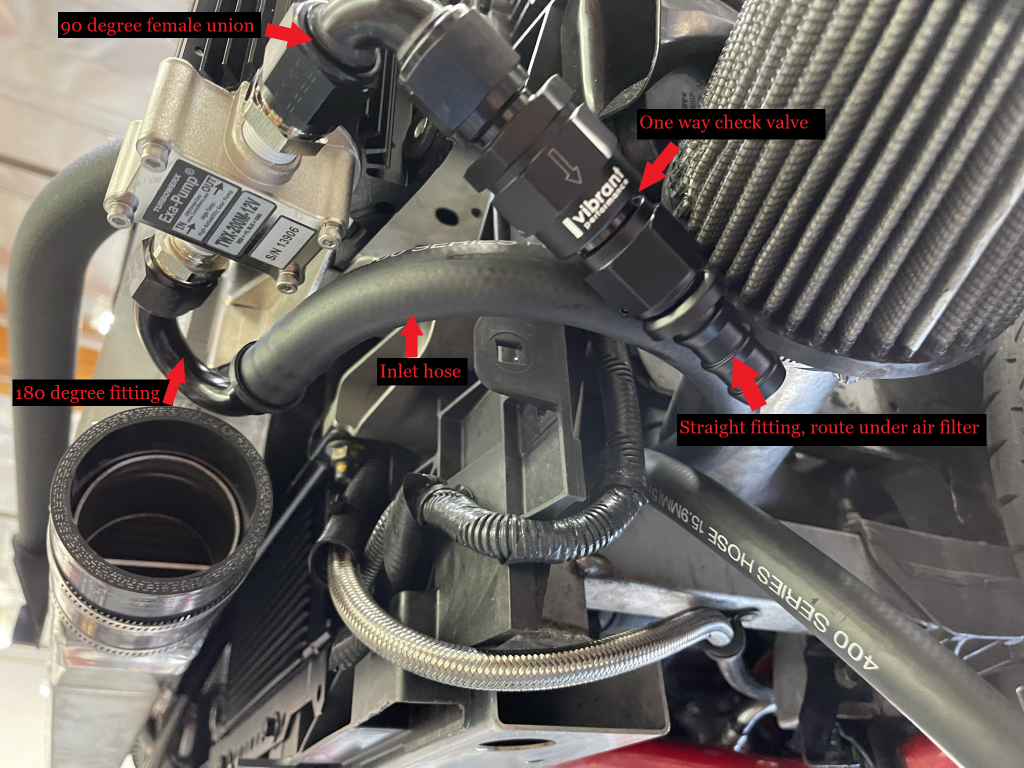
Next up is to install the 90-degree female AN union, it will angle slightly downwards as to clear the piping and air filter. The one-way check valve will install next followed by a straight push on fitting. Install the hose onto the fitting first and then install it onto the check valve, this will be the last remaining hose that is 25” in length. Be sure to tighten all the fittings! Route this hose alongside the hose going to the inlet of the pump. At this point you can reinstall the intercooler pipe. The hose will route below this pipe and install at the existing brass fitting that was already installed into the Greddy oil pan. Reuse the clamp that came off this fitting and tighten. You can use a few of the zip ties to secure the hoses running from the inlet and outlet hoses of the pump to each other and also to the radiator hose so that they do not move around.
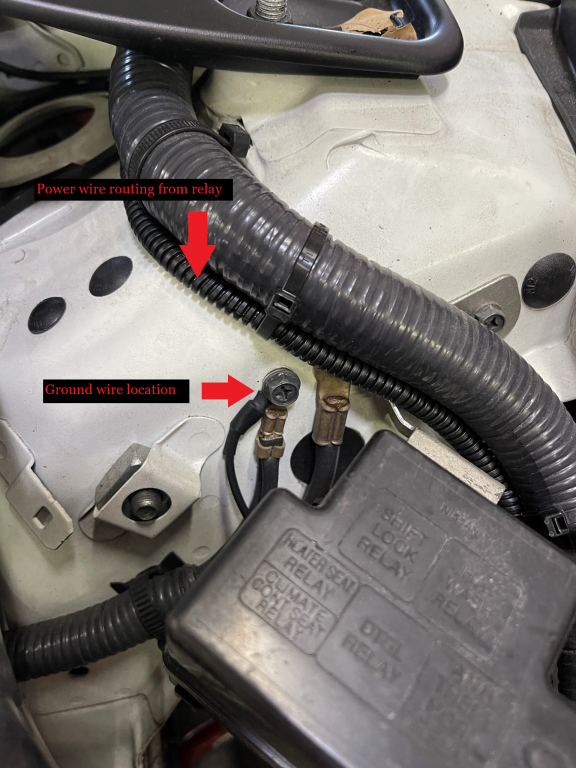
The final step is to wire up the pump. We supply a relay to power the pump. We recommend mounting the relay near the battery. This is left up to you on where to mount it there. The yellow wire will go to the positive on the battery terminal using the supplied red fuse holder wiring. The small gauge grey wire will go directly to the negative battery terminal. You can use a 12v switched wire to tee off of for the small orangish wire, we HIGHLY recommend you tee this wire into your existing fuel pump trigger wire. So, if you installed a return fuel system and your relay for the pump is located by the battery, you can tee into the fuel pump’s relay trigger wire which should be getting it’s 12v trigger from the factory fuel pump power wire (pink wire off fuel pump assembly). This is so that the scavenge pump only runs when the engine is running. This will prevent the pump from running with the ignition ON all the time when the engine is not running. You may need to run the scavenge pump relay orangish trigger wire into the cabin via the main EFI grommet if you have your fuel pump relay inside the cabin or if you do NOT have a relay for your fuel pump you may want to take the time to properly run this wire to the fuel pump assembly and tee off the factory fuel pump pink wire. The last wire off the relay (large gauge red wire) you will route to the pump itself. We recommend running it underneath the cowling, through the brake master cylinder area and by the large harness running by the strut tower brace. You can zip tie the wire along this harness and run to the pump. You have the option of crimping the pump’s sub harness red wire to the relay’s red wire. The black wire off the pump’s harness will be ground and you will ground this to the chassis that already have a main factory ground cable. Remove the 10mm (head) bolt and ground it along with the factory ground cable to this hole. Congratulations, if you followed all the above steps, this means you have completed the installation! Be sure to refill engine oil and you can now fill it all the way to the H (high) on the dip stick. You will probably end up using 6-7 quarts of quality synthetic oil.
Supplied Parts:
-10 AN Push On Hose:
31” length for passenger turbo oil drain hose
26.5” length for driver turbo oil drain hose
31” length from tee to inlet of pump
25” length from outlet of pump to Greddy oil pan
Fittings/Pump/Electrical:
1x 3/8” NPT allen plug (for passenger side of Greddy oil pan)
2x -10 push on straight (tee section)
1x- -10 push on 90 degree (tee section)
1x -10 AN male tee (tee section)
1x -10 push on 180 degree (pump inlet)
1x -10 AN female to female 90-degree union (pump outlet)
1x -10 AN male-to-male one-way check valve
1x -10 push on straight (for outlet of check valve)
1x -10 push on 45 degree
1x – 3/8” NPT to -10 45-degree male AN
6x 11” black zip ties
Turbowerx Exa-Mini Pump 12v -10AN Fittings
Relay
